Radio Boulevard
Western Historic Radio Museum
 

Tobe Deutschmann - Glenn H. Browning
TOBE-Browning Radio Kits
- Ham Receivers -

1935 TOBE Amateur Communication Receiver Model 35/Model H

1936 TOBE SPECIAL Amateur Communication Receiver Model H

History of Radio Kits 1920s-1960s, Problems Only Found in Vintage Electronics Kits,
Glenn H. Browning Bio, Tobe Deutschmann Bio, TOBE SPECIAL Circuit Description,
Restoring the TOBE SPECIAL, Performance Highlights,
TOBE ACR Model 35/H Circuit Description, Modification Problems,
Restoring the TOBE ACR Model 35/H, Performance Highlights
APPENDIX: Browning-Drake Regenaformer


By: Henry Rogers WA7YBS - Radio Boulevard


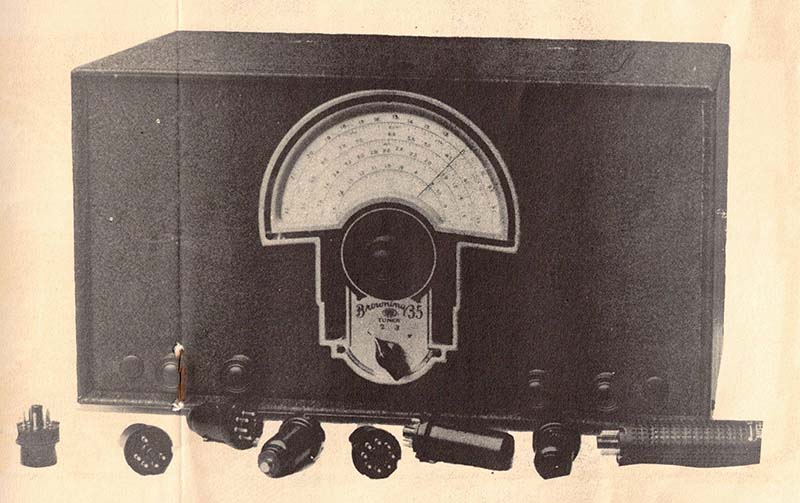
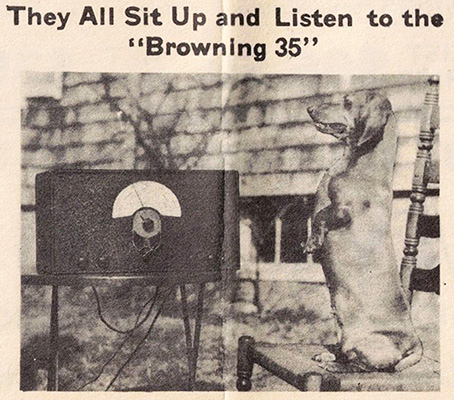
Tobe Deutschmann Corp. - 1936 "Browning 35" shown with metal octal tubes
From Glenn Browning's booklet "Around the World"

Why get so excited about a 1930s radio receiver that was built from a kit? Especially one that only has seven or eight tubes and only tunes the 160M, 80M, 40M and 20M ham bands. Glenn Browning designed these receivers so they could be easily built from a kit and still provide decent ham-level performance. Tobe Deutschmann Corporation pre-built and aligned the Tuners and IFs, packaged the other components and sold the kits that also included the assembly drawings and instructions, all for less than fifty dollars. Browning was a superb radio engineer and his design provides plenty of performance in a fairly simple configuration. The only problem? It was a kit that had to be correctly assembled exactly per the written instructions to attain the published specifications. Good performance results depended on neophyte-builders being able to follow instructions "to the letter" and those novice builders also had to possess skills that could only be developed with training and practice. So, while Browning's receiver can be a great performer, you wouldn't know it from the two receivers profiled here - before they were rebuilt, that is. This write-up provides the history, the circuit details and all of the pit-falls that awaited those newbie kit builders of the thirties and their kit-receivers that are nowadays encountered by vintage ham radio restorers. Included are two of my typical OCD-type restorations, the TOBE SPECIAL and the TOBE Amateur Communication Receiver Model 35 aka Model H, both written up in excruciating detail. Also, info on how to fix the IF overloading when receiving modern powerful SSB signals.
 

A Brief History of Shortwave Radio Receiver Kits - 1920s up to 1960s

A radio kit was one way an enthusiast could own and use a fairly advanced receiver and only pay a fraction of the cost of a commercially-built piece of gear. Kit-building was very popular during the early-to-mid-twenties when radio broadcasting was just starting and the cost of a factory-built radio averaged over $100 (and that didn't include the cost of accessories like tubes, loudspeaker or batteries.) There were also radio kits available in the mid-twenties that provided builders with a broadcast superheterodyne circuit since "kits" were exempt from patent infringement litigation. By the late-1920s, radio kit-building had lost some of its appeal since many non-superhet broadcast radios were inexpensive by then and, for most people, the cost-savings had been the primary motivator.
About the same time (late-twenties,) shortwave broadcasting was just starting and was beginning to interest other types of radio enthusiasts. The lack of any commercially-built shortwave receivers resulted in a resurgence of radio kit popularity. Primarily, this market consisted of DX enthusiasts and building kits was an inexpensive method to see what shortwave was all about. TRF-regenerative receivers like Pilot Wasps and Pilot Super Wasps were popular shortwave kits available from 1928 up through 1930 (selling for around $30.) Some National shortwave receivers could be purchased as kits with the SW-4 and sometimes the SW-5 being somewhat popular as kits. In 1931, most large radio companies were beginning to offer superheterodynes since the patent had recently been given to RCA as part of a settlement of a federal anti-trust suit (the superhet patent had been owned by Westinghouse from 1920 up to 1930.) The settlement required that RCA license other companies to also build superheterodynes. By the mid-thirties, almost all consumer radios were superheterodynes and had at least one shortwave band while the expensive models included "All Wave" tuning from .55mc up to 18mc. The shortwave receiver kit declined in popularity by the mid-thirties although enthusiasts, especially budget-minded enthusiasts, SWLs and hams, still kept the market alive.

Usually, due to the economics involved, most inexpensive pre-WWII radio kits were fairly simple in design. This meant that most of these types of radio receiver kits used plug-in coils, used a single TRF stage ahead of a regenerative detector with maybe two stages of audio. Though it would be possible to offer a more complex apparatus in "kit form" the high-cost of such a kit would severely limit sales since low cost was the primary motivator for a purchase. The radio kits had to offer decent performance AND low prices. Since many Depression-era purchasers were usually on a tight-budget, the designers took into account that test equipment usually wasn't going to be available to the kit builder. Many designs provided "pre-aligned" components to allow the builder to assemble a device that functioned correctly. The "pre-aligned" component assemblies became the mainstay of kits and allowed some of the more complex circuits to become available to hams and SWL enthusiasts at budget prices.


1929 Short-Wave Radio Kit, the Pilot Super Wasp Model K-110. These receivers were a battery-operated, screen grid TRF stage, triode regenerative detector and 2 stages of triode audio amplification. Five plug-in coil sets for tuning from 600kc up to 21.5mc.

1941 Meissner Traffic Scout  Kit No. 10-1169
 

Amateur radio had been the domain of the "homebrewer" - someone who built their own equipment. By the mid-1930s, amateurs had concluded that the superheterodyne receiver was a superior performer on shortwave. Most hams had also decided that to buy the parts necessary to build a decent quality superhet would cost about the same as buying a factory-built model of modest quality. Of course, the top-of-the-line superhets were complex and, with their use of custom designed parts, put homebrew construction beyond most homebrewer's expertise. The expense of the factory-built, high-end receiver all but eliminated a purchase by Depression-era, budget-limited hams. The radio kit offered the ham or enthusiast that was willing to assemble and wire a kit receiver an economical route to own a decent performing receiver for a relatively small expenditure. The superior performance of the superhet was dependent on how well-designed and well-built the front-end of the receiver was. After all, the IF was fixed-frequency, so it could be factory-built and pre-aligned fairly easily. For the front-end to track the RF, Mixer and the Local Oscillator stages required careful design and quality parts, especially since the Mixer output had to match the pre-tuned IF transformers. If more than one tuning range was offered, the complexity increased for each extra band offered. The multi-band superheterodyne employing band switching capabilities was very complex (for kit assembly) and only a few radio receiver kits using the that type of circuitry were produced before WWII. The heart of these kits was the pre-assembled and pre-aligned complete front end, the tuner.
 

Shown to the left is the Meissner Traffic Scout Kit No. 10-1169 from 1941-42. The Scout was a nine-tube superhet with single-preselection and a crystal filter. The kits came with a pre-built and aligned front end and pre-aligned Meissner Ferrocart IF transformers (456kc.) Meissner offered several option-packages for purchasing the Traffic Scout, either the complete kit or other packages with some parts excluded (also, only in the 1942 catalog, a fully-assembled "Laboratory-built" version.) Usually, the original net price was $83.50 (complete kit in 1942 catalog) but the fully-assembled price was $107.50. Like most kits, this Traffic Scout was modified in the past, luckily not extensively, so the circuit was easily returned to original. Its impressive performance is an unexpected surprise (being a kit) with reception capabilities that would allow the Traffic Scout a prominent place in an operational vintage ham station.

With a pre-built tuner and pre-aligned IF transformers, all the kit builder had to do was follow the assembly instructions carefully to end up with a competitive performing superheterodyne receiver capable of functioning as the ham station receiver. However, all pre-WWII radio kit assembly instructions were not enumerated "step-by-step" instructions with drawings for every assembly step as the later Heathkit instructions were. Pre-WWII radio kit instructions assumed that the builder had some radio knowledge and some experience in building. This meant the instructions might seem laconic and lacking details. Certainly, the brevity of assembly instructions might have been a contributing factor to the litany of problems found in vintage radio kits that were built by novice assemblers.

Manufacturers sometimes offered a few of their standard products as "optionally available in kit form." The reduced price was a benefit for seasoned builders that could assemble a fairly complex device accurately. E. F. Johnson started offering ham transmitters after WWII and their Viking 1 transmitter was only available as a kit. Later, most of the Johnson transmitters could be purchased either factory assembled or as a kit. Meissner Manufacturing Company offered several radio kits over the years with the Traffic Scout and the Traffic Master being the most sophisticated ham receiver designs. Lafayette was another popular wholesaler in New York that offered many different radio receiver kits from the 1930s up into the 1970s. Allied-Knight out of Chicago offered radio kits (Knight-Kit) for many years. Kit-building was brought to a new height in renewed popularity along with improved design quality and certainly in documentation, when Heathkit came on the scene after WWII. Heathkit's documentation and illustrated step-by-step instructions were extremely helpful in reducing the assembly problems that formerly had been the norm for kit-built radios.

Lafayette sold many types of receiver kits for decades. In 1959, they began selling a receiver kit that had been designed by Trio of Japan. The Lafayette KT-200 was essentially the Trio HE-10 in kit form. As expected, the front-end and the IFs came pre-aligned. This nine-tube receiver kit sold for about $70 and was available from 1959 up to about 1964. Despite looking like a useless Hallicrafters S-38 on steroids, the KT-200 was a decent receiver that could actually be used "on the air."


1959 Lafayette Model KT-200 Kit Receiver


Common Problems with Vintage Electronic Kits

Radio kits tempted many electro-neophytes with low prices and glitzy ads promoting the performance possibilities that could be had for a small investment and a few hours of assembly time. Unfortunately, what the radio kits didn't (and couldn't) offer was the training and experience necessary for quality radio assembly that would result in the kit performing as advertised.

There are several electro-mechanical problems that will only be found in radio devices built from a kit. These problems are almost never found in a professionally-built radio that was the product from a company production assembly line that was routed through multiple inspections followed by a product test and alignment process followed by a QA inspection.

All of the radio kit's original problems were related to inexperience on the part of the kit builder. One has to assume that many kit builders lacked the skills and experience necessary to properly assemble, test and align electronic circuits. Let's face it! Most kit builders were not professional electronics engineers, electronics technicians or electronics assemblers.

Soldering skills would be the first source of many types of problems. Soldering is a skill that is acquired with training and practice. Poor solder joints account for many performance problems.

Most kit builders weren't professional mechanical assemblers. This is also a skill developed with instruction and experience. Many ground-connection problems found will be mechanically-based assembly issues.

Most radio kits builders weren't really interested in developing the skills necessary for a professional level of assembly either. They wanted to get the "building phase" over with and were impatient to get to the end-result - a functional radio. The upshot was that the kit was usually assembled in a hasty manner in order to get the receiver operating as soon as possible. Of course, rushing the construction always led to mistakes that weren't discovered since the builder didn't want to take the time to double-check his work as it progressed. Sometimes the end result was catastrophic damage at the "power up" phase.

And, if that wasn't enough, many of the vintage radio kits weren't assembled per the instructions provided and many were later modified from their original design. Some of the mods were out of necessity and due to component failures. Correct replacement parts were probably not obtainable with the parts being either unaffordable or obsolete. The result was a repair that used anything close that was found in the "junk box" of salvaged "used" parts. These types of repair/modifications are usually not too difficult to put back to original.

Later modifications that were attempts to "modernize" an obsolete receiver are usually much more difficult to put back to original. The fact that most of the modifications weren't designed by radio engineers usually means you'll be lucky if a modified circuit even functions. Most modifications, if they even work, will compromise many areas of performance to benefit one area of performance. Unfortunately, non-original drilled holes, hacked-out holes or other modification destruction is very common on kit-built radios. All too often the modifications installed in kits were trying to compensate for fundamental errors in wiring, lead dress induced problems or incorrect components used.

Additional problems show up due to aging terminals and connections that bring on oxidation due to poor storage, accumulation of decades of dirt with copious soldering problems and then any troubleshooting becomes a real task that should start with a thorough visual inspection. Ultimately, each connection has to be checked for a good solder joint that was flowed properly and all mechanical connections need to be checked for a snug fit.

The following problems are not unusual to find on radio kit assemblies:

1. Cold solder joints and other soldering problems - causes poor conductivity or intermittent conductivity depending on current flow. Many kits were assembled using "tack joint" soldering. That was merely holding the wire against the terminal and flowing solder over both the wire end and the terminal. Tack joints are prone to cracking over time. I also suspect that some of the solder available pre-WWII was either not a 60-40 SnPb type or it was solid-core solder and a paint-on rosin paste flux was used during assembly. Soldering irons tended to be too large and too hot for proper soldering. 

2. Wiring errors, wrong components, modifications - cause performance problems or, if serious, component damage. Most kit builders either didn't read or didn't understand the assembly instructions. Most didn't even follow the wiring diagrams provided with the kit. Unpredictable operational problems resulted.

3. Lead dress problems - "Lead dress" is how wires are routed and how components are physically mounted and oriented. Not adhering to the instructions or drawings showing the designed lead dress can cause stray capacitive coupling that can cause oscillations or lack of gain due to absorption from capacitive or inductive coupling problems.

4. Diagrams, schematics and instructions not followed - This is very common with kits and causes performance problems since the radio is not built as designed. It becomes difficult to isolate specific problems or to predict performance anomalies since many areas of the circuit aren't assembled "as designed." The assembly instructions and drawings were worked out with prototypes that the radio engineers used as part of the overall radio kit design. 

5. Mechanical assembly problems - causes grounding problems due to loose or never installed hardware. Poor shielding (or shielding not installed) can cause oscillations to occur. Poor fit of assemblies can be due to using improper hardware. Not installing locking washers is a common issue and often the circuit assembly grounding depends on its conductivity to chassis and the "toothed" locking washer provides the improved contact with the chassis.

6. Oxidation of terminals due to poor soldering and/or age - cause conductivity problems since most oxidation would be prevented with proper flowing of the solder on the joint. Many of the oxidation problems are a result of poor storage for decades. Poor storage condition that allow for rodent infestation will cause a litany of sometimes insolvable problems.

7. Troubleshooting Observation - When repairing an all-original, factory-built receiver, you know at one time the receiver did function correctly so now you're looking for a defective component or components. With a kit receiver, you don't know whether it ever functioned correctly. The problem(s) could be anything from one or more wiring mistakes to wrong value components. Bad soldering to completely missing circuitry. Sometimes there are so many problems the best approach is to "strip out" everything and just start over.


Tobe Deutschmann Corporation
 
1936 "TOBE SPECIAL" Amateur Communication Receiver Model H
designed by Glenn H. Browning

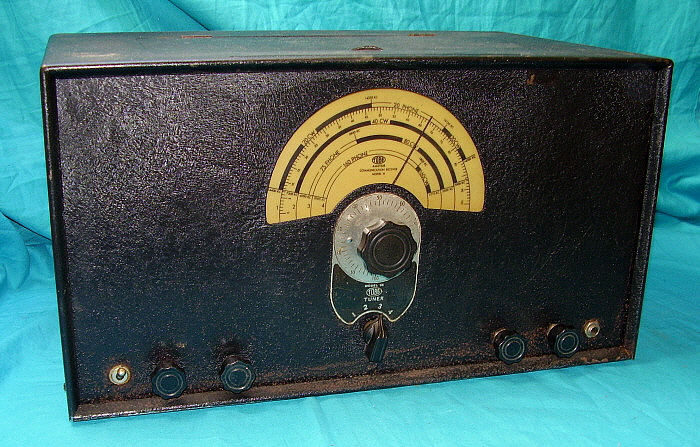
The visual appeal of the 1936 version of the TOBE SPECIAL Amateur Communication Receiver Model H is undeniable. But, was its performance equal to its looks? The 1935 Model ACR-35H was one of the earliest band switching, "ham-bands-only" receivers available so why wasn't it more popular with the hams?

Radio Engineer Glenn H. Browning had been working on the problem of how to reduce the complexity of homebuilt receiver kits starting in 1934. Just how to design a kit-type superheterodyne that provided excellent performance capability but could be fairly easy to build by eliminating the most difficult tasks, especially those that required special test equipment, was Browning's goal. Delicate components had to be pre-assembled to help prevent installation damage caused by inexperienced builders. Browning designed a receiver "front end" that used a tuned RF amplifier and a Converter stage with all of the coils necessary for four band-switched tuning ranges from the AM BC band up to 22mc. Tobe Deutschmann Corporation offered the pre-built and aligned Browning Tuner (by then called the Tobe Super Tuner) as the foundation of a kit called the "Browning 35" (since it was going to sell in 1935) All of the components including the "Tobe Super Tuner" were in the kit, even a loud speaker, for the very reasonable price of $46 (maybe that $46 sounds very reasonable today but in 1935 that was equivalent to just over $1000 in 2023 dollars.)

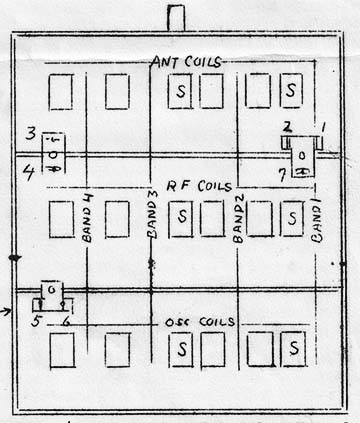
The Tobe Super Tuner T35 was the "heart" of the Browning 35 receiver kit. There were four tuning ranges each with its own coil set that was selected with a band switch that had silver contacts that also shorted the unused coils to prevent losses. Each compartment comprising the Antenna coils, the RF coils and the LO coils were separated by vertical panel-shields. Litz wire was used for the lower frequency coils and silver-plated wire was used for the higher frequencies. Each coil had a compression trimmer for alignment purposes. For final testing, each Super Tuner was installed in an identical chassis to what a finished receiver would be like. The Tuner was connected into the chassis with seven connections. Then the Tuner was aligned using Tobe Deutschmann's test equipment. This assured that the Tuner was accurately tracked and would work properly when installed in a correctly built TOBE receiver. All Super Tuner construction, testing and alignment was carried out at Tobe Deutschmann Corp. and it was ready to install as provided in the kit parts. >>>


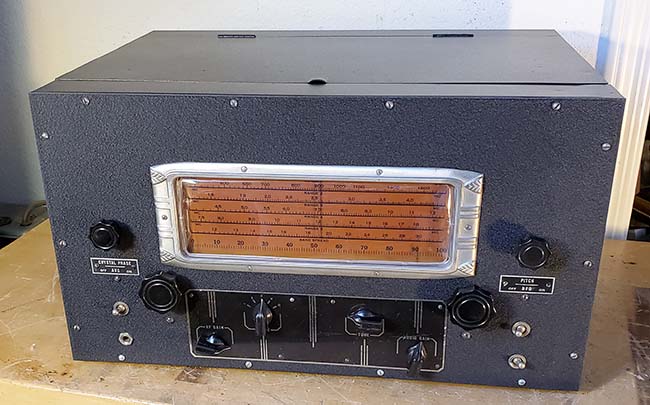
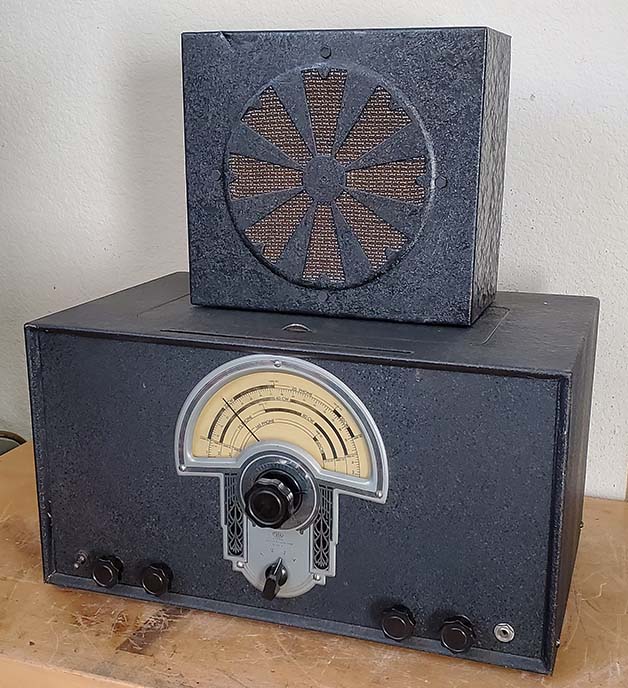
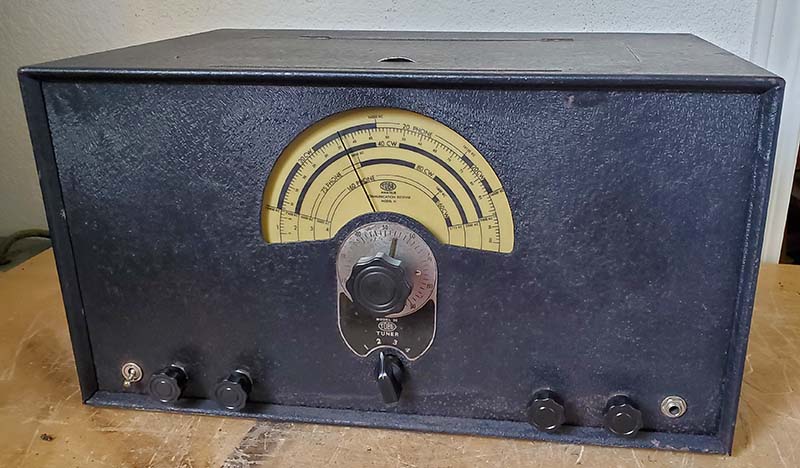
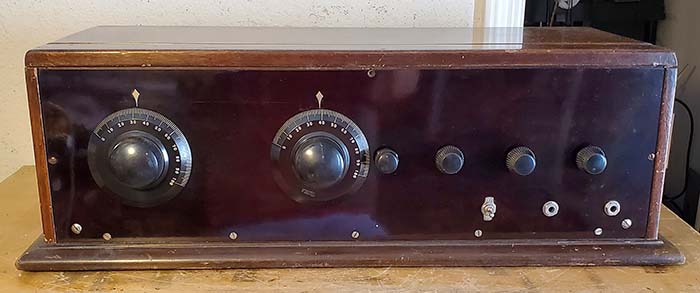
"TOBE SPECIAL" Amateur Communication Receiver Model H from 1936.   2016 photo, 3.8mp, flash 

>>>  The other unique parts for the Browning 35 receiver kit were the two IF transformers that had a tuned tertiary link winding that worked with the loosely coupled primary and secondary LCs to improve selectivity in the single IF amplifier stage. Browning felt that only one stage of IF amplification was necessary if it was designed for maximum efficiency for that one stage. Other more expensive receivers used two stages of IF amplification but they didn't run at maximum gain since shaping of the IF bandwidth was the goal. Browning shaped the IF bandwidth by using widely-spaced primary and secondary LCs and then having a tuned tertiary-link winding between the primary and secondary coils inside the IF transformers. The Q of the resonant link was similar to a bandpass filter and determined the selectivity of the IF transformer. These two IF transformers were pre-aligned at the factory and the assembly instructions are very specific that the "middle" adjustment on the IF transformers shouldn't be tampered with (that adjusted the tertiary-link winding resonance. But, we all know someone had to change that middle trimmer's factory setting sometime in the past 80+ years - but does that matter?) The IF passband was specified as 10kc but that was at -20db. It was about 6kc at -10db and that could be considered moderately "sharp" tuning.

The IF gain control was directly in the IF amplifier tube's cathode to ground circuit and determined the IF tube's gain by its grid bias relative to the adjustable cathode potential above ground. Both the RF amplifier gain and the IF amplifier gain were controlled by the AVC bias voltage when the receiver was operated in the AM mode. If reception of a CW signal was desired, then the BFO was switched on,...and that same switch also turns off the AVC. The AVC switch grounds the grid bias line on the RF amplifier and, with a 400 ohm cathode resistor for "self bias," the RF amplifier stage runs at maximum gain. In this CW/SSB mode, the entire receiver sensitivity is controlled solely by the IF tube cathode self-bias. This was to achieve a high level of sensitivity and, in the 1930s, with low noise levels, much less powerful signals and simple antenna systems, the IF gain control was probably able to keep the CW signals from over-loading. Nowadays, it's difficult to operate a TOBE in the CW (or SSB) mode unless certain precautions are taken such as smaller antennas or signal attenuators to reduce the level of extremely strong signals that will over drive the IF section of the receiver, even with the IF gain at minimum (more on this problem in "No Receiver is Perfect" further down in the TOBE SPECIAL restoration section.)

The Browning 35 employed seven, glass, large-pin base tubes. The builder could select 6.3 volt filament tubes or 2.5 volt filament tubes. At the time there was a controversy regarding the 6D6 used for RF and IF amplifiers that sometimes had their gain controlled by AVC. It was thought by some engineers, foremost being James Millen of National Company, that the six volt tubes added modulated AC hum to the higher frequency signals. National also offered their HRO receiver in both 2 volt or 6 volt versions (they were the same circuit other than the tubes and the power supply provided) up until early 1939. So, Browning also offered the builder the option of using 2 volt tubes or 6 volt tubes. A dual filament winding on the power transformer provided the voltages needed. The builder could choose either 2.5vac tubes - (2) 58, (1) 2A7, (1) 2A6, (1) 56, (1) 2A5, (1) 80 (5 volt filament rectifier.) Or, using 6.3vac tubes the line-up was (2) 6D6, (1) 6A7, (1) 75, (1) 76, (1) 42, (1) 80 (5 volt filament rectifier.) The Detector used a duplex diode-triode tube for the glass tube versions. Later, when the metal octal tube version was available, the Detector was a separate 6H6 dual diode tube and the 1st Audio amplifier was a triode 6F5 metal octal tube. >>>


From "The Radio Builders' Tabloid"

>>>  The Browning 35 was a general coverage shortwave receiver that, although provided as a kit, quickly became a favorite of the SWLs and with hams that couldn't afford the expensive factory-built receivers from "The Big Three" (National, Hammarlund and RME - Hallicrafters was still having their receivers built by contractors in 1935.) But what these thrifty hams really wanted was a "ham bands only" version of the Browning 35 receiver that provided band spread type tuning of just the 160M, 80M, 40M and 20M ham bands. Tobe Deutchmann Corporation offered the "TOBE Amateur Communication Receiver Model 35" (aka Model H) that essentially provided the hams with what they wanted. The TOBE Amateur Communication Receiver Model 35/H used the "Tobe 35H Tuner" that was a version of the Tobe Super Tuner that had a special tuning condenser for band spread coverage of 160M, 80M, 40M and 20M. Some frequency coverage slightly above and below each ham band was provided to allow for reception of a few short wave broadcasters, foreign hams and other stations outside the US ham bands. Since the frequency coverage of each band was relatively small, the LO alignment adjustments on each band included both trimmers and series padders to assure that the tracking was kept within the dial indications of the ham band limits.

Early versions of the TOBE Amateur Communication Receiver Model 35/H have seven large six and seven pin glass tubes. By mid-1935, an eight-tube version that employed all metal octal tubes was available as an option. Since the front-end and IF was pre-aligned, the builder had only to assemble the receiver. Tobe Deutschmann's instructions say "a few enjoyable hours" were required for assembly - a little bit of hyperbole. I've rebuilt from a "stripped out" condition two TOBE Amateur Communication Receivers and a far more realistic estimate would be at least three days working about three hours per day to do good job that's neat and correct. That's followed by a minor "touch up" alignment to the triple-tuned IF (tertiary coupled IF transformers) and to the four band front-end.  >>>

>>>  Instructions consisted of five large drawings (numbered in the order they should be used for assembly) showing the proper placement of components, a large schematic, written instructions and a booklet. There are a couple of pages in the instructions that warn assemblers not to use acid paste flux for soldering or "problems will result." The Tobe Amateur Communication Receivers were available from 1935 up through 1936.  >>>


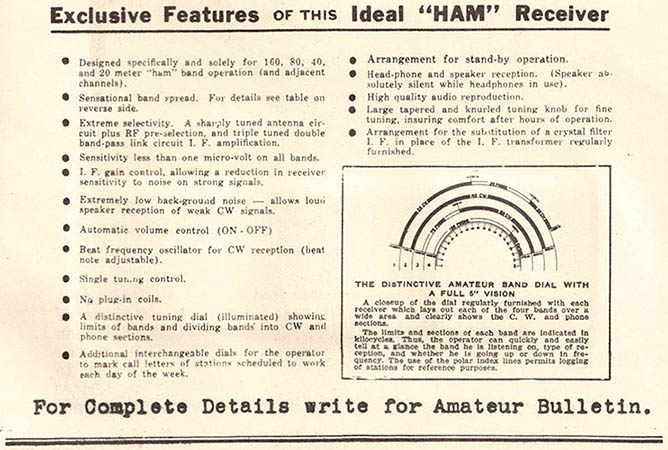
Ad for the TOBE Amateur Communication Receiver in the booklet "Around the World with the Browning 35" by Glenn Browning.

Tobe Deutschmann's "glitzy" ad that appeared in the 1936 ARRL Handbook.
Note that the ad mentions the regenerative IF option for "single-signal" (S.S.) reception.

>>>   When completed, the Tobe Amateur Communication Receivers was essentially a "ham bands only Browning 35" that had one RF amplifier, a Converter stage, a single IF amplifier, a single detector, BFO, a first AF stage, an AF output and a power supply rectifier. A toggle switch in the lower left corner of the panel was a standby switch, something the Browning 35 Shortwave Receiver didn't have. Also, in the lower right corner of the panel was a headphone jack, again not available on the Browning 35.

After alignment the sensitivity was rated at better than 1.0uv on all four bands and with the very selective Antenna and RF tuning (RF preselection) along with the tuned tertiary-link coupled IF transformers the bandwidth was fairly narrow. Browning also suggested that a regenerative IF could be created by eliminating a portion of the IF tube shield on the glass tube sets. Near the oscillation point, the IF would become "very sharp," that is, very selective. Tobe Deutschmann mentioned that there was a Crystal Filter IF transformer that was going to be available but neither its design nor the actual build was ever finished and it never became available. Most hams refused to use Crystal Filters anyway (as James Millen had discovered when researching the HRO Junior.)   

There were several options available for the purchase of either the complete receiver kit, which wasn't exactly "complete," or purchasing individual components or component packages for the receivers. Some advertising indicates that a speaker was included but not the speaker cabinet. Most ads indicate that the Wright-DeCoster Model 1000-B was included if the complete kit was purchased. The "complete kit" though didn't include the receiver cabinet,...a extra purchase of $3.60 ($80 in 2023 dollars) and it didn't include the spectacular dial escutcheon,...an extra $1.25 ($28 in 2023 dollars.) Other extras were air-trimmers in the Oscillator section for more accurate alignment and better stability - that was an extra $6.00 ($133 in 2023 dollars.) Later in 1935, the metal octal tube versions were available. The octal tube version was only $1.75 ($39 in 2023 dollars) more than the glass tube kit version. Many of the Toby Deutschmann ads don't have prices mentioned and indicate that the details could be supplied by writing for "Amateur Bulletin." As can be seen by the added "italics in parentheses" showing the 2023 dollar conversion, the prices for these options weren't trivial. Even today, someone might have "second thoughts" when it comes to paying an additional $80 for a cabinet.    >>>

>>>  The air trimmer assembly was identified as "Model 2" initially and later as "Model 2A" when installed on the T35H tuner. The 2A installation warranted a different name and that receiver option was called the "TOBE SPECIAL." The air trimmers provided a significant improvement in receiver performance with excellent stability and ease of LO alignment (the standard LO compression trimmers were difficult to set accurately.) Audio output was rated at 3 watts (with either a 42 or a 6F6 output tube in 1936, 2A5 or 42 in 1935) driving an electrodynamic speaker with a field coil resistance of 1800 ohms. 

Several other, different types of complete Wright-DeCoster speakers with enclosures could be purchased to go with the Tobe receivers. There were two large wooden enclosures available with one designed for a 10" W-D speaker and the other large wooden enclosure would provide a six inch W-D speaker at the top and room for the Browning 35 receiver at the bottom. Two metal enclosure speakers (designed to go with the ham receivers) were also available, one with a six inch speaker and the other with an eight inch speaker. In 1936, the W-D 1000-B loudspeaker with cabinet was included with the purchase of the complete kit. 

The tuning dial scale was removable thru a slot in the top of the receiver cabinet to allow the user to install a customized tuning dial scale that provided markers to indicate ham "schedules" by call and by day of the week. Besides the main dial logging scale there was another logging scale that surrounds the tuning knob. The knob tuning shaft enters into a vernier reduction mechanism that provides a 6:1 ratio of reduction in addition to the 7:1 gear drive reduction for a band spreading effect of approximately a 40:1 tuning ratio. The Band numbers are Band 1 is 20M, Band 2 is 40M, Band 3 is 80M and Band 4 is 160M.


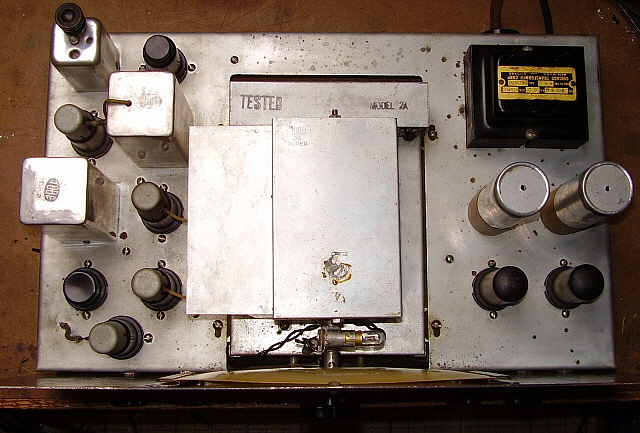
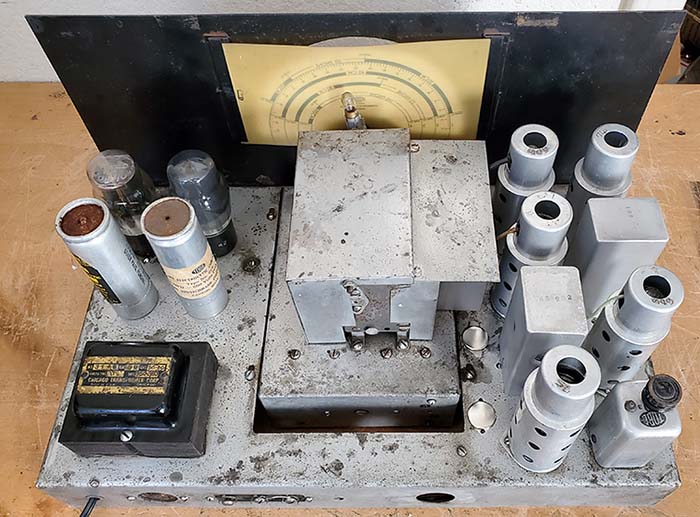
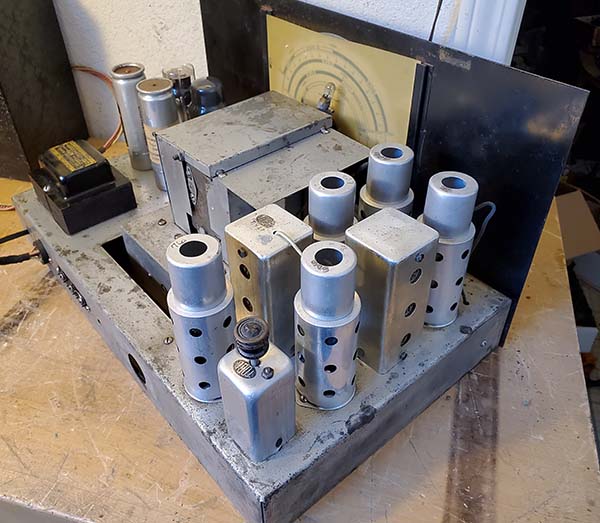
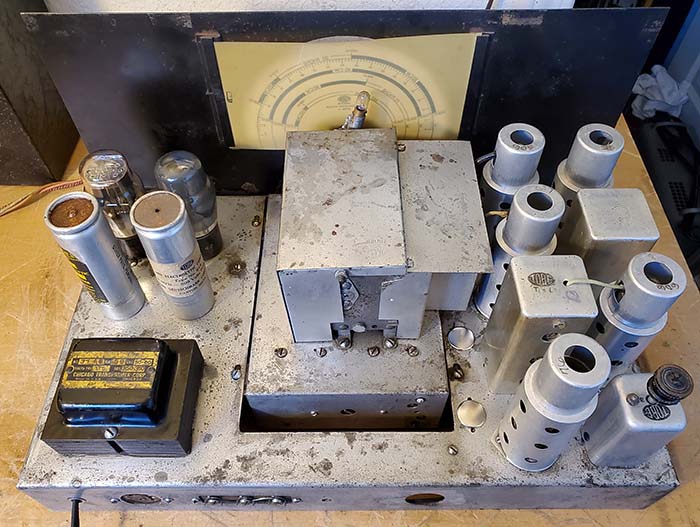
Chassis of the TOBE SPECIAL with optional metal octal tubes. The "Model 2A" indicates Air Trimmers.    2016 photo


Laurence Cockaday (l) and Glenn Browning (r) testing shortwave reception at the Westchester Listening Post using the Browning 35 receiver. Cockaday was editor of Radio News and also had a column in the magazine called "The Listening Post."

The TOBE SPECIAL shown in the photos in this section is a 1936 version using all metal octal tubes and utilizing the air-tuned trimmers (price was $56 with metal octal tubes and air trimmers. The 2023 dollar equivalent is $1240! Total with the cabinet and escutcheon is $1350! Wow!) The eight metal octal tubes are 6K7 (RF,) 6A8 (Conv,) 6K7 (IF,) 6H6 (det,) 6C5 (BFO,) 6F5 (1stAF,) 6F6 (AF out,) 5Z4 (rect.) The TOBE SPECIAL is shown with the standard tuning dial inserted showing each ham band divided into CW or PHONE sections. I also have the calibration dial that has marker frequency notations for alignment purposes. Besides the metal octal tubes and air trimmers, the original purchaser also opted for the cabinet and the deluxe escutcheon making the finished receiver a real "showpiece."

Unlike most ham radio kits, this TOBE SPECIAL is in unbelievable original cosmetic condition. It wasn't ever the victim of modifications and it appears that it wasn't ever used that much because it has no indications of any serious component failures. Certainly untypical of most ham radio kit receivers. Also, its state of preservation indicates that it was always stored indoors and never had to survive the harsh environmental conditions of a shed, garage, wet basement or hot attic. Very unusual.

NOTE: Since the TOBE Amateur Communication Receiver and the Browning 35 were kit receivers, advanced builders would sometimes customize their builds. Once in a while these were impressive creations. There's a photo on the Internet of a Browning 35 installed into a console cabinet that's a really nice looking set up. I wouldn't be at all surprised that during the thirties a few Radio Shops might have built something like that for resale. Radio Shops building radio sets for resale was fairly popular and could result in a radio kit being installed into an older "used but in good condition" radio cabinet. Tobe Deutschmann himself actually wrote a three-part article in "SERVICE" magazine (part 3 was in the Dec. 1935 issue) that describes the profits that radio service shops could make by using old cabinets that were is good condition and then installing the Browning 35 and Wright-DeCoster speakers. The creations shown were using an old RCA-Victor RE-32 ornate cabinet and a General Motors Model 120 cabinet.


This very popular photo of Glenn Browning is from his booklet, "Around the World with the Browning 35"
 

Glenn H. Browning - Radio Design Engineer Glenn Hazard Browning was born in Iowa in 1897. He and Dr. Fredrick H. Drake formed the Browning-Drake Corp. in 1927. Both men had met as students at Harvard University. The Browning-Drake Regenaformer receiver from 1927 was their first famous product, although it had been available as a kit much earlier than when the actual company was formed (kits available as early as 1923.) The Browning-Drake Regenaformer receivers utilized a precision designed coil with very tight coupling but with a very small primary winding for low distributed capacitance. Browning and Drake worked with National Co. to build complete Regenaformer tuners and matching Antenna coil LC tuners that used National variable air condensers (starting in 1923.) The circuit utilized a "balancing condenser" to neutralize the RF amplifier tube and provide a high gain level input to the regenerative detector for the ultimate sensitivity. At one time, Browning even had a small office at the National plant to oversee the engineering of the Regenaformer kits. The National/Browning-Drake Regenaformer "basic" kit supplied the two LC networks with Velvet Vernier tuning dials. The builder had to supply the other components although an engraved panel, adjustable balancing condenser and other individual components were also available separately. Later, other models of Regenaformer kits came with all of the components and parts necessary to construct a finished radio receiver. The Regenaformers were available at a time when building your own broadcast radio receiver was still popular because most of the factory "big name" radios were still fairly expensive. After about 1927 (with the formation of Browning-Drake Corporation,) the receiver was just called the "Browning-Drake" receiver and models numbers were assigned depending on the design. Complete Browning-Drake receivers were produced between 1927 and 1930. In 1927, with the formation of the Browning-Drake Corp., Browning severed his close ties with National since he now had his own company. Interestingly, as Glen Browning left National, they hired James Millen as chief engineer and general manager,...and for National,...the rest is history. More on the Regenaformer at the end of this write-up in the attached Appendix.

As the broadcast radio kit market waned in the late-twenties, the Shortwave Receiver Kit market was opening up. But, all of the popular Shortwave Kits were regenerative detectors with a TRF stage and a couple of audio amplifiers. By the early thirties, when the shortwave superhets were becoming available, the expense of purchasing a Hammarlund Comet or a National AGS left a lot of hams still using their homebrew Schnell or Reinhartz regenerative receivers. In 1934, Browning set about designing an "easy to assemble" kit-type superheterodyne that eliminated the most difficult tasks, especially those that required special test equipment. While Browning did the design work, Tobe Deutschmann took on the job of producing and selling the various components along with selling the complete receiver kit. The "Browning 35" Shortwave Receiver was the initial version available. The "ham bands only" version was next with the TOBE Amateur Communication Receiver Model 35 (aka Model H.) The Browning-TOBE receivers were only available in 1935 and 1936. Glenn Browning then formed the Browning Laboratories Inc. in 1937. The location was Winchester, Massachusetts where Browning Labs providing many different types of electronic designs and devices for decades, including a variety of high-end FM tuners. Browning Labs was reorganized in 1954 but Glenn Browning stayed on as Chairman of the Board. Browning Labs was moved to Laconia, New Hampshire after the reorganization. Browning died in 1974.


Who was Tobe Deutschmann?

What about Tobe Deutschmann? He was born in 1897 in Dorchester, Massachusetts and was the son of German immigrants. He served in the U.S. Navy in WWI and started in business after WWI ended (by 1922.) At first, the Tobe Deutschmann Corporation imported most of their parts and components that they sold from Germany. By the mid-twenties, he was building capacitors for radios along with other small components and doing a great business. Early products indicate that Cornhill, Boston, Massachusetts as the company location. Tobe went to Europe in 1927 to study the newly evolving aviation radio equipment and to pursue his flying hobby (his nickname then was "The Flying Deutschmann.") But, he was back in Massachusetts in 1928 to buy the Rising Sun Stove Polish factory in Canton, Massachusetts and moved his company there. The move was prompted by the $68,000 in business that T-D did in 1927. But after that it was economically downhill for the next decade.

By the mid-thirties, T-D was practically broke. The Tobe Deutschmann company was barely hanging on and had gone from 200 employees in the late-twenties down to only 40 employees in 1936 and most of them were engineers. Supposedly, in the mid-1930s, the Rising Sun Stove Polish factory was in some disrepair with a few broken windows, sagging floors and untrimmed grass out front. How Tobe was ever able to produce the Browning Radio kits is a miracle and certainly the modest sales of the Browning kits didn't account for any increase in T-D business profits. In the late-twenties one of T-D engineers had shown Tobe how to make noise filters from capacitors. This idea was brought back in the late-thirties since by then radios were everywhere and none of them had any noise limiting circuitry. It wasn't until Tobe started down the radio noise suppression filter line did things turn around for T-D. This was just before WWII started. Everyone was discovering that most radios used in vehicles, aircraft, vibrator operated portables,...on and on, all needed noise suppression filtering. But, much of the suppression needed to be in the vehicles themselves. By WWII, Tobe was supplying the military will suppression filters to be fitted to Jeeps and other mil-vehicles along with all military aircraft radio installations. The Tobe Deutschmann company income went up to 5 million dollars in just one year, 1942. This financial boon continued on because there seemed to be a never-ending supply of noise creating devices being built.

After WWII, Tobe Deutschmann decided to come to the aid of WWII veterans by supplying a large quantity of $1000 Canton property lots for only $1 each. The WWII Veteran housing project was to be called Honor Village. The architect also contributed his plans for $1 per house. Tobe was swamped with veterans that took him up on the offer but very few of the veterans had the money to buy the materials to actually build on their lot. No houses were ever built in Honor Village because the city of Canton zoning regulations were constantly used to prevent any building from taking place or any advancement of Tobe's project. The whole project ended up with most of the veterans selling their lots in frustration. By the late-1950s, Toby Deutschmann Corp. had moved to Norwood, MA and they were still building and selling capacitors and filters. After that, T-D seems to have taken on a lower-profile, almost disappearing from view. T-D was probably bought-out by some larger company in the 1960s. Tobe himself lived until he was 94 and died in 1991.
 

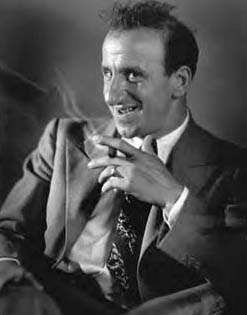
I couldn't find a portrait-type photo of Tobe Deutschmann but the June 22, 1942 issue of TIME magazine has an article titled "Tobe Gets Terrific" about the success of the Tobe Deutschmann Corporation and the writer describes him as follows,..."Tobe - who looks like a small version of Jimmy Durante with milder features but just as frenzied a manner -." 

Could Tobe Deutschmann have really looked like that Schnozzola-guy shown to the right? I don't know,...take a look at the next photo,...

Here's a photo from the February 1935 issue of RADIO magazine, editor Clayton Bane. The photo was included with an article by Glenn Browning about the Browning 35 receiver. This article is a little different than the later write-ups and includes more details on the design of the TOBE Super Tuner. Browning ends this write-up by saying that the "next article" will include the circuit details.

The quality of this photo is absolutely terrible. That's supposed to be Glenn Browning in the foreground. It doesn't even look like Browning. He was 38 at the time but he certainly doesn't look it. The fellow to the right is supposed to be Tobe Deutschmann,...since this is the only photo that I've been able to find of Deutschmann, I guess that's how he looked (but I like the photo of Jimmy Durante better.) Deutschmann was also 38 at the time of this photo. The fellow on the left is identified as "Dorf." That's William Dorf who also had a column in Radio News mainly about different types of circuits (he was also in his late-thirties at the time.) The photo was taken at Westchester Listening Post (Laurence Cockaday's house and radio testing setup for Radio News.) Looking at the photo further up this page showing Browning and Cockaday testing the Browning 35 (and those two guys in that photo actually look like Browning and Cockaday) at Westchester, one can see that this photo-left was taken at the same place. The window frames, the clock on the window sill and the globe on the tombstone radio are all present in both photographs which indicates this is Westchester.

The photo has a copyright of "1935 Tobe Deutschmann Corp" so I guess it's an "official" photo. Too bad the quality is so poor and this is after a lot of "photo-shopping."


TOBE-Browning Serial Numbers

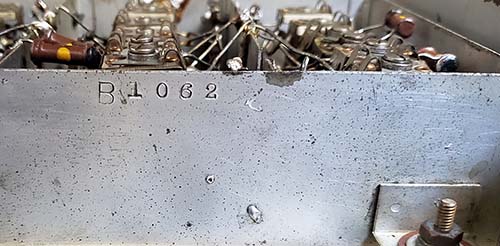
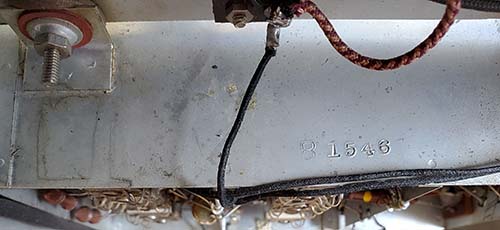
TOBE Amateur Communication Receivers and Browning 35 receivers do have a serial number. It's stamped into the metal on the right side near the bottom of the Tuner. All of the TOBE Super Tuners used in the Browning 35 (T35) and TOBE 35H and TOBE Model 2A tuners (T35H with 2A assembly) used in the ham band receivers had serial numbers assigned since the tuners were built at Tobe Deutschmann Corp. These serial numbers could be used to estimate the number of tuners produced and that should correlate closely to how many receiver kits were produced. Although some tuners were probably sold individually, that probably didn't account for too many sales. The serial numbers used on the T35 tuner used in Browning 35 receivers consists of just numbers. The T35H tuners used in the TOBE Amateur Communication Receivers will have a serial number with the letter "B" as a prefix followed by numbers. The SPECIAL is actually a 2A tuner that was added to the T35H tuner so it also has the "B" prefix to the serial number. Interestingly, only 494 numbers separate the 1935 Model 35 from the 1936 TOBE SPECIAL. From that, one could infer that the production output of T35H tuners (ham bands only tuners) was fairly low.

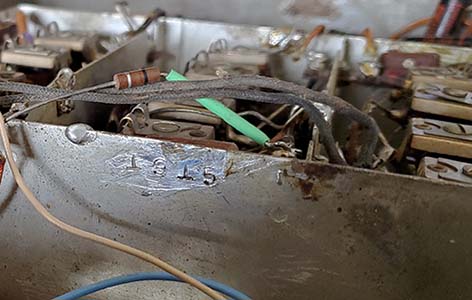
UPDATE: Oct 25, 2023 - I've obtained a parts set chassis of a Browning 35 receiver. The T35 tuner is present. The serial number had been partially obliterated by solder but this was easily removed using Solder Wick. The serial number is "1915" and after the solder was removed it was very easy to read.


Tuner T35 from Browning 35


Tuner T35H from Model 35/H

Serial Number Log - If you e-mail your Browning 35, TOBE Amateur Communication Receiver or TOBE SPECIAL serial number that is stamped on the right side of the tuner side panel, I'll add your SN to the log. Be sure to specify what model receiver the SN belongs to. I'll start off with my two TOBE receivers and the T35 Tuner.  Link to e-mail: TOBE-Browning Receiver Serial Number


Browning 35/Tuner T35
- 1915

TOBE Amateur Communication Receiver/Tuner T35H - B1062, B1158

TOBE SPECIAL/Tuner T35H/2A - B1209, B1546


Tuner T35H/2A from TOBE SPECIAL


 Rebuilding the 1936 TOBE SPECIAL

Amateur Communication Receiver Model H  SN: B1546


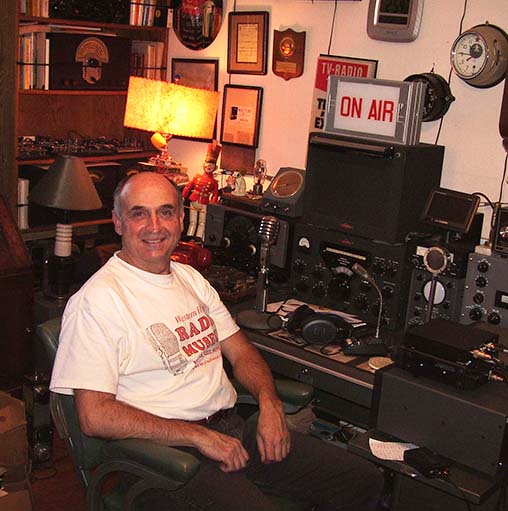
This TOBE SPECIAL Amateur Communication Receiver is about as nice of an example that can be found. I first saw this TOBE SPECIAL in the collection of my old friend NU6AM (photo right.) He had purchased it from an ad in A. L. Brand's "Yellow Sheets" in the late-eighties or early-nineties. It was very complete and in great original condition (I believe that it originally came from the New England area.) Jim recapped it using all of the original TOBE capacitor labels to preserve the correct under-chassis appearance. Jim had the TOBE SPECIAL in his collection for many years. On one occasion it was photographed and used for one of the month's pictures in a calendar for Vintage Ham Gear Collectors. Surprisingly, I didn't know that Jim was considering selling his TOBE SPECIAL until I saw it show up on eBay in early 2016. Of course, I recognized it immediately and I also knew who was handling the auction, K6DGH, a mutual friend of ours. Naturally, with a receiver in the condition that this TOBE SPECIAL was in, and also considering its rarity, the competition was fierce and I ended up having to pay "top dollar." But, it was one of those "gotta have it" moments we all experience once in a while.


photo right: The NU6AM shack with the TOBY SPECIAL on one of the display shelves, upper left - photo 2006 by WA7YBS

Nice T-shirt, Jim!  I used to sell those out of the museum in Virginia City, NV.

Pre-Rebuilding Details - The TOBE SPECIAL had been re-capped by NU6AM, the former owner, who did an excellent job of saving the original capacitor shells and restuffing them to preserve the original "TOBE" brand capacitor appearance. Jim wasn't 100% thorough in his restoration but his goal was to have the receiver operational and to be able to receive some signals. After a little while, the TOBE SPECIAL became a "shelf queen" until it was sold to me.

Essentially, the receiver did function okay but didn't seem to be operating at the level one would expect from an obviously well-designed receiver, albeit, a kit. But, since the TOBE SPECIAL was a kit, I suspected something wasn't wired correctly or maybe the soldering was questionable, so a thorough inspection was necessary. Luckily, the complete and original TOBE drawings, the assembly instructions and the manual were all included when I purchased the receiver.

After the inspection, I was pretty sure the TOBE SPECIAL was originally built by a "newbie ham." That would be a beginner with possibly a little experience in soldering but not really knowledgeable about the importance of proper soldering technique, lead dress, component placement and double-checking the work. The wiring almost completely deviated from the proper placement as shown on the drawings. AC wiring was routed along with RF carrying wiring. The components were placed spanning across the bottom of the tube sockets rather than the normal placement beside the tube sockets (which is what is shown on the drawings.) The "final straw" was finding several wrong value components, many cold solder joints and at least one obvious wiring error. Most of these problems had been there since the kit was built in 1936!

The only solution was going to be an almost total "strip out" of the components and wiring. This would then be followed by "rebuilding" the kit using all of the original parts and as much of the original wire as possible. Many of the components would need to have lead extensions in order to be placed properly and most of the wiring ended up too short to use in the proper routing. Perhaps the most daunting task was going to be the replacement of all of the tube heater wiring. This was totally routed incorrectly with many of the runs not being twisted together but just run separately all over the chassis. The "twist" is important in that it keeps the AC field around the wires from radiating too far.

Glenn Browning and the Tobe Deutshmann design engineers had put a lot of work into planning the best wiring layout and component placement to prevent stray coupling and other types of stability problems. What is shown in the documentation for lead dress and component layout must be followed, a fact that's stated several times in the instructions. This would assure that the completed receiver would function as designed and as described in the manual.   >>>

>>>  Here's a list of problems noted in the operation of the TOBE SPECIAL before the rebuild. Also, the problem's cause and solution (in italics) complete the paragraph. 

1. It wasn't possible to reduce the IF gain enough to eliminate distortion on strong SSB signals on any band, even 20M, when using a full-size, tuned antenna. The IF gain potentiometer has a fixed R that is 1.5K with pot-arm CCW, it should be 500 ohms as indicated on schematic (although this 500 ohms was for the 10K pot.) But this only affects the maximum IF gain since the pot is in the cathode circuit. The minimum gain is determined by the overall resistance of this pot. The TOBE SPECIAL's original IF gain pot was 20K and this might have been a change for all of the ham receivers and only the Browning 35 had the 10K pot. See "No Receiver is Perfect" at the end of this TOBE SPECIAL restoration write-up for more details.

2. The tuning has a "rough" feel to it. Gear-driven and directly coupled to knob might be why. This problem was caused by wear and could only be partially corrected with lube and some adjustment. Vernier reduction mechanism is stuck.

3. Tone control is erratic in operation. Control is a "pot-like" variable capacitor. Pot had been spray cleaned which contaminated the internal parts. Thorough cleaning to remove the oil was necessary to get the variable C working correctly.

4. Dial illumination not present. Might be because the dial lamp isn't shown on the schematic or shown anywhere on the assembly drawings. T-D assumed the builder knew how to hook-up a lamp. I built and installed the articulated dial illumination which has the dial lamp move along with the dial pointer. It's a really neat feature.

5. Rough sounding CW (AC modulated) signals on 20M. Not as apparent on 40M, 80M or 160M. Probably due to lead dress problems.

Deviations from circuit design.

1. The BFO circuit had a 1K resistor between the coil tap and the cathode of the tube. This was in the instructions for reducing BFO harmonics (if needed.) This was a common problem for CW operators that had the BFO on all the time. In the Browning 35, being a shortwave receiver used mostly for AM reception the harmonics wouldn't occur since the BFO was turned off. This 1K resistor is only part of the Browning modification though. Full mod is shown below in TOBE ACR-35H section.

2. The Converter/IF plate coil resistors were changed to 2.2K from original 1K. Probably trying to reduce the IF gain to reduce distortion.

3. An audio output transformer was installed under the chassis to provide an 8 Z ohm speaker voice coil output. Original design had the output transformer mounted on the electrodynamic speaker that was included in the kit. This appears to be an old installation but it must have been by a second or third owner since the original owner must have had the original speaker. Correct rebuilding will remove this non-original component.


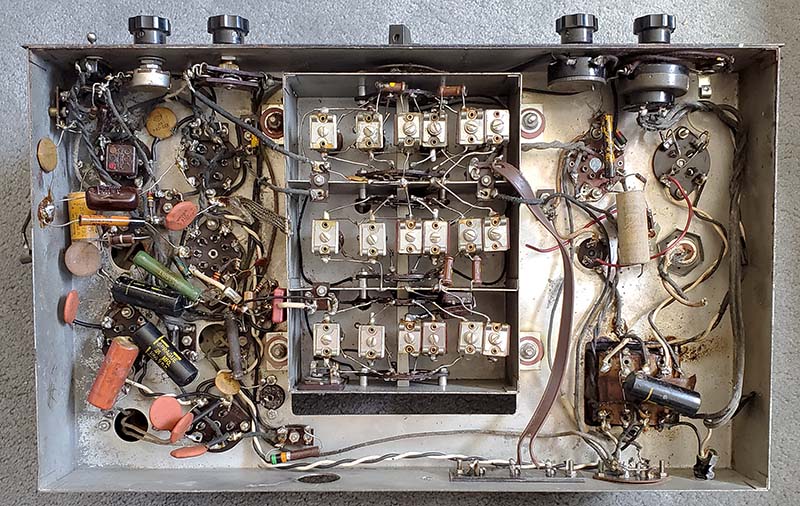
This BEFORE photo (below) shows the TOBE SPECIAL chassis wiring before restoration. It looks excellent at a quick glance but a detailed inspection and comparing the chassis to the TOBE drawings revealed many problems. First the good part, all of the paper wax capacitors had been rebuilt so they had their proper Tobe labels with new polyfilm capacitors inside the shells. The following are the actual problems with this assembly,...

1. There are three Aerovox replacements, two of which were wrong values, that were also restuffed with wrong values. It's difficult to see but the two electrolytic filter caps have cut leads and two axial electrolytic caps are mounted underneath the wiring.

2. Note the twisted red and black tube heater wiring. Near the RF amplifier tube the colors are crossed and black connected to red. Although this doesn't matter electronically, it does show a lack of wiring skill from the builder. Also, most of the front end tube heater wiring isn't twisted as shown on the drawings.


The TOBE SPECIAL looks excellent underneath but subtle problems are present     2016 photo

3. Note the two mica capacitors from the LO section. These are flat-against the metal chassis. These are supposed to be kept away from metal due to the increase in capacitance if mounted that way. Both capacitors are supposed to be mounted vertically above the Converter tube socket. This is mentioned in both the TOBE drawings and in the written instructions.

4. Note the added audio output transformer. Located right next to the power transformer is going to result in some magnetic coupling that would produce hum in the output. The cores are at opposite angels so maybe the coupling would be minimal.

5. Components and wiring are mounted and routed directly over the tube sockets. Although this doesn't usually cause any problems, it doesn't follow conventional wiring practice and it isn't shown that way in the TOBE drawings.

6. Note the slight bend in the front panel due to differing thickness spacers used in its mounting. Actually, the instructions indicate that there shouldn't be any spacers used and the front panel should be mounted directly against the chassis using the control mounting hardware. However, I've found in both this TOBE SPECIAL and in the TOBE ACR-35H that if the front panel is mounted in this manner, the fit of the receiver into the cabinet has too much clearance. By mounting the controls to the chassis using just the mounting nuts and then mounting the front panel against these nuts results in about .090" spacing and that results in the receiver fitting into the cabinet correctly.

7. In addition to the problems mentioned above, most of the solder joints are "cold solder joints." All of the grounding lugs are loose.

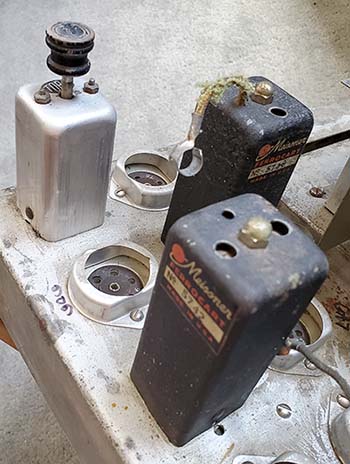
8. Note the hole plug on the rear chassis apron. This hole is original and was to allow access to the padding capacitor adjustments on the 35H Tuner for alignment on the lower ends of the 160M and 80M bands.

The Tube Heater Wiring - What was installed was at least 14 gauge stranded wire that in some places was twisted but most runs were separated and routed around the chassis. I think that Tobe Deutshmann must have included the same wire for the tube heaters whether the kit was a 2.5vac or 6.3vac receiver. Certainly the power transformer has both windings. At any rate, the very large diameter of the wire must have made soldering difficult and as a result nearly all of the tube heater wiring had cold solder joints. I searched for some type of wire that would be nearly identical in appearance but a more reasonable size for 6.3vac metal octal tubes. I found that two conductor 16gauge stranded power cable uses a natural rubber insulation on the wires. The black insulated wire would be ideal for the heaters. This type of power cable is available at Lowes or Home Depot. Be sure to inspect the cable wires carefully because a lot of the cable now being sold comes from China and the wire insulation is vinyl.

I stripped out several feet of cable to get just the black insulated wire out. The natural rubber insulation looks vintage and authentic but its advantage is that it's brand new. The wire twists together well and "tins" (solder prep) easily. The appearance when installed is indistinguishable from original wiring (except for lacking the red wire.)

It appears from photos and inspection of the TOBE ACR Model 35/H that Tobe Deutshmann didn't always supply the same type of wire for the tube heaters. Photos all show a heavier gauge wire used for the tube heaters but not in different colors. The two twisted wires appear to have the same color insulation in the T-D photos (of course, the photos are B&W.) Also noted in the B&W photo is that small gauge wire is used for the filament wiring to the audio output tube. My TOBE ACR Model 35/H had regular hook-up wire for the tube heaters. Builder's choice? Perhaps. The red and black wire used in the TOBE SPECIAL did look original but the rubber insulation had dried significantly and now couldn't be "twisted" without it cracking and falling off the wire. It had to be replaced if it was going to be routed per the instructions.

The Great Depression Wire Saving Enterprise - It must have been because the TOBE SPECIAL was built in 1936 and almost everyone had been affected by the Depression in one way or another. Certainly general conservation and saving unnecessary items was one behavioral attribute that seems to have been common at the time. The original builder of the Model H seemed to want to use as little of the black cloth covered "hook up" wire as possible. In order to save as much wire as possible, the builder didn't follow the proper lead routing as shown on the drawings. All wiring hook-ups were short and many connections were right across the tube sockets. I'm sure the builder only used half of the wire provided by Tobe Deutshmann in the kit. To be able to route the wiring as indicated on the drawings, I was going to need more black cloth-covered stranded wire. I looked in the several junk boxes of wire and came up with an old wiring harness that provided all of the extra wire needed.

Vintage Carbon Resistors - Most of the time, vintage carbon resistors are okay to use. They might have drifted a little in value but they are usually still within 20% tolerance. It really isn't predictable what values drift more often than others. The only way to be sure of a resistor's value is to measure it.

When measuring the value of a resistor that's still in the circuit most of the time the reading will be accurate. However, if your reading is much less than the indicated value then there is likely another component in parallel with the resistor that is affecting the measurement. Desolder one end of the resistor and measure again to get an accurate measurement.

If the measured value of the resistor is much higher then that resistor is out of tolerance. No component in parallel will cause a resistor to measure higher than it's actual value. So, the only explanation is that the resistor is actually one that has drifted higher in value. Desolder one end to double-check but you'll most likely be changing that resistor.

About half of the resistors in the TOBE SPECIAL were either non-originals or were out of tolerance by more than 50%. No problem. I'd just find some correct resistors in my junk boxes to replace them. Unfortunately, Tobe Deutshmann used a particular type of BED resistor that wasn't produced for very long. The straight-body type without the "dog bone" appearance. I was able to find a few in the junk box that were the values needed but all were way out of tolerance and not usable. In fact, most of the vintage resistors that have been "pulled" out of old radios will be found to have drifted in value. Most likely the cause of the problem is heat build up in the resistor during operation and this temperature cycling over a long period of time. I suspect this is the reason because most NOS carbon resistors are very close to specification value and tolerance. There are a few exceptions and some NOS CC resistors will be found "out of specification" for unknown reasons.

Since 1 watt JAN resistors are almost the same size as the Tobe resistors, with a little modification I could use these fairly modern and very reliable resistors instead. First the color code bands were removed using a razor blade. Next, the body of the resistor was painted the proper color. After that paint dried, then the proper end and dot colors applied. The finished resistor looks vintage and correct but actually is a fairly modern JAN replacement. Photos above show the steps involved. I purposely "tone down" the colors so the resistor looks like an original component.

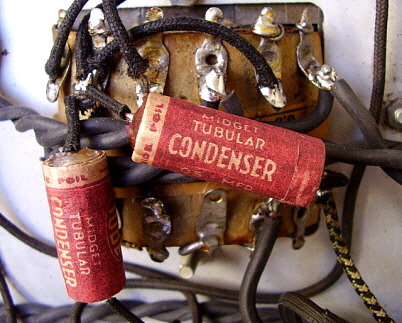
Tobe Deutshmann Capacitor Shells - All but a few of the capacitors were properly rebuilt by the former owner as far as their appearance and value (many needed lead extensions, however.) I double-checked the value with a capacitance meter just to be sure. There were two Aerovox capacitors in the IF circuit that were wrong value components. They were rebuilt as the marked value but that was not the value indicated on the schematic or in the drawings. There was also one other Aerovox capacitor that was the proper value but an obvious non-original. The other note is the TOBE shells with the tan labels are 10uf electrolytic capacitors used for cathode bypass purposes. Modern axial type 50wvdc type electroltyic capacitors were installed into these shells.

How to replicate the Tobe Deutshmann appearance was going to be a problem. My thought was to remove one of the .05uf labels from a T-D cap and copy it on a color printer. The labels were glued to cardboard tubes but one was not glued as well as the others. It was easily removed using a razor blade to carefully slice thru the glue as the label was unrolled off of the cardboard tube. The label retained some of the spray-on glue residue which made it easy to then mount the label to a piece of paper for copying. Some "touch-up" was necessary to correct some of the small tears and rips that occurred during label removal. I color-copied the original label and the result was pretty good. Maybe a slight bit darker than the originals but probably not even noticeable unless pointed out. The repro labels were then glued to correct size cardboard tubes that allowed inserting a modern capacitor inside that was secured with hot-melt glue. The end result was a nice replica Tobe Deutshmann capacitor.

Capacitor Lead Extensions - Since the proper placement of nearly all of the capacitors wasn't performed during the original assembly, the leads of the original capacitors weren't long enough to accomplish the correct placement. The former owner had recapped the TOBE Special but had merely followed the original builder's placement. I wanted to use these rebuilt capacitors because they had the original Tobe Deutshmann shells but the leads, in most cases, were too short. My extensions for the leads were based on the old helical coil that allowed a way to use an "end-to-end" placement of the lead and provide a strong solder joint. I made my helical coils with 22 gauge TC wound on a 16 gauge wire form. I wound about two feet of wire helically and then slipped the coil off of the 16 gauge form. I then cut the coil into 1/4" long pieces. I then cut the original capacitor lead to a little less than 1/4", then slipped the helical coil onto this lead and then inserted a long 18 gauge TC wire into the open end of the helical coil. This was then soldered. When carefully performed, this lead extension is barely noticeable and only looks like a slight enlargement of the lead as it exits the capacitor body. The new long leads allowed proper placement of the T-D capacitors during the rebuild. Rebuilding the Electrolytic Filter Capacitors - As with all of the capacitors used in the TOBE SPECIAL, the electrolytic filter capacitors are also made by Tobe Deutshmann and have paper labels that wrap around the bottom section of each capacitor. This paper label has to be preserved and luckily its not glued to the can of the cap. I sliced the label with a razor to remove it. Then I scribed a line to follow when cutting the cap apart. I also scribed two vertical lines for proper alignment during reassembly. The cut was about one inch up from the bottom of the can. Using a fine bladed hack saw, I followed the scribed line and cut the can in two. The original capacitor drops right out with no wax used to hold it in place - easy. A red and a black cloth covered wire were soldered to a 10uf electrolytic cap and the joints insulated with friction tape. Then the wires are fed thru the bottom gasket and hole. Using a cardboard tube, epoxy is spread on the inside of the can and on the cardboard tube. Both sections of the can are then reassembled and aligned with the scribed marks. Allow the epoxy to cure and then reinstall the paper labels, remount the caps and connect the wires.
Tone Control and IF Gain Control Problems - The Tone Control was a variable capacitance device that looked like a potentiometer but had "finger contacts" inside to allow an increase in total capacitance as the shaft was rotated. The erratic behavior of the Tone Control was caused by excessive oil and dirt that had collected inside. This was probably residue from "contact cleaner" that was apparently sprayed thru the opening by the terminals. Oil removal and cleaning the area resulted in the variable capacitance Tone control again functioning as original.

The IF Gain potentiometer had an internal "fixed" resistance that prevented adjusting the resistance to zero ohms (placing the cathode of the IF amplifier directly to chassis-ground.) The fixed-R was supposed to be 500 ohms but this pot measured 1.5K. This only affects the maximum IF gain. The overall pot resistance of original design was 10K but this original to the receiver pot has a 20K overall resistance along with the increase value of the fixed-R. I decided to use the original pot since it probably was supplied with the kit parts. The 20K value would allow a more apparent negative bias on the IF amplifier grid by elevating the positive cathode voltage and that would allow better control of the IF amplifier gain.

Articulated Dial Lamp Illumination - The original design had the dial lamp mounted to the main tuning shaft. This then had the dial illumination appearing to follow the dial pointer as one tuned the receiver - really kind of neat. The entire lamp socket and wiring was missing but the mounting tab was still present on the tuning shaft. I believe it probably wasn't installed because it isn't shown on the schematic and it isn't shown on any of the wiring drawings (it was assumed the builder would know how to install a simple lamp.) I used an old style screw-base (#40 lamp) socket with the clip bent 90 degrees to have the lamp in the vertical position and therefore be directly behind the dial pointer. Very flexible, stranded wire is made into a "twisted pair" which is connected to the filament voltage access from either the 6F6 tube socket or the RF amplifier 6K7 tube socket since these two are closest to the front-center of the chassis. The twisted pair is wound loosely around the tuning shaft to allow slack while the wire winds-up and loosens as the tuning shaft moves. Also, the lamp socket has to be "floating" above ground since it's connected to the tube heaters which use a CT ground. The end-result is a really nice feature for the TOBE SPECIAL Amateur Communication Receiver Model H as the dial illumination moves with tuning and, of course, without dial illumination there is no visual indication that the receiver is turned on.


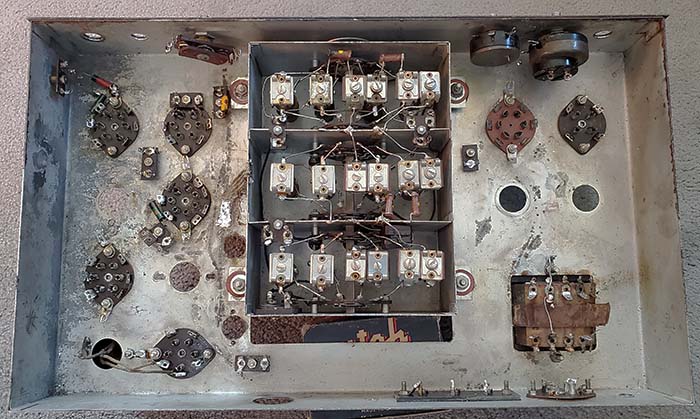
The rebuilt TOBE SPECIAL chassis      2016 photo


Under the chassis of a Browning 35 (seven tube) showing the similarity of lead dress.
Note that the filament wiring appears to be the same color insulation.
Note that the TOBE Super Tuner just has trimmer capacitors for alignment while the 35T/2A tuner added padders on 40 and 20.
Note that a standby switch or headphone jack were not installed on the Browning 35.
Note that the two mica capacitors from the Osc. section are mounted vertically over the Converter tube socket.
The knobs on this Browning 35 are different from those shown in any other photo - hexagonal.

1. The heater wiring is now twisted black 16 gauge with natural rubber insulation. Vintage looking but salvaged from a modern cable. I used an ohm meter to confirm that I was connecting the heaters correctly.

2. Component orientation and mounting now reflect the assembly instruction drawings exactly. Component values are now correct as shown in the schematic and the assembly drawings.

3. All resistors are the correct value and are BED coded, even if they are replacement JAN CC types. The capacitors are all TOBE brand in appearance using some repro TOBE labels as required. New polyfilms inside. The exception being the two tubular capacitor with the tan paper labels are actually 10uf electrolytic capacitors that are used for cathode bypass purposes. The blue-label TOBE .01uf is an original label and it's physically different because this capacitor was already installed by T-D when the 35T/2A Tuner was built. Incidentally, the value of this capacitor is .01uf but the schematic shows this capacitors should be a .02uf. Its value isn't critical but it's interesting that there is that conflict between the actual tuner and the documentation. Also, this is a later version 35T/2A tuner and the cap value might have been changed as an engineering upgrade but the documentation wasn't ever changed (very common in the 1930s.)

4. Wire routing is exactly as shown on the assembly drawings.

5. Note that the "restuffed" electrolytic filter capacitors appear as original now. I used the original TOBE paper labels on the electrolytic filter capacitor can.

6. Audio output transformer has been removed. It should have been mounted on the speaker, which is where it is located now.

7. About 90% of the wires used are original. I did have to make some long runs that required using similar looking vintage wire in those particular runs. I took liberty with the AC wires to the "on-off" switch using black with a yellow or green tracer for those wires. No fuse? I use a fused (not a circuit breaker) power strip for the AC power to the receiver. Also, this receiver was designed for 115vac operation. I use a 6.3vac filament transformer to "buck" the AC line voltage from 122vac to 115vac.

Alignment - IF  - IF is 456kc. Since there is a tuned tertiary-link winding in both IF transformers there are three adjustments. Original instructions warn the builder not to adjust the center trimmer on the IF cans - the tertiary winding. There is a section below that explains the adjustment of the tertiary windings and why the instructions warned against tampering with the factory setting. Input 456kc from a signal generator to the Mixer grid. Use a .1uf coupling capacitor. Modulate the signal with 400hz. Use an audio output meter connected to the voice coil of the speaker to monitor output level. The AVC must be turned on (because turning off the AVC will turn on the BFO.) Adjust the IF gain to about 50% advanced. The receiver IF primary and secondary should be adjusted to 456kc first, then the tertiary link trimmer adjusted to 456kc also. More details on the tertiary link adjustments is further down in this section. NOTE: The TOBE receivers all have the BFO tube mounted directly in front of the 1st IF transformer adjustments. While performing the IF alignment, easier access to these adjustments requires removing the BFO tube. After the IF alignment is complete, the BFO tube can be re-installed. The metal tube version isn't a problem but, with the glass tube versions, the BFO tube and tube shield block any access to the IF adjustments unless the BFO tube and shield are removed. Browning mentions the BFO tube removal for the IF alignment in his booklet "Around the World."

NOTE: Regenerative IF for Single-Signal Reception - A page of vintage optional instructions was included with my TOBE SPECIAL docs. It's titled "Obtaining Regeneration in the IF amplifier of the Tobe Communication Receiver." It describes how to adjust the overall IF gain to the point just before it breaks into oscillation by "cutting down" the tube shield on the IF amplifier tube. If the shield were entirely removed, the IF would oscillate uncontrollably. By removing just enough of the metal tube shield, it becomes possible to control the regenerative pre-oscillation using the IF Gain control on the front panel. The idea was that by adding the right amount of regeneration to the IF that would increase selectivity as the IF gain was increased. The end result was the IF Gain control would then not only increase the gain but also "sharpen" the selectivity. Determining the amount of shield to remove was done experimentally (the estimate is 1.25") with the IF Gain control at maximum. The instructions indicate to only remove just a little at a time since the amount of regeneration is dependent on the tube quality, the set wiring and many other variables. The goal was to have the the IF just begin to oscillate with the IF Gain at maximum. Reducing the IF Gain slightly should get to the best regeneration point for maximum gain and best selectivity. Further reduction would continue to reduce the IF gain and receiver overall volume along with increasing the IF bandwidth. Of course, this is only possible to implement with the glass tube version of the receiver. Although, the metal 6K7 IF amp could be replaced with a 6K7G tube and a metal shield collar added to the socket along with a metal shield for a glass 6K7G. However, the instructions don't mention this additional modification even though the instructions were included with the metal tube version, the TOBE SPECIAL receiver. I'm sure I wouldn't want to be cutting the original tube shield to try this on the "glass tube" TOBE ACR-35H. However, experimentation on that receiver with a similar type of spare "junk" tube shield might be interesting.

RF Tracking - First note that Band 1 is the 20M band and Band 4 is the 160M band. The LO adjustments are accessed from the topside rear of the Tuner (will have "MODEL 2A" stamped on it.) Front end alignment has only single adjustments for LO, Mixer and RF on 160M and 80M. The Mixer and RF will have "series C" (padder) adjustments. Adjust 160M and 80M first. Connect a signal generator thru a 300 ohm CC resistor to the antenna terminal. Set the generator to 2000kc and set the receiver to band 4 and the dial to 2000kc. Adjust the 160M LO trimmer to maximum signal. Check 1800kc and 1715kc. See NOTE below. 

Next, adjust 80M. Set the generator to 4.0mc and the receiver to band 3 and the dial to 4000kc. Adjust the 80M LO trimmer for maximum signal. Check 3500kc. There's a 3900kc marker on the dial to check tracking. See NOTE below.

40M requires adjusting the upper end LO trimmer and the lower end padder capacitor (marked as "Series" on the drawing) First set the signal generator to 7300kc and the receiver to Band 2 and the dial to 7300kc. Adjust the 40M LO trimmer for maximum signal. Adjust the signal generator to 7000kc and the receiver dial to 7000kc. Adjust the "Series" capacitor for maximum signal. Recheck the upper end and adjust back and forth until tracking is correct. There aren't any mid-band frequency markers on the 40M section of the dial. Only 7300kc and 7000kc dial markers are provided.

20M requires the signal generator be set to 14,400kc and the receiver set to Band 1 and the dial to 14400kc. Adjust the 20M LO trimmer for maximum signal. Adjust the signal generator to 14,000kc and the dial to 14000kc. Note that this setting on the dial is offset from the other scales. Adjust the 20M "Series" capacitor for maximum signal. Recheck the upper end and adjust back and forth until tracking is correct. On this TOBE SPECIAL, I had to input a slight error on the trimmer adjustment by peaking it at the 14,325kc to get the middle section of 20M to track fairly close. There are 14,250kc and 14,150kc markers on the dial that are used for checking the tracking. If the trimmer was set at 14,400kc, then the lower frequencies on 20M tracked "way off." By setting the trimmer at 14,325kc better overall tracking was attained in the 14,000kc to 14,250kc part of the 20M band but the error skewed as the tuned frequency was increased beyond that and with the dial at 14,400kc the error was about 40kc (14,400kc on the dial was about actually 14,360kc.)

Once the LO tracking is correct on all four bands then go back and adjust the trimmers for the RF amplifier section and the Mixer section. On 160M and 80M use the upper end of the dial and adjust each trimmer for maximum signal. On 40M and 20M you will find that there is a "Series" capacitor for the RF and Mixer. Adjust the trimmer at the high end of the dial and the "Series" capacitor at the low end.

NOTE: Regarding 160M and 80M Padder Adjustments - This alignment is for the TOBE SPECIAL that has the 2A tuner with air trimmers in the LO section. The standard 35H Tuner is aligned differently in that all adjustment trimmers are accessed from under the chassis except the 160M and 80M padder adjustment that's on the back apron of the 35H Tuner. Although the TOBE SPECIAL alignment procedure that's in the instructions doesn't mention the 160M and 80M padder capacitors for the 2A Tuner, they are there and connected to the 160M and 80M LO coils to adjust the lower end tracking. There's a large hole in the rear apron of the chassis to allow access to the 160M and 80M padder adjustments. I don't know why it isn't mentioned in the procedure but it could be that TOBE felt their "pre-tuned" setting was accurate and any minor adjustments required could be accomplished just using the upper end trimmers. I've found that the 160M and 80M padder adjustments will only change the lower frequency by about 5kc or so. Usually, you can get the low end close but not exact. When all of the components were new, the factory had test equipment that could do the alignment exactly,...but that was 80+ years ago. The coils and trimmers have aged considerably and with the vague dial indications it's all pretty meaningless to try to achieve "to the kilocycle" accuracy when the index divisions are in 100kc increments (or no increments at all.) The factory adjustment of these two padders is probably accurate enough.

Adjusting the IF Tertiary Windings

The manual and instructions tell you several times to NOT adjust the center trimmers on the IF cans,...but why?

The first question though is what are the tertiary windings for? Looking at the photo below that shows the internal construction of the transformer, one can see that the separation of the primary and secondary coils is quite wide which results in very loose coupling. This in turn results in very narrow selectivity but at the expense of very little coupling. By having another tuned LC inserted between the primary and the secondary coils with one end connected to chassis-ground the coupling is increased and the Q of the tertiary LC becomes in essence a bandpass filter that determines the selectivity. This tuned tertiary link LC bandpass filter gives the IF transformer good selectivity with steep sides to the passband and a "flat nose" for good fidelity.

But, why were the instructions adamant to not adjust the tertiary link since the trimmer was provided? This goes back to the idea that nearly all of the hams and enthusiasts that would purchase a TOBE receiver kit in 1935 or 1936 would be on a Depression-era budget. The belief was that none of these builders would have any sophisticated test gear and certainly wouldn't have a high-quality RF Signal Generator. Since the IF transformers were aligned at Tobe Deutschmann using high-quality test equipment, the 456kc signal was accurate. Then the IF transformer could be adjusted for resonance of all three LCs - the primary, the link and the secondary. BUT LATER, if the receiver builder wanted to "peak" his IF adjustments AND he didn't change the link's resonance adjustment, then his primary and secondary would "peak" on 456kc just listening to the received noise (no RF signal generator required.) Many hams and enthusiasts used to just "peak" their IF adjustments for maximum received noise with no reference signal. They didn't realize that the very first IF trimmer adjusted slightly skewed the IF and then the next trimmer resonated to that new IF, so on and so on, through the IF adjustments. As the IF was "tinkered with" several different times during a year or so, in a short time the IF would be pretty far from the correct tuned frequency since there really wasn't an IF reference signal used. By having the tertiary link kept resonant by "not adjusting it" each time the primary and secondary were "peaked" they would do so at 456kc. If Browning's booklet "Around the World" is read carefully, in the section about alignment using a RF signal generator, a procedure for aligning the TOBE IFs, including adjusting the tertiary link, is provided. Browning indicates in that section that all three IF trimmers are "peaked" for 456kc.

Nowadays all rebuilders and restorers have high-quality RF signal generators, digital frequency counters and many other types of lab-quality test equipment at their disposal. Aligning the TOBE IF transformers is just a matter of applying a 456kc sine wave to the mixer grid and peaking the adjustments. The tertiary-link has to be adjusted "to peak" at 456kc, otherwise the IF gain will be much lower than normal. If the link resonance was slightly off it really won't be too noticeable on 80M or 40M but 20M sensitivity would be down significantly if the tertiary-link was tuned to some frequency other than 456kc.  


TOBE Tertiary Coil IF Transformers

The center trimmer adjustment is for the tuned tertiary link. The correct adjustment of all three trimmers of the IF transformer will require a good quality RF signal generator. Browning's booklet, "Around the World," has the procedure for adjusting the IF transformers. All three trimmers are "peaked" at 456kc.


Inside the TOBE Tertiary IF transformers
T1 on the right, T2 on the left

In looking at how the TOBE IF transformers are wired, the tertiary winding is a parallel LC that's connected to chassis-ground and is electrostatically-coupled to the primary and secondary of the IF transformer. At resonance the tertiary parallel LC will be a very high impedance to chassis-ground and that allows maximum coupling between the primary and secondary coils of the IF transformer. Any frequency excursion from 456kc and the tertiary LC will exhibit some loss to chassis-ground between the primary and secondary which reduces the coupling and the gain. In operation, as the tertiary LC becomes non-resonant to the 456kc center frequency, the impedance becomes very low and signal losses due to the greatly reduced coupling between the primary to secondary increase significantly which reduces the signal level through the IF transformer. When the IF is at 456kc,  the tertiary LC impedance is very high so losses to chassis-ground are non-existent. The Q of the tertiary LC also shapes the "nose" of the passband giving it a flat response for good audio response within the selectivity provided.

Overloading and CW/SSB Distortion - With the IF transformers adjusted correctly, that is, primary, secondary and link all tuned to 456kc, the receiver will overload easily when the AVC is turned off and the BFO turned on for CW/SSB reception, even with the IF gain set to minimum. However, very strong AM signals will utilize the AVC and reduce BOTH the RF and IF gain by increasing the grid bias with the result being no distortion in that mode of reception. The problem in the CW/SSB mode is insufficient ability of the IF gain control (being only in the cathode circuit of the IF amplifier) to reduce the level of the signal produced by the RF amplifier, which runs at maximum gain when in the CW/SSB mode. One does have to consider that powerful SSB signals were far in the future in 1935 and the average CW signal of the thirties was easily demodulated without distortion. However, it seems that Browning was aware of this overloading problem and the IF gain pot was changed from 10K to 20K in an effort to reduce distortion in the CW mode. However, the IF gain control isn't enough. The RF stage gain level has to also be reduced when the AVC isn't used. Since there's no RF gain control, that leaves only a couple of options if the receiver circuit is to be kept original. Use a small antenna (50' end-fed wire) that isn't impedance matched or use an outboard signal attenuator to reduce the signal level coming into the RF amplifier. A small antenna will reduce signal strength but that limits the ability to receive weak signals. The outboard attenuator would probably be better since it could be adjusted for the specific signal level causing the distortion.     

Antenna Tuners Can Make a Difference - If you're just in the "listening mode" and using a tuned antenna system, just detune the antenna using the antenna coupler/tuner to reduce incoming signal levels. This will act something like an outboard attenuator and is easy to readjust for weaker signals. Separate and external receiver-only antenna couplers were somewhat popular devices that were used up well-into the late-1950s. These allowed tuning or detuning the antenna match to the receiver only as needed, depending on the signal strength.

Performance Results for the TOBE SPECIAL

The TOBE SPECIAL was connected to a heavy-duty electrodynamic speaker that had a 1400 ohm DCR field coil. Since this wasn't quite enough R for the +HV drop expected, I added a 450 ohm 25 watt WW resistor to compensate (I didn't have the Wright-DeCoster1000-B at the time.) The antenna used was the regular ham antenna, a 135' tuned inverted-vee with open feed line. The antenna was "tuned" for the particular band being listened to. This antenna provides exceptionally strong signals and certainly contributes to the "strong SSB distortion" on 80M.

80M - AM stations sound incredible. Very nice audio. AVC works quite well. SSB stations have a tendency to over-load easily. Manual IF gain must be kept very low which is normal for SSB reception when trying to keep the signal to BFO injection ratio correct. Sometimes though, no matter how low the IF gain is, the SSB signals will still distort some. The antenna can be "detuned" to reduce signal levels if necessary. CW sounds great.

40M - Very similar to 80M performance except the SSB over-loading is rarely encountered.

20M - Excellent DX performance and sensitivity. On CW, I heard an XE1 station in Mexico. Another listening stint produced a YV5 station in Venezuela and a SV9 station on Crete, both on SSB. I thought that was pretty good but the next day I tuned in a 4X9 station in Tel Aviv. Wow!

160M - I really didn't hear much on 160M however one can tune to the upper end of the AM BC band since the TOBE does tune below the "1936" 160M low end of the band, 1715kc.

In the AM mode, the TOBE is operated in AVC with the IF gain at max and the Volume adjusted as needed. The IF gain can be reduced to clear up noise problems. In the CW mode, AVC is turned off when the BFO is turned on and the TOBE has to be adjusted just like any early receiver. Turn the Volume up almost to max and reduce the IF gain to minimum. There is a limit to reducing the IF gain since the pot is only a 20K but, for the most signals, this is a good starting point. With CW signals, just advance the IF gain as needed. For SSB, it will be necessary to not advance the IF gain too far or distortion will result. The exception will be 20M where the IF gain can usually be advanced as much as needed since sensitivity is reduced somewhat on this band. The TOBE SPECIAL takes a little practice but once you know its little quirks, it's a good performer and very sensitive. Selectivity is about 8kc at -10db which is marginal with crowded band conditions but okay in most average QRM conditions. Remember, it's a receiver with only one IF stage, one preselection stage and no crystal filter so don't expect miracles when trying to cope with QRM. Toby Deutschmann had plans for an optional Crystal Filter to be available but, probably due to slower than expected sales of the receivers, the Crystal Filter was never actually produced.


Control Functions
Browning 35 shown but controls are the same. I'm not sure why the IF Gain control is marked "IF Selectivity" (maybe the IF tube's shield has been "cut-down.")


The TOBE SPECIAL - Seven years after the restoration. Still looking and working great.

2023 photo, S-10 12mp, no flash
 

Vernier Reduction Mechanism - The reduction mechanism has an odd problem. At room temperatures it's "stuck" and just gives a 1:1 output. But, if the mechanism is heated (heat gun) then it works fine. I've worked melted grease into the mechanism but it appears that it's either assembled with too much end-clearance or the input shaft doesn't have enough clearance in the front bearing (or both.) Either way, heat expands the fit and the mechanism works fine. But, as soon as it cools to room temperature, it's stuck again. Unfortunately, the mechanism is not meant to be disassembled. The output gear has to be removed for disassembly but it's splined and swedged to the shaft. I removed the swedge but still couldn't get the output gear off. Not wanting to irreparably damage the entire mechanism, I stopped at that point and put everything back together. I really didn't realize the reduction mechanism didn't work correctly until I started working on the TOBE ACR-35H and saw how the reduction is supposed to work with that receiver. There's still the 7:1 reduction of the tuning condenser drive gear, so at least the TOBE SPECIAL tuning isn't "one to one."

Original Knobs - The knobs pictured in all of the original T-D and Browning B&W photos of these receivers are noticeably different from those mounted on the TOBE SPECIAL or the TOBE ACR 35. The band switch knob is like the original. The tuning knob was originally a tapered type of knob with very fine fluting. The four smaller knobs appear to wooden knobs in many photos so they might be similar to the BFO knob but maybe slightly larger. In the B&W photo of the underside of the Browning 35 (shown further up,) note that the knobs are "hex knobs" which are quite different from the wooden knobs shown in most other B&W photos. At any rate, over the decades it seems the original knobs disappeared and these standard Hammarlund knobs were installed (Hammarlund-type, used on the Super Pro.) Maybe it was "builder's preference."

NOTE: The Seven-Year Glitch - Sept 30, 2023 - When I went to test the operation of the TOBE SPECIAL after about seven years of just setting on the shelf I was surprised that it didn't work. Nothing. Out of the cabinet to measure some voltages and naturally B+ is the first thing to measure. When putting the voltage probe on the speaker socket +Vr to the field coil pin, immediately the TOBE came to life. Wiggling the speaker cable would also instigate a failure. The socket receptacle pins were very loose and allowed the plug pins to move around. I removed the plug and used needle-nose pliers to bend the socket pins back into shape. Tight receptacles fixed the problem. Receiver on steady, wiggling the speaker cable made no difference now. The reason for not catching this the first time around (seven years ago) was I didn't have the 1000-B loudspeaker that has its original cable and plug. I used clip leads to connect a test-speaker set-up so I didn't use the standard four-pin plug.

No Receiver is Perfect
The Solution for IF Overloading with AVC Off

The Problem - The TOBE receivers have a difficult time when tuning into MODERN powerful ham signals in the SSB mode when using a large, resonant antenna. One does have to consider that these receivers were designed in the mid-1930s when noise levels were low, most ham transmitters were running CW at less than 100 watts and most receiving antennas were simple 50 foot long end-fed wires (remember, the Browning design is almost 90 years old!) Also, one has to consider that these receivers were kits that had to be fairly easy to build and the selling price had to be kept reasonable. The original Browning 35 design was for a short wave receiver that primarily was for AM reception. When the TOBE receivers are operated in the AM mode, which forces the use of the AVC control circuits, modern AM reception is great. The RF amplifier and the IF amplifier grids are BOTH biased with the AVC voltage that is inversely proportional to the signal level, that is, as the signal level increases the AVC bias voltage becomes more negative. The end result is no distortion regardless of the level of signal input. BUT, the ham receivers were almost certainly used primarily in the CW mode (in the thirties, CW was the dominate mode of ham communication.) CW reception requires the BFO to be turned on and the AVC to be turned off. In this set up, the RF amplifier stage runs at maximum gain and the IF amplifier gain is only controlled by the variable cathode resistance to chassis-ground, a self-bias type of control. The level of apparent grid bias available at the IF amplifier tube is not capable of controlling the receiver gain when tuning modern CW/SSB ham signals AND there's no way to throttle-back the RF amplifier gain that's running at maximum. The result is extreme distortion on SSB signals due to signal overload in the IF stage, even with the IF gain set to minimum. Browning seems to have been aware (from his 1930s perspective) of this potential problem, although in the 1930s, CW signal levels were not nearly as potent then and, MORE IMPORTANTLY, high-power SSB was far in the future. When in the CW mode, signal overload might have only happened occasionally back then. Browning did change the IF gain control from 10K up to 20K to provide better IF gain control (possibly only for the ham receivers.) For modern CW signals, the distortion isn't nearly as noticeable due to the nature of the signal (being a keyed tone) and, additionally, almost all modern CW seems to be at a power level of about 100 watts or less. Only powerful SSB signals, of which there seems an abundance, are difficult to demodulate without distortion.

Possible Solutions - As an experiment to confirm my analysis of the problem, I disconnected the 400 cathode resistor in the RF amplifier circuit and "tack soldered in" an adjustable 25K rheostat instead. With control over the RF amplifier gain I was able to easily find a balance of RF gain, IF gain and Volume (AF gain) that would provide undistorted demodulation of extremely strong SSB signals when using a resonant large antenna (tuned collinear array.) I didn't encounter ANY powerful SSB signal on either 40M or 20M that couldn't be demodulated with a combination of RF gain, IF gain and the Volume control. Now, I'm certainly NOT advocating that this mod be done to any TOBE receiver. My installation was only a temporary one and it was just done to confirm my analysis regarding the "fixed-at-maximum gain" RF amplifier being "the problem" when in the CW (and modern SSB) mode. As stated, if the receiver is in AVC for the AM mode, the AVC bias controls both the RF and the IF gain and reception is excellent for all levels of AM signals  -  BUT not in the CW mode with the AVC-off and with a manual gain control that only functions on the IF amplifier tube and, most importantly, with the RF amplifier running at a non-adjustable "maximum gain."

Easy, All External, No Mods Solution - For an absolutely "no mods" solution, the easiest method is to be able to control the RF level from the antenna tuner to the receiver antenna input. Using a "tuned antenna" set up will allow using the antenna tuner itself as an attenuator to reduce the level of signal as needed. When maximum sensitivity can be utilized, then the antenna system can be "in tune" for best response. And, by a mere adjustment of the tuner, the operator can reduce the RF level by "detuning" the antenna to cope with extremely strong signals. A popular device at one time was the receive-only antenna coupler. This was a small antenna tuner that allowed adjusting the match of the station antenna to the receiver only. It could enhance the signal or it could also be used as an attenuator for strong local signals. This antenna coupling device method will work most of the time but extremely powerful SSB signals may still distort. Also, in a working vintage ham station, it normally does require a DPDT frame-type relay to switch the balanced feed line from the transmitting coupler to the receiver coupler. However, for the vintage approach, the receiver antenna coupler was the method used by many hams.

Another less-complicated method is to use a simple adjustable voltage attenuator can be inserted between the receiver antenna input and the antenna or antenna coupler output. The attenuator would allow using the maximum antenna response when weak signals are to be received and a reduction of the RF level when extremely strong signals are encountered. Suitable attenuators are fairly cheap at about $25 and provide stepped attenuation from 0db up to -82db using a 50 ohm load. They are from China and can only handle 0.25W so they are definitely for "receive only" use. They have a nice layout, a small metal housing and the attenuator adjustment by multiple toggle switches and input/output via SO-239 connectors.

Testing with the Tronson Attenuator Between the Collinear Array/Matchbox Output and the TOBE SPECIAL Antenna Input  - I bought the Tronson RA-1728A attenuator off of eBay. I had to pay about $10 more to purchase from a USA-based seller ($35 with free shipping.) The SO-239 input and output connectors make hook-up easy. The Collinear Array is the largest antenna I have at 240' center-fed with 106' of open feed line. There is a slight gain of a little over +1.5db on 75M and a little more than that on 40M and 20M. The received signals when using this antenna are noticeably stronger than with the 130' Tuned Inv-vee antenna. The attenuator was tested on 80M, 40M and 20M. ALL extremely strong SSB signals could be easily reduced in strength just by switching the labeled toggle switches. For example, -20db + -20db + -3db would equal -43db of attenuation. The switches allow selecting any level between 0db and -82db in -1db increments. You have to add up the total of the db switches thrown to know how much attenuation is switched in. Most strong SSB signals on 80M required about -40db of attenuation. One really strong SSB station required -70db (must have been a local.) On 40M, between -40db and -20db was typical. On 20M, between 0db and -10db was typical.   The Tronson RF Attenuator is shown in the photo below.

I couldn't find ANY SSB station strong enough that the attenuator couldn't reduce the signal level to where the TOBE SPECIAL easily demodulated the SSB. For weak signals, the attenuator can easily be switched out of the circuit by placing all of the toggle switches to the "down" position. Using the attenuator allows keeping the antenna resonant (tuned for the received frequency) and just reducing the signal level of extremely strong stations as needed BUT still having the ability to easily return the antenna system/feed line to maximum response for weak signals. Another observation was that by reducing the input signal level before the RF amplifier, it seems there's much less distortion than with the simple RF amplifier cathode-type gain rheostat modification. The antenna attenuator is by far the easiest and best method to deal with the IF overloading of the TOBE SPECIAL (and the ACR-35H) when used with a very large array antenna.

 
My old friend and fellow longwave enthusiast Dave Sampson from New York gave me the proper Wright-DeCoster loudspeaker for this TOBE Special receiver. It's the 8" version, Model 1000-B, and it has the correct high resistance field coil for the power supply circuit and the correct audio output transformer. Plug and play.

Wright-DeCoster Loudspeaker Model 1000-B

 for TOBE-Browning Receivers
 

When the TOBE Amateur Communication Receiver kit was purchased a loudspeaker without enclosure was included. For an extra five dollars, an optional loudspeaker was also available for use with the various Tobe Deutschmann receivers, the Browning 35, the TOBE "Special" and the standard TOBE Amateur Communication Receiver. There were actually two models that were available. The Model 1000-B, was an eight inch Wright-DeCoster electrodynamic speaker housed in a metal cabinet that was painted black wrinkle finish and sold for five dollars. In 1936, the Model 1000-B was included with the purchase of the complete TOBE Amateur Communication Receiver kit.
 

The Model 900-B, was a six inch speaker in a similar type cabinet that sold for $4.50. For either model, the field coil DC R was 1750 ohms and the proper audio output transformer was mounted on the speaker frame. A four conductor cable with four pin plug connected the loudspeaker to the receiver.

The photo to the left shows the advertisement for the Wright-DeCoster/TOBE loudspeaker Model 1000-B from page 22 of the Browning booklet "Around the World."

The 1000-B features an eight inch W-D loudspeaker. The grille cloth was originally silver and black but this example (shown in the photo to the right) shows that the original grille cloth has faded and discolored to now appear brownish tweed in pattern and color. The "sunburst" grille featured a small diamond-shaped metal badge in the center that is missing from this example (the badge seems to be missing from all actual W-D examples that I've seen.)

The eight inch speaker provides a good reproduction that has some bass (not a lot) and decent highs. It's a very nice accessory and really adds even more to the overall receiver "bench presence."


TOBE SPECIAL and 1000-B Loudspeaker
2023 photo, S-10 12mp, no flash


1935 TOBE Amateur Communication Receiver Model 35, aka Model H - SN: B1062

This is the first version of the Standard TOBE Amateur Communication Receiver from 1935. This example had many restoration challenges and that's not totally unexpected with Ham Radio Kits. The most difficult to solve problem was the missing TOBE tertiary winding IF transformers. Replacement-quality Meissner Ferrocart IF transformers had been substituted for the TOBE IFs. The Meissner IF transformers can't provide the selectivity that the original TOBE IF transformers had. It was a surprise to find a 2005 modification that added a Q-multiplier circuit and a 0A2 voltage regulator - more modification mayhem!

There are two parts to this restoration. The first part involves finding a suitable substitute for the Meissner Ferrocart IF transformers. I used IF transformers from a junk Hallicrafters SX-28 because of the similarity in appearance to the original TOBE IFs. Also, correcting the other hamster mayhem so that the ACR-35H became a working receiver that looked pretty close to original. The second part of the restoration involves replacing the Hallicrafters SX-28 IFs with acquired original TOBE tertiary winding type IF transformers and the dramatic improvement in performance that can happen when using original parts.

The initial TOBE Amateur Communications Receiver was available in 1935. These versions used seven glass tubes. The power transformer had both 6.3vac and 2.5vac windings so the builder could choose either 2.5vac tubes - (2) 58, (1) 2A7, (1) 2A6, (1) 56, (1) 2A5, (1) 80 (5 volt filament rectifier.) Or, using 6.3vac tubes the line-up was (2) 6D6, (1) 6A7, (1) 75, (1) 76, (1) 42, (1) 80 (5 volt filament rectifier.) Very early versions of the Browning 35 and possibly the TOBE ACR 35H had a dial opening that was exactly 180º (a true semi-circle) but most receivers have the dial opening that is a few degrees more giving the dial slightly <0º and slightly >180º capability (and a nicer appearance.) A dial surrounding escutcheon wasn't normally included on either the Browning 35 or the Amateur Communications Receiver models. Instead, a small oval metal plate with logging scale and band select numbers was used. This oval type of logging scale plate was used on the standard versions of either type of receiver (that's why Model 35 is on the plate.)


Early Browning 35 with oval logging scale plate and 180º dial opening
(poor quality photo from July 1935 Short Wave Craft magazine. It took a lot of "photo-shopping" and it still almost looks like a cartoon.)

However, many kit builders opt'd for the Deluxe Chrome Escutcheon that could be purchased separately since its price was only $1.25. In fact, there were several purchase package options that allowed for different combinations of parts rather than a complete kit. These options were intended for advanced builders.

Dials on early versions had the "TOBE" logo and receiver model information printed below the band scales. The "TOBE" logo and receiver model (Model 35) were printed on the logging scale plate. The dial just had the band scales except that "Model H" is printed below "TOBE Amateur Communication Receiver." Throughout this section, this receiver will be referred to as "TOBE ACR 35H" with ACR being Amateur Communication Receiver and 35H being the type of tuner installed (the ham band tuner.)


1935 TOBE Amateur Communication Receiver - Standard Version - SN: B1062
The designation shown on the dial scale is Model H and the designation on the logging scale is Model 35. The original purchaser opted for the cabinet but not the deluxe chrome dial escutcheon. The escutcheon option was an extra $1.25 but without the escutcheon the difference in appearance is dramatic and its absence results in the receiver looking "incomplete."

This is an older photo taken with 3.8mp Olympus and flash. New photo at the end of this write-up.

Discovery - I found this 1935 TOBE Amateur Communications Receiver at Ham & Hi-Fi in Sparks, Nevada, in March 2018. It was part of a large collection of radio gear (dregs from the WB6ACU collection) that was brought in but hadn't really been sorted yet. I spotted the TOBE receiver at the bottom of a pile of the usual commonly-seen type of vintage ham gear. It was quite an effort to extract the TOBE from "the bottom of the pile." Unfortunately for me, Ethan (the H&HF owner) was not at the shop and I knew I had to leave with this TOBE or it would end up on eBay. I made the shop assistant an excellent offer ($200) and I couldn't believe he balked at it. Even the tech at H&HF told the assistant that was a really good offer. I finally got the assistant to call the owner and over the phone Ethan and I made the deal. 

Well, for all the effort in purchasing the receiver I'd hoped the 1935 TOBE was going to be easily restorable but that wasn't the case at all. Unfortunately, this particular 1935 TOBE Amateur Communication Receiver Model 35H was heavily modified. Not totally unexpected from "kit built" equipment. It starts with the original builder who felt he was totally familiar with the circuit and therefore felt qualified to modify its design (even though he certainly wasn't a radio engineer.) In some cases, minor modifications made sense and sometimes improved the usability of a piece of equipment. Other times the mods were to repair the receiver when the correct parts were no longer available (like during WWII) and the parts used came from the "junk box." Mods by more contemporary owners become unnecessary and more frivolous and less likely to improve performance.  

Compromised Originality - This TOBE receiver was modified by a ham that had no regard for what the TOBE ACR Model 35H was and just considered it something else to "cut and hack." Unbelievably, a Q-multiplier was added with the circuit based on a Q-multiplier that was in the 1962 ARRL HB! The mod added a 6AB4 tube to the chassis and had the Q-tuner enclosed in a small metal box that was externally connected to the receiver with a plastic jacketed cable. Granted, the earlier mod (or repair) that had installed the Meissner Ferrocart IF transformers probably resulted in typical IF bandwidth and a Q-multiplier would have been an easy way to gain some selectivity. But, why compound existing mod problems with even more destructive modifications? Additionally, a 0A2 regulator tube was added for a regulated +150vdc (this mod was probably because the 80 rectifier was removed and solid state diodes installed on the tube socket resulting in a significant increase in the B+ voltage.) This Q-multiplier mod installation dates from 2005! I thought by that time all of this type of destructive hamstering that endeavored to "modernize" a vintage relic had disappeared (since the very concept of "modernizing" a 1935 kit receiver 70 years later seems to go against the entire idea of collecting and preserving vintage radio gear in the first place.) Conservative, well-planned, accurate restorations that can then be used as references to how the original circuit performed,...especially when dealing with rare pre-WWII radio gear,...are much more interesting. 

NOTE:
The entire chassis top and especially underneath was filthy. Wires that obviously had the insulation eaten off were just left in the circuit. Spider webs and fibrous debris were under the wires. Greasy deposits were both on top and underneath the chassis. I've found that it's very common to find highly modified receivers where the mod-perpetrator wouldn't do anything to clean up the chassis but was intent on destroying its originality. Just disgusting.
 

The Plan - Ultimately, I'll have to "strip out" everything under the chassis, thoroughly clean the chassis, select the usable original parts, find original replacement parts where those types are missing or defective and basically start over,...same as I did with the TOBE SPECIAL. However, the TOBE SPECIAL was super clean, almost looking brand new underneath and on top. The TOBE ACR Model 35H is just the opposite and extensive cleaning is going to be required after all of the components and wires are removed (and even then it won't look very good but at least it will be clean.)


Top of the chassis showing Meissner IFs, additional miniature tube socket(s) and the modern multi-sectional electrolytic filter capacitor

If I could have located the correct "T-1" and "T-2" TOBE IF transformers, then the rest of the receiver would have been fairly easy to restore to original. I'd advertised a few times for the TOBE IFs and also have watched for "parts sets" but nothing ever turned up. The Meissner Ferrocart IF transformers were Meissner's iron-core better quality, fairly selective bandwidth IF transformers used for homebrew projects. I can easily find replacements that are closer in appearance to the TOBE IFs and are a decent quality IF transformer. I'm thinking about using T1 and T2 from a junker Hallicrafters SX-28. These would be for 455kc (but easily set to 456kc,) they have slug tuners on the side (on the side like the TOBE IFs, although the TOBEs used C-trimmers) and they have a selectable extension coil winding (not tertiary) but it's to broaden the IF passband, not narrow it. There would be two bandwidths available depending how they were connected, one broad bandwidth or one narrow bandwidth. Selecting the narrow bandwidth would probably be fairly close to the NARROW IF (Non-Crystal) setting on the SX-28.  >>>


NOTE
: It's interesting that Meissner offered a tertiary-wound IF transformer called "Triple-Tuned IF Transformer" that was exactly like the TOBE IF transformer (center f was 456kc.) I wonder why these standard Meissner Ferrocart IF transformers were installed when almost exact replacements for the TOBE-types were available. It could have been the price because Triple-Tuned IF transformers were $1.80 each and the Ferrocarts were $1.20 each.


Meissner Ferrocart IF Transformers

>>>  Anyone that owns and uses a SX-28 knows that the NARROW IF Non-Crystal is probably the most used Selectivity position of the six available on the receiver (for actual "on the air" ham band communications reception.) Additionally, I think the Halli T1 and T2 would look very close to the original TOBE types (with the exception that the TOBE logo wouldn't be present on top of the can.)

I'm sure there will be many more problems discovered as I start work on this project. The rest of the receiver might be easy to return to the original design,...but one never knows until the rework commences. Capacitors would have to be built and since I have the correct TOBE labels from the TOBE SPECIAL to copy and that would have been an easy task. I no longer have a color printer (went to a laser B&W printer.) Another possibility is the use of another brand shell since the Glenn Browning booklet states that the builder can use other capacitors as long as the values and build-quality matches the TOBE caps. The necessary resistors can be built from 1W CC JAN types, color coded BED. I've already removed the Q-multiplier tuner and cable but the 6AB4 and the 0A2 are still in place. Due to the chassis finish and the hole size, I'd probably have to use metal hole plugs when the tube sockets are removed. The chassis metal is not in very good condition with lots of rust spotting. I'm pretty sure someone in the past "over-sprayed" the front panel's original wrinkle finish with gloss black paint (to cover rust spots.)

Chassis Inspection - Observations and Problems Found

1. Band 1 20M LO coil TC buss wire broke off from coil terminal - tack soldered and a cold joint.
2. Half of the original wires are gone, replaced with plastic insulated wire. All tube filament wiring was replaced with plastic insulated wiring. Some deviations from proper layout because of the added 6AB4 tube. Many of the wiring solder joints are "tack soldered" joints. Original solder used was probably solid core with "painted on" rosin paste flux.
3. Most capacitors replaced with ceramic disks. Also, a few molded types. There are no TOBE caps left except for one of the can electrolytic filter caps that has its wires cut. Modern multi-section replacing one TOBE can filter. The two mica capacitors from the LO section of the T35H Tuner to the 6A7 converter tube are installed next to the chassis (should be vertical, over the 6A7 socket not next to the chassis and should be connected to the Tuner with 14ga solid wire.)
4. Type 80 tube not installed because solid state diodes are soldered across the tube socket (bet the B+ was pretty high.)
5. The C-type TONE control was sprayed with something like oil. It probably needs to be disassembled and cleaned in order to function as a variable-C again (surprisingly, tested and working.)
6. Volume control is a newer small type potentiometer (a half-shaft type.)
7. Six of the resistors appear to be original as supplied with the kit. All originals check within 10% tolerance. Many of the newer replacements are completely wrong value resistors, some by a factor of 100, that is, a 100K installed where the resistor should be a 1K (how did this even work?)
8. The Meissner IF transformers appear to be about 1940 vintage. The two are Ferrocart but ID'd with different numbers.
9. 6F6 installed with octal socket to replace original 42 and six pin socket (looks like a vintage repair.)
10. Plastic insulated 300Z TV twin-lead installed from Antenna input to the Tobe Super Tuner.
11. The installation of the 6AB4 tube socket was accomplished by soldering the socket mounting flanges directly to the TOP of the chassis (unbelievable!)
12. In several places components or wires are soldered directly to the chassis. Originally there were only two places, one capacitor lead and the braid from the Super Tuner chassis, that were soldered directly to chassis.
13. Standby switch circuit was changed to remove B+ from all of the tubes except the 6F6. Original standby only removed plate voltage from the oscillator section of the converter tube.
14. While the power transformer is a very close match (even the same brand,) it's not the original power transformer. This one doesn't have the 2.5vac tube heater winding. The terminal outputs are in different locations. Some evidence on the chassis that the original power transformer over-heated and failed. 
15. Inside T35H Tuner the ground connection for the 160M and 80M padding C was broken and not connected to chassis.


Underneath the TOBE ACR Model 35H - BEFORE the rebuild - "cringe-worthy" modification mayhem!
Note the two silicon diodes soldered on the rectifier tube socket. Lots of ceramic disks.
The tube socket for the 0A2 is easily visible but the tube socket for the 6AB4 is under the cluster of components just above the left-rear Tuner mounting bracket (look for the pink mica cap.)
Note the varnish residue around the power transformer mounting hole indicating a past failure.


Hallicrafters T1 and T2 from parts set SX-28. While not exactly like the TOBE tertiary IFs, they are physically similar in appearance and are adjustable to 456kc.

Pre-Rebuild Summary - It's apparent that this TOBE ACR Model 35H was used almost incessantly as a ham receiver for several years. Some non-original parts are definitely from vintage repair work. The power transformer might have come from T-D or Chicago Transformer Company since it's very close to the original type. The early "repair" that did away with the TOBE IF transformers was "design/performance-wise" certainly the most destructive. But, it might have been out of necessity due to a failure since there are indications on the chassis of heat-failure of T2. I'm pretty sure these early repairs date from before WWII.

It would probably be around that time or a bit later, perhaps post-WWII, that many of the 1930s "kit-built" receivers would have been "parted out" by their owners. The very poor survival rate of any of the pre-WWII receiver kits combined with the types of owners involved (hams) seems to have doomed most of these receivers to destruction. Those kit-radios that managed to survive the "parting out" fate later faced further destruction going though the gauntlet of "modification mania" that lasted from the early-1950s to late-1960s. While earlier pre-WWII mods may have been necessary to keep the radio functional, these later mods were attempts to "modernize" a circuit that was engineered in the mid-1930s and "supe-it-up" with newer tubes or different circuit designs. However, nearly all modification mania mayhem was perpetrated by hams, not actual radio engineers. Many times, the modified 1930s radio was then scraped since improvement goals seemed elusive. The actual work of installing mods also seemed to bring out the worst in the limited mechanical ability of the perpetrators.   >>>

So, this TOBE ACR 35H has all of the characteristics of a "survivor." It's made it to 88 years of existence on the planet. It might be in really rough shape and the dismal quality of workmanship and the filthy condition of entire set has it begging to be refurbished back to something like it was in its heyday. While some things can't be fixed, the TOBE ACR 35H can be returned to "close to original" condition,...both in appearance of the chassis and in functionality.

Plan Details - My plan is the strip the chassis of all wiring and components (in the vernacular of the HGTV "reno" programs,...a "gut job.") Then the receiver would be rebuilt per the written TOBE-Browning instructions and as the five Model 35 drawings show. Usable original components will be incorporated into the rebuild but many replica BED resistors will have to be made. Capacitors will have to be built before installation. I've rebuilt all of the capacitors for a rebuild in advance before and it really makes capacitor installation easy. Most of the original wiring cloth insulation has rotted (or was eaten,...probably both.) I have lots of good condition cloth covered wire that's very close to the original type that will be used in the rebuild. My only major deviation from original will be the Hallicrafters IF transformers T1 and T2 from a SX-28 receiver. But, with the type of rebuild this is going to be, if by some miracle, original TOBE tertiary-type IF transformers are found, they can easily be installed to bring the TOBE ACR Model 35/H completely back to its original design (and that's what happened in Oct 2023.)

Good performance from any electronic circuit depends on a good assembly using proper soldering technique, good grounds, solid mechanical connections, proper lead dress (following the drawings provided,) cleanliness and accurate component values,...NONE of that is found in this TOBE ACR Model 35H at the moment.

It's a "Gut Job"

Sept 1, 2023 - All of the power supply and audio output side of the chassis has been stripped of all non-original wires and parts. Some parts are soldered directly to the chassis and these were cut out but the solder residue will have to be removed using my ESICO #418 soldering iron. The octal tube socket was removed. Started on the RF/IF side by removing all of the new style components. New parts were cut out but vintage parts and vintage wire were removed using solder wick. If the vintage resistor was isolated and could be measured for value accurately it wasn't removed from the circuit (if the mounting followed the drawings.)

Once all of the components were removed, then the excess solder could be cleaned off so that during the rewiring the terminals will have the proper holes for correct mounting of the leads before soldering. There's so much excess solder that Solder Wick wasn't practical to use. I heated the joint and then used a small acid brush to remove the solder. This is a messy way to do it and it does require thorough cleaning afterwards but it is quick and doesn't waste the Solder Wick.

Of course, while doing this strip-out, I did have the TOBE drawings available to double-check on lead dress and component mounting. Either the original builder didn't follow the instructions or this ACR 35H has been modified so much very little originality remains.

Sept 2, 2023 - I used my ESICO #418 130 watt soldering IRON to remove the soldered in seven-pin miniature tube socket that was for the mod-added 6AB4. This 1950s vintage soldering IRON has tremendous heat capability and easily removed all of the solder that had been applied directly to the chassis. All of the solder residue was cleaned off of the chassis and then the area washed with denatured alcohol to remove the excessive smeared-on rosin. There are only two places where a part is soldered directly to the chassis and that is the braided ground strap from the T35H Tuner and the .05uf capacitor soldered to the side wall of the chassis near the detector tube. The T35H Tuner braided ground strap was soldered to the chassis in the correct spot and the side wall of the chassis "tinned" with new solder for the .05uf capacitor component installation.

Sept 3, 2023 - It was obvious that a thorough cleaning was necessary. There were signs of mice being around, not necessarily an infestation, but certainly some wire insulation munching and other corrosion spots here and there. There was a greasy film on the chassis from something. Since almost everything is stripped off of the chassis now was the time for a good scrubbing. I used WD-40 as the first solvent applied with a brass bristle toothbrush. This was worked around to loosen the grease and the grimy residue removed with a cotton rag. Next, the rust spots were brushed with WD-40 and a steel bristle brush and wiped down. Finally, the entire chassis was wiped down with lots of denatured alcohol. Some cosmetic improvement was noted but mainly a good degreasing and decontamination were the end results.

I checked the values of the original resistors that were still present (about 6 resistors.) All resistors measured within 10% and that's better than the spec (20%.) As I found with the TOBE SPECIAL, the IF Gain pot is supposed to have a fixed 500 ohm internal resistor but it actually measures 1.2K ohms (the TOBE SPECIAL measured 1.5K ohms.) This does affect the maximum IF gain setting. At least the pot is a good, usable original. I also checked though the vintage pots box and found several 500K examples that will need to be tested before installed as the Volume control.

As I was removing the last of the old wiring (grungy, eaten insulation stuff) I noticed that the front of the 35H Tuner was covered with grease and fibrous debris. Now that all seven wires that connect the Tuner into the chassis are removed, this would be a good time to dismount the Tuner for a thorough cleaning. Three of the four mounting bolts and nuts were easy extractions. The fourth had mouse induced corrosion (you know what I mean) and had to be cut off to remove. The Tuner was then dismounted from the chassis. The knobs, the logging dial pointer and the control mounting nuts were removed and then the front panel was dismounted. Corrosion wasn't too bad but any paint that was on the inside of the panel next to the chassis had deteriorated and was peeling off.

Front Panel to Chassis Mounting - Although the assembly instructions say to mount the panel directly against the chassis, I've found that the fit of the cabinet to the front panel and the dial scale to pointer clearance is much better if the controls and switches are mounted to the chassis first using a nut in front and only a lock washer inside the chassis surface. You have to make sure there are sufficient threads protruding out the front of the chassis to allow mounting the front panel using just a standard control-mounting hex nut on the control's threaded bushing. The gap between the chassis and front panel will only be about .090" and be sure that all of the spacer-nuts are about the same thickness. This will result in a much better fit for the panel into the cabinet. I don't know why the instructions indicate no spacer-nuts since they are an improvement (it could be because the cabinet was optional.) I've used this method of mounting the front panel on both the TOBE SPECIAL and on the TOBE ACR 35H.

Sept 4, 2023 - I've found the roll of NOS black cloth-covered hook-up wire. This is very close to what the original hook-up wire looked like. I've also located the black rubber insulated 16 gauge wire for the tube heater wiring. I've also found a very good match for the missing TOBE electrolytic filter capacitor (a Fletcheim and it looks very close to the TOBE in size and shape.) I found four 6-pin fiberboard tube sockets. Three were the wrong size (too large.) Luckily, the one marked as "6C6" was the size I needed. I used a brown permanent marker to color-out the engraved and white-filled"6C6" ID and then used white rub-on transfers to add "42" to the top of the tube socket. NOTE: In looking through several boxes of saved tube sockets it seems that nobody ever saved fiberboard tube sockets very much. Hundreds of bakelite and ceramic sockets but very few fiberboard sockets were found.

Closely inspected the T35H Tuner. Found the broken ground connection on the 160M and 80M padder capacitor. I had already repaired the broken buss wire connecting the 20M trimmer to its coil. Cleaned the band switch contacts with DeOxit and a brush. Cleaned the tuning condenser rotor ground contacts with DeOxit. Repaired the grid lead for the RF amplifier tube using black sleeving. Reinstalled the front panel. I checked the natural rubber cushions and unbelievably they were in great shape. Remounted the T35H Tuner back into the chassis but didn't solder the braid ground just yet. Checked mechanical alignment of the tuner installation and it was okay.

Continued to further remove all wires under the chassis. Some of the wires were in good shape, just dirty. With these wires removed, it's really easy to clean the insulation and make them look in almost new condition. I used Isopropyl Alcohol and a soaked rug. I pulled the wire through the soaked rug a couple of times in each direction. I then set them aside to dry. Afterwards, these clean wires can be reused during the rebuild (maybe.) Of course, many of the wires were eaten or rotted, so these few good ones aren't enough for the job. I'll use the NOS black cloth-covered wire to complete the wiring. The heater wiring will use 16gauge rubber insulated wire, twisted, just like I used when I rebuilt the TOBE SPECIAL (except this time I have red and black rubber insulated wires available.)


TOBE ACR Model 35H Chassis Stripped (a gut job, but it has "good bones" doesn't it?)

Sept 5, 2023 - Small Details - Installed two .625" diameter hole plugs into the seven pin miniature tube socket holes. Luckily, I have all ten of the unique tie points that are required for the rewiring the chassis to the original plans. The two tie points next to the RF Amplifier tube socket weren't installed correctly. Instructions are specific (but who read the small print on the drawings?,) the tie point that mounts to the tube socket must use a 1" long stand-off. I remounted this tie point using the correct dimension stand-off. Also the tie point next to the RF Amplifier tube socket should be mounted using a .250" stand-off but only a nut was used as a spacer. The tie point next to the Converter tube socket should have been mounted using a .500" stand-off but it only had a nut for a spacer. All of these spacers result in the tie-point mounting either allowing clearance for tube socket pins or to allow better placement of the components so that shorter leads result. I had to take the TOBE SPECIAL out of its cabinet to use as a reference to see how these small details would become important later on.

What the Five Drawings Show - Drawing #1 is the schematic of the receiver. Drawing #2 shows the mounting of the larger components onto the chassis and how they are oriented. Drawing #3 just shows the correct as designed wire installation and the correct routing of the wires. Drawing #4 just shows the as designed placement of the resistors. Drawing #5 just shows the as designed placement of the capacitors. It's stated in Glenn Browning's booklet that all of the wire and component layouts were carefully worked on during the design phase to assure that the receiver would function "as designed" when it was built "to the drawings." The TOBE SPECIAL deviated somewhat in its construction and it had a few subtle problems in performance that were corrected when the circuit was built exactly as shown in the drawings. This Model 35 was completely unlike the drawings with every circuit having no resemblance at all to the original drawings or design.

Sept 6, 2023 - The Halli IF Transformers - T1 has six wires exiting from the bottom of the can and T2 has eight wires exiting from the bottom of the can. Checking the SX-28 schematic provided the information as to the function of the extra wires. When I extracted the IF transformer assembly from the T1 can, I really didn't expect to find two extra components that ARE NOT on any SX-28 or 28A schematic. A 250pf mica capacitor and a 500K resistor. I suspect that these are connected into the SELECTIVITY switch and provide some bandwidth shaping. These two components aren't connected to the IF coils. Using a DMM to measure the DCR of the windings I sorted out the correct wires for the primary and secondary and removed the other connections and parts. I did a crude test with no loads by injecting a 456kc signal into the primary and connecting an oscilloscope to the secondary. I then peaked the secondary. I reversed the connections and injected the signal into the secondary and adjusted the primary for peak. This was just to see if coupling seemed okay and that 456kc resonance was easily found. Upon reassembly into the can, the T1 was tested again just to verify its operation.

T2 has eight wires on the IF assembly. The secondary is tapped in two places. I have to use the one connected to pin 3 of the SELECTIVITY switch which was the IF NARROW position. The primary just has a non-tapped adjustable coil and fixed C.

Sept 7, 2023 - I had to look for some correct color coded cloth-covered hook-up wire for the IF transformers. While looking, I also found some 16gauge natural rubber insulation wire in red and black. This will end up with the filament wiring looking something like the original wiring in the TOBE SPECIAL (I didn't have this wire when I rebuilt that receiver.) Found some more vintage black cloth-covered stranded hook-up wire. Two lengths are twisted pairs that can be used for the Standby switch wires and for the Articulated Dial Lamp wiring (unless the originals can be cleaned up.)

I checked the color code wires on the TOBE drawings and as expected, B+ is red, Plate is blue, Grid is green and AVC/chassis is black (the tertiary winding is yellow but I don't have that in the Halli transformers.) I wired the Halli IF T1 to have these color wires so connection into the chassis wiring will be easy.

Sept 8, 2023 - More Halli IF Transformer Stuff - The Halli T1 and T2 are not identical IF transformers. The L used in TI are relatively small with 215pf C values and, of course, L is adjustable. With T2, the L is larger and the C relatively small at 90pf. T2 was also part of the Crystal Filter and had multiple taps on the secondary for bandwidth selection. Just selecting the tap that connects to pin 3 of the SELECTIVITY switch hopefully will allow T2 to have a relatively narrow bandwidth and still allow tuning to 456kc. Both Halli IF transformers did follow the color code for the wiring so it was easy to determine which wires to use. T2 had wires that connected to pin 1, pin 3 and pin 4 is the SELECTIVITY switch and conveniently the wire colors were brown, orange and yellow (but I checked the DCR just to be sure.) With T2 out of the can, the proper wires were connected to a 456kc signal on the primary and a 'scope on the secondary and then tuned to peak. Connections were reversed and the secondary peaked. This confirmed that with the tap selected, T2 can be adjusted to 456kc. All original wires were removed and new correct color wires were installed on the terminals to be used.   >>>

>>>   Before final assembly of the Halli IFs, I gave the cans the NaOH treatment (sodium hydroxide found in Easy Off Oven Cleaner.) This cleans the aluminum and leaves a matte finish. After drying, the IF transformers were assembled and installed on the Model 35/H chassis. Three of the unique type tie points also are mounted to the IF can studs. These were the original tie points with one still having its original 100K resistor that measured 108K or only 8% off, not bad for 88 years.

With the completion of the IF transformers and their mounting, the Model 35/H is now ready to begin the wiring installation.

The "Ren-o"

Sept 9, 2023 - Tube Filament Wiring - I'm using 16gauge AC stranded wire with rubber insulation in black or red. To keep the twisted pair consistent, pin 1 on all tube sockets is wired with the red wire. Since the tubes are all five, six or seven pin tubes, the filaments are always pin 1 and then the highest number pin for the other connection (1-5, 1-6 or 1-7.)

The 80 rectifier was also wired with red and black 16gauge wire. This 5 volt winding is floating since it carries B+ when in operation. When looking at the photo to the right the red wires actually look pink (and they are.) I salvaged the wire from a new USA-made 12 conductor HV cable and the "red" natural rubber insulation was this pink color,...and it's a brand new cable. I guess pink is the new red.

I went ahead and soldered the braid from the Tuner back to the chassis (requires the ESICO #418 or any large soldering iron.)

All tube filament wiring completed. T1 and T2 IF transformers connected into the circuit.


Just getting started. Filament wiring installed. IF transformers installed.

Sept 10, 2023 - I'm making my own black cloth covered wire. The original wire is so oxidized it has to be scraped clean to tin and then I don't really know how well the "tinning" is penetrating the strands. So, I'm using new 20ga stranded wire that I can slip into the black cloth insulation "tube" that I remove from salvaged old solid wire. The "recreated" wires look just like the originals because the outer insulation is vintage excellent condition but inside it's new wire that tins really well.

I've installed many of the new wires into the power supply side of the chassis. It's fairly time consuming because each wire essentially has to be routed correctly and custom-fitted as it's made.

Sept 11, 2023 - The wiring instructions show dotted lines for the wires connecting to the Tuner. Browning thought that careless builders might damage the Tuner if it was installed during the chassis wiring and component installation. Drawing notes say the the Tuner should be mounted after the wiring is completed and only then should the dotted-line wires be installed. I've already had the Tuner out and now it's back in so I'm installing the wires to the Tuner at this time (but I know what Browning's concern was about after seeing the original wiring of this receiver.)

The IF gain pot to IF amplifier cathode wire and the Tone control to the 1st AF amplifier plate capacitor wire must be routed from the power supply side of the chassis over the front end side of the chassis. The assembly drawing says to either tape or sew (lace?) together the two wires where they pass in front of the Tuner. I used friction tape to look authentic for the time period. Unfortunately, I didn't consider the headphone jack wiring. So,...

Sept 12, 2023 - Phone Jack and Standby - The Standby switch wiring and the Headphone jack wiring are not shown on the large drawings. Likewise, the drawings in Browning's booklet don't show the wiring or even the installation of the Standby switch or the headphone jack. I checked the drawings for the octal tube TOBE SPECIAL and neither the Standby switch nor the headphone jack are shown. However, both the switch and the jack are shown on all of the schematics as "X" indicating where the components should be installed (cut the wire to install) with identification notations.

The headphone jack breaks the audio line at the 1st Audio Amplifier plate coupling capacitor and the wire that runs along the front of the chassis to the Tone control and then to the grid of the 42 Audio Output. I had already run the wire and it was taped with the IF cathode bias wire (as shown on the drawing.) I unwrapped the tape to access the audio wire. I then cut the wire to add a longer extension to be able to reach to the headphone jack. This was spliced and soldered. Then the IF and AF wires were again taped together with friction tape. The connections were made to the Tone control and then to the 42 grid. When the phones are plugged in, the audio signal comes from the 1st Audio Amplifier. The Volume control works normally whether on phones or loudspeaker. The loudspeaker, although still connected, since the 42 has no input when phones are installed, the speaker is essentially silenced.

In the case of the Standby switch, the B+ is turned off to the 20K g2 (osc. plate) resistor of the 6A7 converter tube to implement a "standby" condition. An additional small tie point is installed on the larger tie point next to the 6A7 to allow a twisted pair to be routed from the Standby switch on the panel to the tie points by the 6A7. The appropriate wiring can then be installed.

New black cloth twisted wires were used for both of these installations since the original wire was in poor condition.

NOTE: The articulated dial lamp wiring isn't installed yet. This wiring also isn't shown on the schematic and it isn't shown on any of the drawings. It was assumed the builder would know how to hook-up a lamp. I'll use a twisted pair connected to the 42 tube socket filament pins, wrap the twisted lead around the tuning shaft a couple of times, make sure that the wire "uncoils" as the tuning shaft rotates, then wire the lamp socket, install the lamp and mount on the tuning shaft.

Sept 13, 2023 - Volume Control - I found a proper vintage 500K pot to use for the Volume Control. I took the pot apart to do a visual check, clean the carbon element area and reassemble. The carbon element looked in good condition so I cleaned it with DeOxit applied with a Q-tip. Testing after reassembly showed the pot was functioning nicely. The instructions don't indicate if the Volume Control was supposed to be a linear taper or an audio taper. I would think for the time period, the original pot was probably a linear taper. The pot I installed was also a linear taper (~250K at half rotation.) This will result in a lot of gain the first 30% of rotation and then not too much gain increase for the remaining rotation. Also, the secondary return wire on the output IF transformer was too short to reach the Volume Control. I cut the wire so the splice joint for the extension wire would be under one of the tie points. I used friction tape for covering the splice (a vintage method, common in the thirties.)

Continued to install the new wiring. I installed the longest wires first since these are the most visible. The shorter wires are really easy to make and that made the last half of the wiring go along pretty fast. I'm somewhat surprised at how much wire actually is required. I've used all of one type of 20ga stranded wire and had to use about half of another type of 22 gauge stranded to finish. I only used about half of the black cloth-cover solid 16ga wire that was used for the exterior insulation sleeve. Maybe I'm obtuse but I found it helpful to mark-off the wires in pencil on the drawing as they were installed. That way I could keep track of what was installed and wouldn't miss any wires. Interestingly, neither the drawings for the TOBE SPECIAL nor the drawings for this TOBE ACR Model 35H had any markings at all - like they were never used.  

Sept 14, 2023 - All wires installed. Installed a black rubber zip cord for the AC cord. The drawing shows a cloth covered AC cord and a bakelite plug. The TOBE SPECIAL had an original rubber insulated AC cord so I installed a rubber one in this TOBE ACR Model 35H. I used vintage AC wire twisted black with yellow tracer for the connection to the AC power switch. I used friction tape to insulate the soldered junction that's necessary for the power cord to twisted AC wire.

I inventoried the original resistors. I had six original resistors that all checked within 10% of marked value. I had to repaint the 400 ohm 2W cathode resistor for the 42 (yellow body, black end, brown dot.) The remaining resistors had decent paint so they were left original. The 400 ohm was installed on the 42 socket. An extension was required since the original mounting was not like the drawing. I used a helical coil made out of 22ga TC to create a "butt joint" splice that was soldered. This type of splice is about as "unnoticeable" as a splice is going to be and yet still be strong. The 5K 1/2W resistor on the detector tube (75) socket needed to be remounted to be as shown in the drawings. Also, the grid lead to the 75 tube needed to be remounted to the lead of the 2 meg resistor near that tube socket. This was "as indicated" on the drawing and results in the grid lead being about 2" shorter, which probably helps with hum pickup since that is the grid lead to the 1st Audio Amplifier.

There are about 12 other resistors that were either missing or were wrong value or newer type resistors that will need to be replicated. For size, the JAN 1W CC are very close to most of the resistors supplied in the kit and just need to be painted in the BED code to look convincingly original.

Sept 15, 2023 - I wrote out a list of the 1 watt carbon composition resistor values that were needed. Although the drawings and the schematic shows 1/4 watt, 1/2 watt, 1 watt and 2 watt dissipation ratings in examining the TOBE SPECIAL, there are only what appear as about 1 watt resistors and two larger resistors shown as 2 watt on the schematic. Examining the B&W photo of the wiring of the Browning 35 shown above it also appears to use mostly 1 watt size resistors. So, I went through the boxes of carbon resistors to find JAN versions in 1 watt dissipation. The reason for selecting JAN types is they tend to be very stable, don't drift in value and are high-quality parts. The standard resistance values were changed during WWII for JAN applications. For example, in the 1930s, 50K was a standard value. For JAN one has to use 47K, 51K or 56K. 250K was a standard value in the thirties but with JAN one has to use 220K, 240K or 270K. So, I try to keep the values within 10%, if possible and 20% maximum deviation from specified value.

Measure and Paint - The next step was to confirm the value by measurement. JAN resistors are reliable for not drifting but it's always good to check and make sure. Also, there were a couple of values that I couldn't find in 1 watt JAN so I had to use 1 watt in standard consumer brand CC resistor. These had to be checked to confirm value. The next step is to paint the resistor in the Body, End, Dot or BED code. I use the small glass bottles of Testor's hobby-type paint. Sometimes I'll use a "paint pen" if I have the correct color (especially good for the ends and the dots.) If the resistor is a 240K but it's going to be used where a 250K resistor originally was, I paint the resistor with the 250K color code or body=red, end=green and dot=yellow. After the paint dries, the resistor can be installed.  >>>

>>>   In order to be somewhat efficient at painting the code on the resistors, I installed all the resistors onto a piece of cardboard to hold the resistors upright. I then wrote on the cardboard next to each resistor what value-code should be painted on that resistor. Since the resistor body has to be painted first that would cover up the original JAN band code, so that's why the marked cardboard,...to keep track of which resistor is which until the code is completely painted. I know,...OCD.

Sept 16, 2023 - Completed painting on the color coding for the replica resistors and they will be ready to install as soon as the paint has completely dried. A few hours later,...I installed all of the replica BED resistors. There were ten replicas, six originals and the four original 100K resistors in the T35H Tuner bringing the total number of resistors used in the receiver to 20 (so half are replicas.)

I hate to admit it but I made a wiring error at the 6A7 socket. Luckily, there was a 20K that needed to be connected to pin four and I had two wires already connected there that should have been connected to pin 3. But, it shows that mistakes happen and paying attention during all phases of construction will usually bring about discovery and the error can be corrected easily.

Sept 17, 2023 - What to do about Capacitors? - There's no doubt that creating "TOBE" capacitors would be a major headache. First, I can't really find cardboard tubing small enough to make the shells. Paper straws in "mega-size" (.5" diameter) are about the closest but they are biodegradable so I can't really consider them stable enough to use. Pyro tubing (for fireworks) have walls that are too thick so the OD ends up about .75 inches. But, making the shells is just one headache. Making the "TOBE" labels requires a color printer and all I have is the B&W laser printer. I could probably go to Office Depot and make the color copies there but I'd have to remove some of the original labels from the TOBE caps in the TOBE SPECIAL for copying - major headache, since that receiver is a completely restored example.

Glenn Browning states in his booklet, "Around the World," that if the builder wanted to use a different brand of capacitors (other than the TOBEs) that would be fine as long as the values were the same and the quality equal to the TOBEs. Also, T-D offered experienced builders all of the parts for a TOBE ACR Model 35H purchased individually or in various "packages." That could have resulted in a TOBE receiver that would be very different than the typical assembled "complete kit" but still a believable 1935 construction possibility.

I'm thinking that since I don't have the original TOBE IF transformers, why am I worried about having TOBE capacitors under the chassis? I can use vintage Cornell-Dublier TIGER capacitor shells since they are about the same physical size that the TOBEs were. The key to having the chassis looking somewhat authentic is to have ALL of the caps match. IF by some miracle, I later find the original TOBE IF transformers, I can always install the TOBE labels on the TIGER capacitors at that time. Well,...I did find a pair of original TOBE IF transformers,...more on that further down.

Sept 18, 2023 - I sorted out the required capacitors in C-D TIGER types. I'll melt out the original capacitor just leaving the shell. I use a hand-held heat gun to melt the wax and extract the capacitor. The shell is then wiped with a paper towel while it's still hot (to remove any excess wax from the shell.) This time of the year, I can do this messy, smelly job outside, which is nice. Fourteen paper capacitors are used in the circuit along with four mica caps and four electrolytic caps.

I installed the articulated dial lamp. I used 22ga black rubber insulated twisted pair wires routed around the dial pointer shaft making one loop and then is routed down past the Tuner to the filament pins on the 42 socket. The only thing to watch is that the "coil" around the dial pointer shaft does wind and unwind correctly while tuning the full range. Also, the position of the slide-in dial scale ends up being between the dial pointer and the dial lamp so the position of the lamp has to be adjusted to allow enough space so that the lamp won't burn the dial scale when lit.

Sept 20, 2023 - Melted out all of the capacitor cores to salvage the C-D TIGER shells needed. I'm doing the restuffing a bit different this time. I'm not using any bee's wax. I'm using all hot-melt glue. In checking a few things, the capacitor in the T35H Tuner is shown as a .02uf on the schematic. The TOBE SPECIAL has an original TOBE .01uf capacitor installed. It's the 2A Tuner, but I don't think that mattered. The value isn't critical since it's just a bypass on the AVC/ground side of the grid coil for the Antenna/RF amp input section. On these TIGER shells, I'm not going to coat the exterior with Bee's Wax since there might be a possibility that TOBE labels could be added in the future. Also, I can't really find colored hot-melt glue so I'll try using a brown marker (furniture touch-up markers) to make the clear glue look like wax.

In checking the values of the mica capacitors that were installed, two were very close and one was within 20% and the other was either defective or was off by over 100%. The pink mica cap definitely has to be painted. 

Sept 21, 2023 - Building Replica Caps - Sorted the new polyfilm capacitors that are going to be installed into the vintage TIGER shells. These are the "yellow jackets" that are commonly used for rebuilds. These are actually a very good quality capacitor despite their terrible appearance. I first wrap the polyfilm caps with masking tape to increase their diameter so they will stay in place inside the shell. I mark the orientation with a slight bend in the left side lead (as viewed with the writing right-side up.) Then hot melt glue is flowed into each end, one side at a time (let one side solidify and then do the other side.) I let the glue cool for a couple of hours. Then I used a brown marker to color the hot melt glue to look like wax. The caps were then ready to install. I have to say that just doing hot melt glue works really well. I used to top off the ends with bee's wax and then coat the entire cap with bee's wax. That step can be skipped by coloring the hot melt glue after it's cooled. NOTE: I know there are colored glue sticks but I never seem to be able to find brown available (although one time I did find "eatable chocolate" hot melt glue sticks.)

I installed all of the replica paper-wax caps into the chassis. Since the TIGERs are slightly longer than the TOBE caps, sometimes it was difficult to fit the capacitor in the proper orientation and proper position. But, while difficult, it wasn't impossible. I came up short one .05uf cap. I had counted six and made six replicas but seven .05uf caps are required. I had forgotten about the AC line bypass. Easy to make one more and install.

For the cathode bypass capacitors, I'm going to use 18uf 50volt solid tantalum capacitors. Tantalums are known for their long-life and reliability. Four other remaining caps required that need to "stuffed" into vintage shells are the two cathode bypass caps and the two can electrolytics. Additionally, there are four mica capacitors to install. Two micas that are from the LO section of the Tuner to the Converter tube have to be mounted vertically next to the Converter tube and 14ga buss wire is used for connection on each mica.

Sept 22, 2023 - Built up one .05uf TIGER cap. Installed to complete the TIGER paper caps. I couldn't find any vintage electrolytic shells that were even close for cathode bias use. I decided to just utilize two .05uf  C-D (non-TIGER types) shells. I melted out the insides and then I used an X-acto knife to scrape all of writing off of the shell except for the outer shell band. I then added + sign on the opposite end of the band. Installed the tantalum capacitors into these shells. If I end up making TOBE labels for the other caps, I'll make TOBE labels for these cathode bypass caps too. 

I painted the "pink" mica cap brown so it would look vintage. Checked the spare mica caps box to find a 100pf mica that was closer than the 86pf that was installed. Found a 101pf to install. The 100pf and the 2000pf (former pink one) had to be installed using 14ga buss wire so that the two micas can mount vertically over the 6A7 tube socket.

The "Finish-up"

Sept 23, 2023 - Getting the TOBE ACR 35H Operational - It's been three weeks working on this project and all that's left to do are the two electrolytic capacitors. I'm impatient to see how this rebuild is going to function, so,...just temporarily,...I tack-soldered two new 10uf 450v electrolytic capacitors into the circuit. This allows powering up the receiver and sorting out any problems. Once the receiver is working, it won't take too long to rebuild the can electrolytic capacitors to complete the rebuild.

I had to install the original IF amplifier tube grid clip that was still on the Meissner IF transformer. I connected the Wright-DeCoster 1000-B speaker to the receiver and a short 10 foot long test antenna. I brought the receiver up relatively slowly using a Variac and watched the plates of the 80 tube for a purple glow that would indicate a heavy load (I could have also measured the DC resistance of the B+ line to chassis and if it measured >5K ohms that would be considered normal.) No shorts indicated.

Alignment and Minor BFO Problem - Power up went okay. Since the IF transformers aren't aligned I didn't expect much. I could hear the audio stages and switching noise if the band switch was operated. I connected a RF Signal Generator to the 6A7 grid (capacitor-coupled) and applied a 456kc modulated sine wave. Nothing heard, so I swept the frequency and found a response around 500kc. With a little "back and forth" by slowly lowering frequency and then resonating the IFs, then lowering the frequency some more, resonating, etc., I was able to adjust the IFs to 456kc with the result being lots of audio output in the receiver loudspeaker. The TOBE receivers have the BFO tube in front of the 1st IF transformer adjustments but the BFO tube can be removed while doing the IF alignment and re-installed afterward. I was on 80M and switched to 160M, output was down considerably but still audible. 40M was apparently "dead" as was 20M. I swept the frequency ranges with the signal generator and found the the LO tracking was way off on ALL bands except on 80M. Tuner alignment was necessary. Next, the BFO didn't function at all - nothing. BUT,...I haven't tested the tubes yet, or even measured any voltages. So, this was just a preliminary test to see if "generally" the receiver worked.   >>>

>>>  BFO problem was an open filament on the type-76 tube. I installed a good tube to correct that problem and then adjusted the knob on top of the BFO coil shield can for approximately zero beat on the IF. Good level of injection. I wonder if the 2005 modifier that installed the Q-multiplier (which can oscillate and allow demodulating CW) installed a bad 76 tube so the actual BFO was disabled? Maybe. At any rate, I tested all of the tubes and all checked as "used-tested good."

The 80M band apparently had been aligned so it was tracking pretty close. The other three bands weren't aligned or even close to tracking correctly. 160M was okay on LO adjustment but the Ant/RF stage was way off. The 40M was way off on all adjustments. The 20M band was even worse. Since 40M and 20M were working, I just had to increase the RF signal generator output level, find the signal and then bring the trimmers down to the correct adjustment. For final alignment, the signal generator has to be set to the very lowest output level that can be heard in the receiver. With only one RF amplifier, a strong input signal will likely result in some images that will confuse the alignment (especially on 20M.) Using the lowest level signal input will generally result in very weak images that usually aren't heard.

Operation - After alignment, the TOBE ACR 35H worked well on all four bands. I went to a larger outdoor antenna since the little ten foot wire was limited. One half of the collinear array, that's about a 225' wire antenna, was connected as an "end-fed wire." It was a mid-afternoon on a weekend so 40M had a lot of stations on. Demodulation of SSB signals was good. All controls work correctly except the Standby switch. I'll have to examine the way I wired that in. There aren't any specific instructions so I worked off of the schematic but maybe I missed something.  UPDATE: The tie point where the LO plate load (g2) was actually a two terminal with a link. These two points needed to be separated for the Standby switch to work. Easy. UPDATE: I switched to the full collinear array antenna and touched up the alignment of the 20M band again. Copied CE3WB in Chile and a very strong LW (Argentina) station. Lots of CW SE Coast stations for SS. CW is clean sounding. Stability is not the greatest but it doesn't affect copy. It's not nearly as stable on 20M as the TOBE SPECIAL with its air trimmers in the LO (although the problem is probably with the BFO coil or those connections inside the BFO can.) Tuned in an AM net on 40M that was from the Midwest. Good signals from W4s and others. 80M AM stations had tremendous signals with excellent audio. The 40M and 80M SSB signals could be demodulated if the IF gain was kept low, which is normal. In all, the TOBE ACR 35 seems to be working great.

A couple of alignment notes: - The padder adjustments for 160M and for 80M do very little. They can provide a slight change in the lower end frequency adjustment of the tracking but the dial readout is so vague that there's very little point in trying to get "to the kilocycle" accuracy when the dial only shows 100kc increments. That's probably why the TOBE SPECIAL 2A Tuner alignment instructions don't mention the 160M and 80M padders.

The use of compression trimmer capacitors will make setting the LO very "touchy." I had to use a plastic screw driver to adjust these trimmers since a metal screw driver skews the actual oscillator frequency. I don't know how long these compression trimmer adjustments will hold their setting since expansion and contraction due to temperature changes and then mechanical flexing or "bumps" can all affect the permanence of the setting. It's not hard to touch-up the alignment at any time since the stock TOBE cabinet has openings underneath to provide access for this very reason - one doesn't even have to remove the chassis from the cabinet.

T35H "Amateur Tuner" Layout - This page of the documentation was missing from the paperwork included with this receiver. Substituted was the drawing for the TOBE Super Tuner. The TOBE Super Tuner (T35) was for the Browning 35 and since there are only trimmer capacitors used in that tuner, these trimmers aren't shown in the drawing. For the Amateur Communication Receiver, the T35H Amateur Tuner is needed and it has series padding capacitors for 40M and 20M that are mounted along side the trimmer capacitors. The written instructions do tell how to identify the trimmer capacitors from the series padding capacitors but the correct drawing is much easier to use (the trimmers are mounted directly over the associated coil.) I've included a copy of the "complete" drawing (shown to the right.) The "unmarked" compression capacitors are the "trimmers" and these are adjusted at the upper end of the frequency coverage or the high frequency end of the dial. The "series" or "S" padders are only on the 40M band (band 2) and the 20M band (band 1) and these are adjusted at the lower end of the frequency coverage. The series padders for the 80M and the 160M bands (bands 3 and 4) are located on the rear apron of the tuner and accessed from the back of the receiver through the large hole on the rear of the chassis. 


T35H Tuner Alignment Layout

Restuffing the Electrolytic Capacitor Cans - I used the same procedure to restuff the electrolytic cans that I used when doing the same job on the TOBE SPECIAL. The only difference is one of the cans I'm using this time is a Fletcheim but inside it's just about the same as a TOBE, so it was also easy to restuff. Everything else was just like how I did the electrolytics for the TOBE SPECIAL.

Reconditioning the Gloss Paint - Short of a total repaint, nothing is going to look perfect. The rust at the bottom of the panel was probably the reason for the gloss black overspray job. I tried a rub-down with denatured alcohol. This sometimes will dull the gloss. The rub-down did reveal some of the paint chips and some of the rust spots but that's okay since it shows the receiver's history. The alcohol also did reduce the gloss a little so what's left of the over-spray looks like an old attempt at "rust protection." I gave the cabinet the same rub-down.

Chassis Underneath - The photo to the left shows the underneath of the chassis of the TOBE ACR 35H after the rebuild. All paper wax capacitors are Cornell-Dublier TIGER shells with polyfilms inside. The wiring follows the assembly drawings exactly and the placement of the components also follows the assembly drawings exactly. Of note are the two mica capacitors that are mounted vertically over the Converter tube socket. 14 gauge solid copper wire has to be used for the connections from the LO section of the tuner in order for the mounting to be mechanically stable. Note that the chassis mounted electrolytic capacitors are different. The one of the left is the TOBE while the one on the right is a Fletcheim type. Both have modern 10uf 450volt electrolytic capacitors mounted inside. The cathode bypass electrolytic capacitors are unmarked vintage shells with the band indicating the negative connection (18uf 50v Tantalum inside each.) Note the twisted wire from the standby switch. This switch isn't shown on the assembly drawings so installation techniques will probably vary. I made this one like the Standby installed in the TOBE SPECIAL. 

The goal of the rebuild was to have the chassis appear "believably authentic" and look like it was assembled in 1935 per the instructions,...just not using TOBE capacitors (Glenn Browning mentions this option in his booklet "Around the World.") Also, to have the receiver function similar to the TOBE SPECIAL and it does that pretty well. However, the TOBE SPECIAL has the advantage of the 2A tuner with air variable trimmers in the LO for much better stability and ease of alignment. Plus, that receiver has eight metal-octal tubes in its circuit.

If you have sharp eyes you'll notice that the front panel is mounted directly to the chassis. It was obvious that there was a poor fit of the receiver chassis and front panel into the cabinet with this type of front panel mounting. A day or two after this photo, I added the control nut spacers to move the front panel out from the chassis about .090" and that really improves the fit of the receiver into the cabinet. I had used this mounting method on the TOBE SPECIAL about seven years earlier.

Chassis Topside - These two photos show the deviations from original on the top of the chassis. The most noticeable are the two Hallicrafters IF transformers but these transformers do have a very similar appearance to the original TOBE IFs. The first IF transformer has its adjustments facing the BFO tube. This is the correct and the original way the TOBE IF transformer was oriented.

The other somewhat obvious deviations are the two hole plugs that cover where the two seven pin miniature tube sockets were installed. There really just wasn't any good way to fix the "hole damage." 

If you have sharp eyes, you'll notice that the tube shield cap on the BFO tube is marked "75" and, of course, it should be the "76" cap (it's installed on the detector/1st AF tube.) >>>

Overall the impression I tried to present is that the chassis is original with perhaps a few period replacement parts for repairs and then with the typically found age-oxidation problems due to decades of existence in the humid conditions found in coastal locations. Despite its appearance, the chassis is very clean. It has been washed with WD-40 and a small brass brush, then Glass Plus to remove the WD-40 residue. That was followed by a wash with denatured alcohol using an acid brush. It's as clean as old cadmium-plating can get without doing a complete re-plating job.


Performance Comparisons to the TOBE SPECIAL: One of the difficulties of this comparison is the basic condition of the two receivers. The TOBE SPECIAL looks like it was very seldom used. There's no wear, no indications of long hours of use,...it's like the receiver was built, used a few times and then stored away in a box that was kept in a closet inside a house. On the other hand, the TOBE ACR Model 35H was practically worn-out with use. The original power transformer had apparently burned up leaving varnish residue around the mounting area. It also looks like the TOBE IF T2 had burned up with some heat indications where it mounted. It appears that the ACR Model 35H was built, used extensively for several years (probably up to WWII,) repaired many times and finally put away in a shed or basement where further damage happened with the ingression of moisture, arachnids and rodents. Finally, years later, attempted repairs and thoughtless modifications created further damage. Besides the condition differences, there are the differences between the 35H Tuner and the 2A Tuner to consider. In addition to those differences there's the fact that the TOBE SPECIAL uses eight metal-octal tubes in its circuit and the TOBE ACR 35H uses seven glass tubes in its circuit.


1935 TOBE Amateur Communication Receiver Model 35H aka Model H    2023 photo, S-10 12mp, no flash

Sensitivity - The ACR 35H is very sensitive, especially on 80M and 40M. Sensitivity is down somewhat on 20M. The TOBE SPECIAL performs about the same with quite a bit more sensitivity on 20M. Excellent performance on 80M and 40M. With either receiver I use a large wire antenna with an antenna coupler (tuner) for maximum received signal levels.

Selectivity - The ACR 35H has average selectivity. I measured it on 80M using a signal generator and tuning from center out each way until the signal couldn't be heard. I got 4kc each way indicating an 8kc band width at -20db. So, that's very close to the specs (in fact, slightly better since the specs indicate a 10kc bandwidth at -20db) so the Halli IF transformers set up for NARROW IF seem to work very well as substitutes for the TOBE tertiary winding types of IF transformers. The BFO can be set slightly higher or lower than "zero beat" with the IF to achieve better CW selectivity. Also, a higher beat note of 800hz to 1000hz helps CW copy. Also, there's the "regenerative IF" option that Browning suggests.

Stability - The TOBE SPECIAL is very stable and that's probably due to the 2A Tuner and the air trimmers in the LO section. The ACR 35H has good stability in the AM mode and drift isn't really noticed. But, it's not really very stable in CW/SSB. There are random slight frequency changes that are only noticeable in CW/SSB and are most noticeable on 20M. Although the BFO is almost certainly the cause, the 35H Tuner in this ACR-35H receiver doesn't look like it was built very well. Most of the sloppy solder joints are just barely above "tack joints." It's very difficult to believe that it came from Toby Deutschmann that way. So, CW/SSB stability is good on the lower bands but 20M is most affected with occasional minor frequency excursions of a few hz. But, further testing revealed that a fairly long "warm-up" improves the stability. As the receiver was used more and more this stability problem settled down and eventually went away. Probably switching, tuning and using the receiver helped to eliminate contact problems and improved stability.

BFO Mod - Another observation was that the BFO harmonics are tuned in around 7.2mc. It's a pretty strong and noticeable signal. Browning suggests that if the BFO harmonics are a problem that the user should install a 1K resistor between the cathode of the BFO tube and the BFO coil tap, change the BFO plate load from 50K to 500K and add two 0.1uf filament bypass capacitors. Full mod shown to the right. As the description mentions, receiver wiring and the type of 76 tube are factors in this potential problem. The TOBE SPECIAL, with metal octal tubes and a 6C5 as the BFO tube, doesn't have this problem but the ACR-35H, with the type 76 glass tube, does. At the time period of this mod, the only reason for the BFO was to demodulate CW and the BFO injection is usually kept quite low to keep the BFO from "masking" weak CW signals. Nowadays, we want to listen to SSB signals that require quite a high level of BFO injection for reasonable demodulation. It's possible by increasing the plate load resistor by a factor of ten the resulting BFO level might be quite low,...perhaps okay for CW but it might be a real problem for modern SSB that's already challenged by the non-adjustable "max" RF gain when in the CW/SSB mode.


BFO Harmonics Modification


A Pair of TOBE Tertiary Coil IF Transformers Found

IMPORTANT UPDATE: Oct 19, 2023 - UNBELIEVABLE FIND! - A "super-junk" Browning 35 receiver chassis with T35 Tuner showed up on eBay. No cabinet, no front panel,...it was only the chassis and it had been "hacked" almost beyond recognition. I was just about to "click off" of it when I noticed that BOTH TOBE IF transformers were still mounted on the chassis. I didn't think I'd ever come across a junker TOBE-Browning receiver that could provide the correct IF transformers for my ARC-35H sn: B1062,...but here it was! I looked very carefully at the photos (of which there were several nicely focused shots) and the T2 transformer looked all original. T1 transformer looked original but maybe with replaced wires, the three trimmer caps were present and the correct type of nuts were present so the assembly looked original except for the wires. Very fairly priced since the guy knew it really was a "junker" but might have useful parts. The T35 TOBE Super Tuner, while present, was missing the shields. UNFORTUNATELY the T35 was also missing the 6:1 inline vernier reduction mechanism. Almost everything else on the chassis had been replaced with 1950s era components.

Oct 24, 2023 - The Browning 35 "junk set" arrived today. I photographed it to show what it looked like "as received" since I was going to remove the IF transformers. The photo is shown to the right. It can be seen that the two IF transformers are correct. As to why T1 has the TOBE logo and T2 doesn't,...the TOBE logo is "ink-stamped" and the logo is there on T2 but it's very faint indicating that it was probably washed off during past rework to the transformer. I dismounted T2 first since it had its original wires. I carefully marked the connections on small pieces of blue masking tape and applied those to the wires for identification. I tested T2 when it was removed and it tested good. I then removed T1 and since it didn't have its original wires I just clipped those wires and didn't bother identifying them since I had T2 for a reference. I tested T1 and it also tested good. The next step is to disassemble each IF transformer for cleaning, checking the solder connections and installing new (but original type) wires for connecting the IF transformers into the TOBE ACR-35H.


The "junker" Browning 35 showing the TOBE IF transformers

Oct 25, 2023 - I disassembled each of the IF transformers and they are both original. The transformers mount on a large ceramic base that houses the three trimmer capacitors. The coils are mounted on a single form supported on each end with the three coils spaced about equally on the form and directly over the associated trimmer capacitor. Wires from the coils are soldered to the trimmer capacitor terminals and the hook-up wires also attach to the same terminals (or to duplicate terminals with the same connections.) On T1, apparently the repair of this transformer involved gluing the ceramic base that had broken in half at about the center. It looks like Duco Cement was used for the repair so it is fairly old. The break is across the tertiary trimmer. A quick test will indicate whether or not the trimmer changes C value. The tertiary winding is a parallel LC so at resonance the impedance will be infinite. By connecting a low level 456kc sine wave to one end and looking at the other end with an oscilloscope, a change should be seen on the 'scope at resonance which would indicate the C trimmer is working. I could also just disconnect the coil and just use a C meter and adjust the trimmer to verify it works (that's probably easier.) I wouldn't bother except that there's some glue residue on one side of the trimmer so a test is required to see if that glue is affecting adjustment. T2 is in excellent original condition.

Oct 26, 2023 - For testing the tertiary trimmer C in T2 I disconnected the coil from the trimmer. I then connected C-tester which indicated 80pf. I adjusted the trimmer down to <50pf and up to 125pf, so it does work correctly. I reset the trimmer to 80pf.

I installed NOS cloth-covered with correct color codes (stranded wire inside) to replace the incorrect wires on T1. Also, to replace the darkened original wires on T2 (the wires were the correct color code but after 88 years they all appeared to be black or dark brown.) Cleaned the IF shield-cans to remove some sort of amber discoloration (smoke, tar, nicotine?) The cleaning allowed the TOBE logo to just be visible on T1. T1 had a non-original hole in the top of the IF shield-can that had been for an added ground lug for a shielded grid wire (a mod.) I used epoxy to fill the hole and then colored the epoxy silver to match the shield-can.

I installed the IF transformer assemblies into their proper shield-can to complete the check-out, new wire installation and cleaning. These IF transformers are now ready to install into the TOBE ACR-35H receiver.

Oct 27, 2023 - I had to remove the Halli IF transformers from the ACR-35H chassis. When I modified these Halli-IFs I installed the correct color code wires. When removing the Halli transformers I clipped the wires but left about an inch or so for identification of wire location. I still got out the TOBE drawing as a "double-check" and to confirm that the tertiary winding was connected to chassis ground on both TOBE IFs. I then installed the TOBE IF transformers onto the ACR-35H chassis and routed the color-coded wires to their approximate location. This installation was easy and only required unsoldering the old clipped wire, cleaning the solder joint if needed and then installing the new TOBE IF wire. Of course, the TOBE IF wires had to be cut to the proper length, the ends stripped and tinned before installation. After the installation was complete, I "double-checked" the connections and straightened any of the components that I had to move slightly for the "R&R" of the IF transformers.

Testing - I connected the W-D 1000B loudspeaker to the ACR-35H and connected the RF signal generator through a 0.1uf capacitor to the Converter tube (6A7) grid. I tuned the signal generator to 456kc but not much was heard. The IF transformers seemed to be set around 470kc. Returning the signal generator to 456kc, the amplitude output was increased until a signal was heard in the receiver loudspeaker. Then, as each trimmer was peaked, the signal generator amplitude was reduced. I set the tertiary trimmers to "peak" on 456kc.

WOW! What a difference the correct, original TOBE IF transformers make. This TOBE ACR-35H is like a totally different receiver now. That is, a lot better and very much like the TOBE SPECIAL. Lots of gain on ALL bands, including 20M. I was picking up lots of 40M signals on just a 50 foot wire laying on the floor. Then I switched over to the tuned Collinear Array and it was just incredible. I went to 20M and luckily there was some sort of contest going on. Signals everywhere. Many were so strong I had to reduce the IF gain to minimum for proper demodulation (and this was on 20M!) But, the average 20M SSB signal could be received fine with the IF gain moderately advanced. The only change in the receiver is the replacement of the Halli IF transformers with the original type TOBE IF transformers. The gain and sensitivity improvement is dramatic, especially on 20M.

Some of the stations heard on the 20M DX Contest,...

P49Y - Aruba
PY2NY - Brazil
JA3YBK - Japan
PX2A - Brazil
XL3A - Ontario, Canada

also, prefixes heard,...
CN3 - Morocco
PE7 - Netherlands
CE3 - Chile
CM3 - Cuba
also, lots of USA hams

Contests always bring out a lot of stations and DX contests are the best for lots of activity. The day after the contest band activity was way down but I still copied ZS1UOK out of South Africa Q5-S7.

Further Observations - As expected, with a large tuned antenna, the IF gain has to be at minimum to demodulate SSB signals and even then many will distort, and this is on 20M. The IF overload is rampant on 40M or 80M SSB signals. This is normal for the TOBE receivers that were really designed to use a 50 foot untuned end-fed wire as the antenna. A tuned antenna system can use the antenna tuner to "detune" the antenna to reduce distortion or use an in-line RF attenuator between the tuner and the receiver. See "No Receiver is Perfect" further up in the TOBE SPECIAL restoration section for an analysis of the problem and non-invasive solutions. Also, the stability problem has been eliminated. Just normal drift now. The BFO output has really settled down. It could be that the receiver just needed some hours of operation with the normal switching, adjusting and tuning to clean the contacts. Also, the BFO tube was in-and-out of its socket for a few different IF alignments (maybe that cleaned the socket contacts.) Anyway, a terrific overall improvement.

Two views of the TOBE ACR-35H SN: B1062 showing the original type TOBE tertiary IF transformers now installed.

Installing the Halli IF transformers got this receiver working fairly well and looking much better than it had looked when found. But finding and installing the correct TOBE Tertiary IF transformers has made this TOBE into a NEW receiver with dramatically improved performance. Even the chassis appearance, though still "spotty" and having two hole plugs, is now looking close to original.

If I ever run across an original deluxe dial escutcheon, I'd have to do a new black wrinkle paint job on the front panel.

And, maybe the next Browning 35 I find won't be a "junker."

 
Wrap-up for both the TOBE SPECIAL and the TOBE ACR 35 - In a day when the SWL might have wanted a brand new Scott or McMurdo Silver but could only afford a radio kit receiver, the Browning 35 filled that niche and provided unexpectedly good performance. The Browning 35 would easily beat any of the typical broadcast-entertainment radios that happened to have a couple of shortwave bands. When the Depression-era ham might have dreamed of owning a new National HRO or a new RME-69 but could only afford a ham radio kit, the TOBE Amateur Communication Receiver was an alternate route that could provide a good, usable ham receiver for a lot less than half the price of the factory-built receivers. Since most dealers would offer the HRO or the RME for very little money down and monthly payments to cover the purchase, most hams opted for the commercially-built receivers. But, those hams on a tight, Depression budget, or perhaps just habitually frugal, decided on the ham receiver kit.

Neither of these TOBE-Browning receivers ever achieved a renown position in "Hamdom." In fact, very few hams have ever heard of Tobe Deutschmann. Only some have heard of Glenn Browning. These receivers didn't sell all that well in the two years they were available. Most that did sell (and were built) never made it much past WWII without being "parted out" by the very hams that had assembled them perhaps a decade earlier. If the "kit receiver" made it past WWII, then it might have fallen victim to modification mayhem and have been tinkered-with until it was no longer capable of functioning correctly,...and then it was parted out. Certainly the problems of operating the TOBE receivers in the CW mode must have led to a lot of modifications. To have survived 88+ years on the planet and still be in one piece (more or less) is a miracle. The Tobe Deutschmann-Glenn Browning receivers are rare today because they had to survive the gauntlet of hamster activity that usually involved a lot of "cutting and hacking" to implement mods that were installed with very little actual circuit analysis, design experience or mechanical ability.

Today, radio collectors tend to ignore kits,...and for good reason! Most kits are fraught with problems that might have been in the circuit since the day it was built. This is compounded by decades of amateur repairs and modifications that have left the receiver circuit non-functional and totally unrecognizable when compared to the original schematic. Then there's the expected lack of performance from a necessarily simple circuit. Why waste time restoring something that won't work very well anyway? But, some radio kits were different. Some kits provided pre-aligned assemblies for the complex sections and left the easy stuff for the kit builder. These are the receivers that are capable of good performance. The question today is,...does the restorer want to spend a lot of time doing what I did to the TOBE SPECIAL and the TOBE ACR 35H? That would be a total strip-out of all wiring and parts in order to completely start over and build the receiver exactly to the assembly drawings and instructions. From my results, I think it's the only way to accomplish the "error-free professional level of assembly" that allows the circuit to perform as originally designed. And then, to be able to accurately assess what the receiver was capable of doing back when it was new. I had fun doing these two "complete rebuilds" and the "Two TOBEs" are now enjoyable to use. It's always a pleasant surprise to tune-in a rare DX ham station on 20M using a mid-thirties kit-built receiver and with either TOBE receiver that happens a lot! 


1936 TOBE SPECIAL with Wright-DeCoster 1000-B Loudspeaker

 
References:

1. Glenn H. Browning - booklet - "Around the World! and with the New Single Control Browning 35 with the TOBE Super Tuner" - despite the lengthy title, this small booklet of just 23 pages contains all of assembly instructions, operational instructions, suggestions for successful shortwave reception and even has the assembly drawings besides several graphs and photos. Text details on the design and performance. Alignment instructions for builders that have access to a quality RF signal generator. Since it's a booklet, the drawings and particularly the schematic are greatly reduced in size - magnification required.

2. Tobe Deutschmann Corporation - Complete Assembly Instructions & Drawings for the Browning 35 Seven Glass Tubes Version, drawings and 8 pages of written instructions with schematics and assembly drawings. Five large drawings specifically for assembly of the seven glass tubes version. The written assembly instruction pages would specifically be for either the Browning 35 or the Amateur Communication Receiver but the five large drawings are for the Browning 35 with different "sets of five" drawings for either the seven glass tubes version or the eight metal octal tubes version. The only difference in wired assembly between the SW receiver and the Ham bands only receivers would be the type of tuner installed. Of course, the kit ordered would have the specific parts necessary for the receiver to end up as the Browning 35 Short Wave Receiver or to end up as a TOBE Amateur Communication Receiver. 

3. Tobe Deutschmann Corporation - Complete Assembly Instructions & Drawings for the Browning 35 Eight Metal Tubes Version, drawings and 12 pages of written instructions with schematics and assembly drawings. Five large drawings specifically for the metal tube version of the Browing 35. The written instructions I have are for the Amateur Communication Receiver with details included on the 2A Tuner along with other Tuner details, schematics and 2A drawings which accounts for the extra four pages of written instructions.

4. Glenn H. Browning - "The Browning 35 -All- Wave Receiver" - Short Wave Craft magazine July 1935 issue. Article on the receiver design "stage by stage" with schematics, graphs and drawings. Mostly the same material that Browning has in "Around the World!" Header photo (quality is awful, I used it in the TOBE ACR 35 Restoration section above after a lot of Photoshop manipulation) shows the Browning 35 without the large fancy dial escutcheon (just the small oval logging scale plate for the band switch position and tuning log.) Apparently, there was a second part to this write-up that covered the detector and audio sections. Probably in August 1935 issue.

5. Time Magazine - June 22, 1942 - Article on Tobe Deutschmann Corporation in the Manufacturing section, titled "Tobe Gets Terrific" - good details, some history but mainly about WWII filters - available Online

6. Canton Citizen - Dec 9, 2017 - True Tales from Canton's Past - Honor Village by George Comeau, details Tobe Deutschmann's "Honor Village" post-WWII veteran housing project - available Online

7. Daily Times Chronicle - April 15, 2019 - "Electronics Pioneer Glenn Browning put Winchester on Radio Map" by Ellen Knight - detailed bio of Browning and Browning Laboratories - available Online

8. Browning Laboratories - Website - The "company history" section of this website has several Browning-Drake receivers pictured, also Regenaformers. History of Glenn Browning's involvement with National Company, Inc.

9. Glenn H. Browning - Feb 1935 issue of RADIO magazine has an article by Glenn Browning about the Browning 35, mainly on the TOBE Super Tuner. First part, second part might be in the next issue. This article contains the only photo I've been able to find of Tobe Deutschmann. It's very poor quality. - available Online at worldradiohistory.com  . Clayton Bane (Technical Radio/TecRad fame) was editor of RADIO.

10. Tobe Deutschmann - "SERVICE" magazine, Dec 1935 - "Profits in Old Set Conversion using Modern Methods" - three-part article written by Tobe himself on how to use good condition older radio cabinets and install the Browning 35 and Wright-DeCoster speakers for "new sales" of a profitable creation. The radio cabinets used were an old RCA-Victor RE-32 and a General Motors 120. - available Online at worldradiohistory.com

11. Radio Builders' Tabloid - More than likely, this is a Tobe Deutschmann produced advertising paper. It was printed in Braintree, Massachusetts. The paper I have was sent to Harvey's Radio Shop in NYC. Four pages of details on the Browning 35 design, especially a lot on the mechanical details and the testing done at T-D on the Super Tuner. Graphs, the schematic, the parts list and the normal accolades. This is the only place that I've read a "hint" on how the tertiary IF transformers and how the TOBE Super Tuner were tested and aligned at the factory. A very informative paper. Probably dates from early 1935 because the price for the Browning 35 is only $39.90. The Amateur Communication Receiver is only briefly mentioned and nothing is shown in the price list for purchasing the TOBE ACR 35H. Also, the deluxe dial escutcheon isn't shown in the price list.


Appendix

The National Co.,Inc. - Browning-Drake Regenaformer Receiver Kits
 

The Regenaformer was a very popular receiver and National Company sold a lot of the kits that consisted of the Regenaformer Coil with Air-variable Condenser, the Antenna Coil with Air-variable condenser and two matching Type A "Velvet-Vernier" dials. It was also possible to purchase a pre-drilled panel and a finished cabinet along with an adjustable balancing condenser. At first, the builder had to provide the remainder of the parts to construct a complete receiver. Later, complete kits were available. Some builders used the Browning-Drake Regenaformer circuit and didn't bother with purchasing the kit from National Company. They used other types of "low-loss" coils in their construction. Since the true Browning-Drake coils were mathematically designed and built accurately to that design, it's doubtful that using the typical "low-loss" spider-web coils would perform as well as the coil sets intended for the Regenaformer receiver. See photo to the right.

The Regenaformer tuner uses a 199 tube for the RF amplifier and a 199 for the Regenerative Detector. Browning used the 199 tube because of its low inter-electrode capacitance. Apparently, the useful life of the 199 tube was rather short compared to the 201A tube, so many later variations of the Regenaformer used 201A tubes. There was a special component that was supposed to take the place of the Balancing Condenser if 201A tubes were used (called a Phasatrol.)


This is a Regenformer Circuit but not using the National-Browning-Drake coils. Rather, this builder used low-loss spider web coils.

The initial Regenaformer Kit was only a tuner-detector comprised of the RF amplifier and the Regenerative Detector circuits. It was assumed that the builder would know how to construct a two-stage audio amplifier to provide loudspeaker volume, if that was desired. The first version advertised was a bread-board receiver-tuner. While its output could probably drive a set of 'phones, it would require two stages of audio amplification to drive a horn speaker. The early instructions show such a two stage AF amplifier on the schematic but the components weren't included in the kit. The early tuners intended to cover the AM-BC band but, in 1924, that band hadn't officially been created. At that time, 400 meters and 360 meters were the official wavelengths for broadcasting. But, most broadcasters didn't adhere to their assigned wavelengths due to interference from other broadcasters. These stations couldn't venture too close to 500kc since that was the Internationally recognized emergency frequency and the 200M ham band started at 1500kc, so the AM-BC band just "grew into" the range of 550kc to 1500kc. That was made "official" in 1925. Since the Regenaformer was designed in 1923-24, the lower end of the tuning range is around 500kc and the upper end barely makes it to 1300kc. The National "straight-line frequency" tuning condensers help to "spread out" the upper end of the tuning range.

Performance is typical of a 1924 regenerative detector battery set. There's a lot of interaction between the regeneration setting and the detector and RF amp filament settings. The Balancing Condenser connects the detector grid coil tap to the RF grid input. This C can be adjusted for very little C and then, with less feedback, the detector will oscillate fairly easily. If no oscillation is desired, then the Balancing Condenser can be set to a rather high C providing more feedback and then it will be difficult (if not impossible) to get the detector to oscillate. Most BC listeners didn't want the oscillation but did want the increased sensitivity of regeneration so the Balancing Condenser was set to a level of feedback where rotating the Tickler provided increased sensitivity but not so much that the detector would break into oscillation. The adjustment was really only good for a set up on a favorite station because any change in tuned frequency or changing the filament control setting would upset the entire "balance" and either no increase in sensitivity would be noted when adjusting the Tickler or the detector would break into oscillation at some setting of the Tickler (in relation to the filament settings.) Like almost all 1920s regenerative detector receivers, the Regenaformer is "touchy" and has a lot of interaction between the various adjustments. Best performance depends on the listener only having one favorite station that can be "optimized" for best reception.

The example shown is an early Regenaformer kit incorporated into a complete receiver. The cabinet is commercially-built, purchased piece. The mahogany formica panel was purchased and fits the cabinet correctly. The panel was drilled by the kit builder and shows an amateur level of workmanship. The chassis is made of poplar wood painted black. I believe that the builder had some plans to follow since the layout is very good. The builder used BradleyStat compression variable resistance controls for the filament adjustments and these three variable R controls operate fine. The ON-OFF toggle switch unfortunately was defective (a shunt was installed across the switch.) Originally, the radio used Lyric-Rauland S-500 interstage transformers but the extreme weight of these transformers and the total lack of packing inside the radio allowed the Raulands to break loose from their mounting (wood screws in soft wood) and hurl around inside the cabinet doing extensive damage to the chassis, breaking all four tubes and breaking the front side edges of the cabinet during the shipping process that went from Connecticut to Nevada. For the rebuild, one of the Raulands was open and I didn't have a matching replacement (I did have a Rauland somewhere around here, but I couldn't find it.) I decided to rebuild the entire receiver, repairing the damage to the Regenaformer coil (mostly bent coil windings that had to be straightened and then reseated into their grooves) and installing two matching Thordarson interstage transformers. Since the Rauland connections were on top of the chassis and the Thordarson connections are under the chassis the rebuild in the audio section was extensive (I had to fill all of the original holes with wood filler and repaint. Then drill new holes.) Since the new connections were under the chassis, the rewiring was fairly extensive but I used vintage lacquer sleeving and 16 gauge buss wire to have the rework look authentic. Incidentally, the seller felt very badly about the shipping damage due to lack of packing correctly and issued a "full refund" - not that the radio was very expensive, it wasn't - but it was the thought that counted.


Return to Index-Home Page


Radio Boulevard
Western Historic Radio Museum

 Vintage Radio Communication Equipment Rebuilding & Restoration Articles,

 Vintage Radio History and WHRM Radio Photo Galleries

1909 - 1969

- 60 years of Radio Technology -


This website created and maintained by: Henry Rogers - Radio Boulevard, Western Historic Radio Museum © 1997/2025