Radio Boulevard
Western Historic Radio Museum

Rebuilding the R-390A Receivers

Brief History  -  Assessing your Receiver  -  Disassembly

The Main Frame  -  The RF Module  -  The IF Module

The AF Module  -  The Power Supply Module  -  The PTO

Front Panel Restoration  -  Alignment  -  Performance Today

Miscellaneous Info on Variants and Accessories,

Restoration logs for:
R-390A built from Spare Parts, (2) 1967 EAC R-390A Receivers
Collins R-648/ARR-41, Collins R-389/URR MW,LF,VLF Receiver
Recreations of: Arvin R-725/URR, ASA Motorola R-390A,
Clark AB/NSA Black Panel R-390A, USMC OD Panel R-390A


by: Henry Rogers WA7YBS/WHRM

     PART 1 - History, Assessing your Receiver, Main Frame, RF Module, IF Module, Audio Module, Power Supply, PTO, Front Panel Restoration, Meters


     PART 2 - Other Details, Contractors List, Receiver Alignment, Expected Performance, R-390A Diversity Operation, Building a R-390A from Spare Parts, (2) 1967 EAC restorations


      PART 3 - Recreations of Famous R-390A Variants: Arvin Industries R-725, Army Security Agency/NSA R-390A, Clark AB/NSA Black Panel R-390A, USMC Olive Drab panel R-390A


      PART 4 - R-389 Restoration - WARNING! This write-up contains "Extreme OCD" detailed information and it's long, Dynamotor R-648/ARR-41, R-392 Info, Other R-390 Variants,   Security Dial Cover, CV-979 and CV-979A Cabinets


1963 Western Electric R-392/URR

The R-392 was used in the GRC-19, a portable 100 watt transmitter-receiver combo. The circuit is essentially a scaled-down R-390 with +28vdc the only voltage required.

PART 4

Restorations of Other Receivers in the R-390 and R-390A Family, Variants, Accessories


R-389/URR - LF Receiver

I really thought that meticulous attention to detail was a "good thing." The R-389 is a mechanically complex receiver but everything seemed to be going along just fine until I discovered the VFO oven had been turned on and had probably been on for decades - every time the receiver was powered-up. I thought turning off the VFO oven and thereby reducing the heat would be a "good thing." I found out that was only the beginning of problems that have been on-going for a couple of years now. Well,...read on,...

I had been hearing about this R-389 for a long time. It belonged to WX7M Patrick, who lived in Wellington, Nevada. When asking anyone locally about R-389 receivers, I'd always get "Patrick's got one but he won't sell it. He wants to make a lightning detector out of it." This went on for years. Finally, I heard through the "SNARS grapevine" (that's W7SSB, my old friend Don) that Patrick had been asking around about prices on R-389s and what his was worth. A call to Patrick in Wellington set up a visit the next morning. Wellington is a small town at the south end of Lyon County (south of Yerington, Nevada.) Anyway, it took a little over an hour to drive there from Dayton. Patrick's immense house even had a complete authentic Irish Pub inside but the R-389 was located in a storage room under the house accessed through closet doors in the basement. The R-389 wasn't in the greatest shape but it was complete except for lacking the correct meters, minus the top and bottom covers and no AC power cord with the military connector. I was told that it sort of worked, so $700 later I left with the R-389.

Basic Description - Electronics - Built along some of the same lines as the famous R-390 receiver, the Collins R-389 is essentially the LF companion receiver of the R-390. The receiver tunes from 15kc to 500kc in one tuning range and 500kc to 1500kc in the second tuning range. The R-389 uses very complex methods, both electronic and mechanical, to achieve its complete MW, LF and VLF coverage while still utilizing a 455kc IF. The receiver uses 36 tubes within five modules that interconnect and are mounted within the main frame. The 15kc to 500kc tuning range utilizes five permeability-tuned RF bands. The 500kc to 1500kc tuning range utilizes two permeability-tuned RF bands. The motor-driven band switching occurs seamlessly as the receiver is tuned from the lowest to the highest frequency within the two tuning ranges.

Two RF amplifiers are used and the first conversion mixes the incoming RF signal frequency with the VFO (470kc to 1955kc output f) plus the 10.455mc Crystal Oscillator (8.5mc to 9.985mc resulting f) to achieve a 10mc IF. The second conversion mixes the 10mc IF with the same 10.455mc Crystal Oscillator to achieve the 455kc IF. This double conversion scheme was to allow complete coverage from 15kc to 1500kc with no gaps in the frequency coverage. Additionally, since the two mixer stages are 180 degrees out of phase, any drift within the conversion mixers is cancelled leaving only the VFO drift. This is similar to how the "drift-cancelling" Wadley Loop operates. >>>


photo above: R-389/URR SN: 268 installed in a CY-979A mobile table cabinet

>>>  From the second mixer circuit on, the R-389 utilizes the same modules that are found in the R-390. That would be the six-stage IF module, the two channel audio and electronic voltage regulator circuit module and the power supply module. Although the PTO (VFO) looks exactly like that found in the R-390, it's very different inside and tunes (in two ranges) from 470kc to 1955kc.

Mechanical Details - The manual tuning of the receiver RF front end uses clutch-coupled gears to rotate the main RF tuning shaft that has worm gears that perpendicularly engage and rotate the gear-driven front and rear line shafts that have worm gears that in turn engage gear-driven vertical screw-shafts (cut with forward and reverse threads) that raise and lower the various slug racks. This gear-driven system seems like it would be fairly heavy to manipulate but with proper (lightly oiled) lubrication it operates with no more effort than a good condition, clean, well-adjusted R-390A gear box. Since the frequency ranges span a great deal of the spectrum (and this requires a lot of knob-turning) a clutch-coupled, motor-drive tuning system is provided. A separate motor-drive system is employed to operate the bandswitch. There are specific frequencies, that as the receiver is tuned past that frequency, the motorized bandswitch operates and automatically changes to the next higher or lower band as required. 

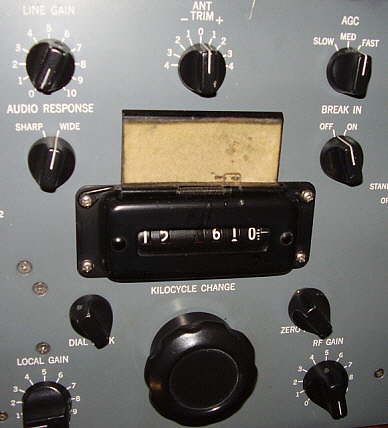
The Veeder-Root counter is somewhat different than that used in the R-390 and provides two sets of digits, one for 15kc to 500kc (lower set) and the other for 500kc to 1500kc (upper set.) The resolution of the digits (tuned f) is to the tenth of a kilocycle (which are the red background digit wheels.) Neither a calibration oscillator or an antenna trimmer are provided (or needed.)  >>>

>>>  Most of the controls are the same as those found on the R-390. The BFO controls, the Noise Limiter, the Local Gain, Line Gain, Line meter range switch, RF Gain, AGC switch, Break-in switch, Audio Response switch and Function switch. The controls that are unique to the R-389 are Motor Drive, IF Bandwidth (five ranges instead of six,) RF bandwidth KC indicator and the single tuning knob. The two meters perform the same functions as the R-390 meters, that is, Carrier Level and Line Level.

More Details - Physically, the R-389 is the same dimensions as the R-390 and will fit into the CY-917 or CY-979 table cabinets. If installed into a table cabinet, the top and bottom covers should be removed. The receiver weighs 82 pounds but, for easier moving (e.g., up or down stairs,) the power supply and AF module can easily be removed and then the receiver weighs around 65 pounds.

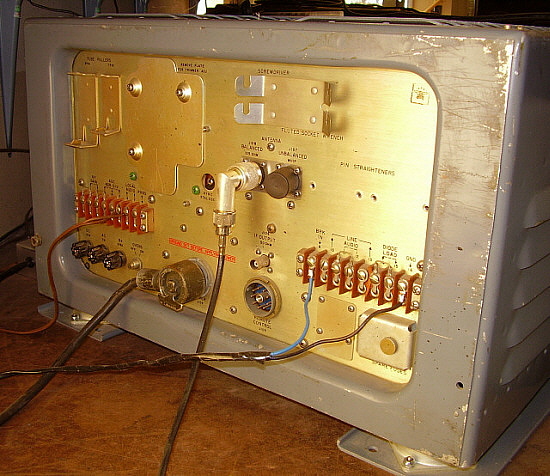
Two antenna connectors are available. Balanced input for 125 ohms input impedance from dipoles or other balanced antennae. Balanced is connected to the primary winding of each antenna coil. Unbalanced input is for random length wire antennae. This input is capacitively-coupled through a .01uf capacitor to the RF amplifier coils. The Unbalanced input impedance is not specified but is probably fairly high assuming that end-fed wires were probably the design target Z. The Balanced input utilizes a "Twin-ax" two-pin coaxial connector and the Unbalanced input utilizes a "C-type" coaxial connector. As mentioned, no antenna trimmer is provided so the antenna impedance should be somewhat matched to the particular antenna input used.

Both audio outputs, Local Audio and Line Audio, are 600 Z ohm outputs and can provide about 500mW on Local and about 10mW on Line. The phone jack doesn't disconnect the audio output (LOCAL) from its respective load. There is a series resistor and a load resistor to the PHONES jack to keep the audio level (5mW) from over-driving the headset if the proper 600 Z phones are used.  

The AC power connector is a four-pin military connector that is keyed and held in place with a central screw that has a fold-down, wing-type handle. There are at least two different types that fit,...sort of. The original (CX-1358/U cable + connector PN) connector has a small round cylinder-shaped housing with a cable exit tube on the side. This type will fit in almost any orientation and can be used if the receiver is installed into a table cabinet.  

There is also a large square housing with the triangular top type that will only fit in one orientation that won't interfere with the terminal strip or the fuse housing. Although this later and larger connector will fit and can be used, it isn't the original type.   >>>


photo above
: Top of the R-389 showing the RF module and IF module mounted in the receiver. The RF module has the slug racks located under the cover. The two tubes showing thru the opening are the two RF amplifiers. Located under the shield cover are the nine slug racks that comprise the seven tuning ranges and tuned mixer and VFO buffer stages. The Crystal Oscillator and first mixer is the to the left and the second mixer is to the right. The IF module is identical to the type used in the R-390 receiver and is located on the left side of the top frame.

>>>  Unlike most other LF and VLF receivers, the R-389 doesn't have any fixed-circuit audio restrictions within the audio module other than the switch-selected Broad-Medium-Narrow. Selecting Broad results in a fairly wide audio bandwidth. Medium is shaped for voice with noisy conditions and Narrow is a bandpass filter at 800hz for CW. The IF bandwidth can be restricted down to 100hz. Both 100hz and 1000hz IF bandwidths use a crystal filter that's onboard the IF module. The 2kc, 4kc and 8kc IF bandwidths are determined by the IF transformers and Q-resistor set-up. For static bursts and other types of atmospheric noise, the dual positive-negative noise limiter is available. When tuning in the AM BC range, the receiver's bandwidth can be increased to 8kc and BROAD and, with no other specific audio restrictions, the resulting audio isn't too bad. However, the audio is more-or-less communications-grade audio so don't expect high fidelity because it isn't. Most listening on LW will usually be using a headset. Most listening on the AM-BC band will be on loudspeaker.

Only one contract for R-389 receivers, Order 14214-PH-51-93, was issued in 1951. The build rate was slow so most R-389 receivers were actually built from 1952 up to about 1955. Total build was 856 receivers.

Rebuild is Necessary - After using the R-389 for a few weeks it's become apparent that this receiver has not been "gone through" in decades. There apparently was some minor work performed about ten years ago that involved the meters and the dial bezel. However, no thorough inspection or any rework or alignments have been performed for quite a long time (well-over ten years.) Sensitivity is poor, not even close to spec (2uv.) The motor-drive sometimes "bogs-down" indicating either poor mechanical alignment or lubrication problems (too much grease, as it turned out.) Most of the worm gears and shafts that require lubrication are located under the RF module which has to be removed to perform the lube job. Per the manual, any lubrication should be very light coatings applied with a paint brush with the excess removed afterward. So, as this project gets started I will insert additions regarding the progress here in this section of the R-390A webpage.

Rework started March 11, 2018.


photo right
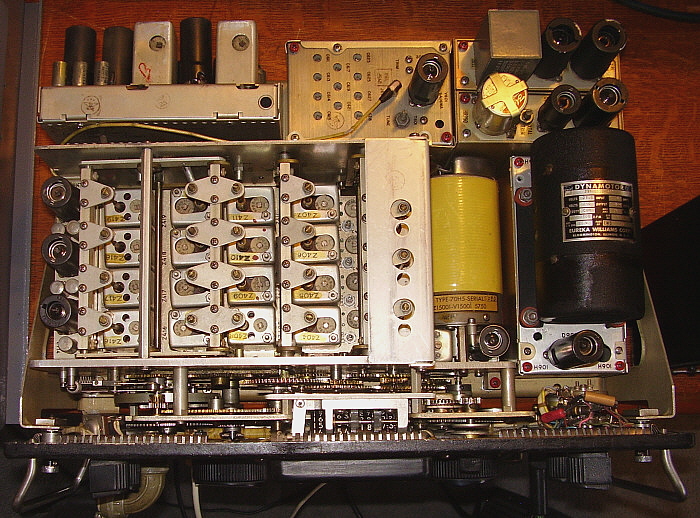
: Bottom of the R-389 showing the Power Supply module on top, the VFO in the center and the Audio and Electronic Voltage Regulator module on the bottom. Motor drive system is directly behind the front panel. The large rectifier (green with fins) is part of the motor-drive power supply. The long metal arm directly behind the tuning knob is the motor-drive clutch actuator that is cam-driven from the MOTOR TUNE control on the front panel. The three coaxial cables behind the VFO are the inputs from the antenna box (two for the Balanced Antenna input and one for the Unbalanced Antenna input.)

Work Performed Before Servicing - One of the first things I did to the R-389 was to remove the solid-state diode mod to the power supply. The four plate resistors had been removed and these had to be replaced. I installed four 47 ohm 2 watt CC resistors and then removed the two diodes that had been soldered to the rectifier tube sockets. Two good 26Z5 tubes were inserted into their respective sockets. Upon reinstalling the power supply I noticed that the receiver seemed to have less gain. I checked the regulated +180vdc and it measured +179.6vdc which is close enough. The rectifier output voltage is not used anywhere in the receiver. Only the regulated +180vdc is used throughout the circuitry for high voltage. I had also obtained an original power cable for the R-389 which, as an original, didn't have the three-wire grounded cable or plug. At this point, since the receiver performance was very poor, it was decided to thoroughly inspect, de-mod, test and align the receiver.

R-389 Restoration Log (Started March 11, 2018)

This probably isn't really a "restoration" but more of a full and complete "servicing" of the R-389. Includes the removal of any "non-military" modifications in order to return the circuit to the original design. Before starting it's worth noting that the receiver does function - not to spec, but it does receive signals. This indicates that most circuits are working but probably not aligned where needed. The R-389 is a very mechanical type of receiver and this servicing will probably include not only electronic alignments but also mechanical alignments.

March 11, 2018 - Disassembled receiver by pulling all modules. Power Supply, Audio-Regulator and IF module are easy. RF module requires dropping front panel. Like the R-390A, the gearbox is integral to the RF module. Only the frequency that the receiver (RF module) is tuned to has to be remembered when doing the reinstallation because the VFO (PTO) remains in the main frame.

March 12, 2018
- Finished dismounting the RF module. Inspection of the line shaft gears showed that some type of black grease was used. It's probably Molybdenum-grease. Excessive amounts of "multi-purpose" grease were used in the gearbox. Like the R-390A gearbox, the R-389 gearbox really doesn't need any grease and copious amounts of grease will just trap dirt and then "harden" over time. The manual states that "no lubrication is better than too much lubrication." A light coat of 10W machine oil is all that's necessary. After all, you wouldn't grease a clock's gear work,...right?

March 13, 2018
- Started removal of the excessive grease. I used WD-40 as a solvent to remove and clean the areas on and around the line shafts of the moly-grease used. This required several "cleanings" to remove all residue. Started removing the excessive multi-purpose grease in the gearbox. Anything that rotated was "greased."

March 14, 2018
- Grease, grease and more grease. Some of the grease in the gearbox is as hard as candle-wax. I'm having to scrape it off in some places. I'm using WD-40 applied with a small paint brush but this doesn't hardly touch the hardened grease. I switched over to a small wire brush and WD-40 which removes the hard grease much better.

March 15, 2018
- Used WD-40 to "flush" the gearbox and that got it very clean with all of the hard grease gone. Cleaned all of the threaded rods that comprise the slug rack lifters. The manual Frequency Change still seemed "heavy." I readjusted the motor-drive clutch and discovered it was adjusted to "full engagement." This had the motor-drive clutch turning with the manual tuning. Once the clutch was adjusted to "slip" when manual tuning, the "heavy" tuning was gone and the gearbox "feel" was very much like a clean R-390A gearbox. Also, the slip-clutch in the tuning knob had been adjusted to "full engagement" because of the heavy tuning. The slip-clutch was adjusted to be engaged with manual tuning but to "slip" if any binding or other drag occurred in the entire tuning mechanism. The problem was caused by all of the grease creating so much drag in the gearwork, the motor-drive clutch had to be in full-engagement to get the motor to turn the gears. The slip-clutch in the knob needed to be in full-engagement to turn both the drive clutch and all of the grease.


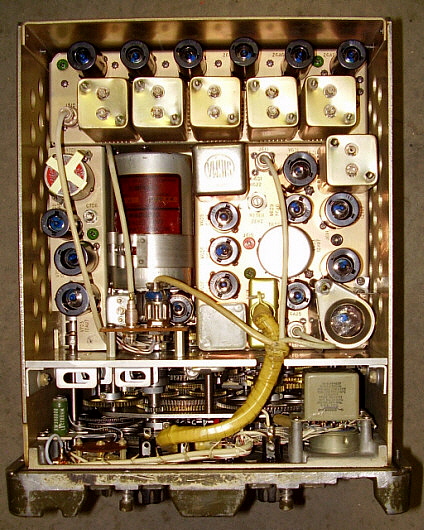
photo above: Under the RF module after cleaning off all of the grease. Note the two line shafts that drive the gears that turn the threaded shafts that raise and lower the nine slug racks. The motor-drive bandswitch is in the center of the chassis with the gear drive at the very rear of the module. The motor for the motor-drive tuning is in the lower right of the photo. Note the date on the motor - Sep 10 53.

March 17, 2018 - Checked Antenna Relay Box connectors because when operating the receiver, Balanced Antenna didn't seem to work. Found connector J110 center pin damaged on Antenna Relay box. Also, found mating connector, P110 also had center pin bent.

March 18, 2018 - Dismounted Antenna Relay Box and removed bottom plate. I could see that the Balanced Input wiring had been changed from original. The mod has the Bal. Ant. connector wired to go to the output BNC connectors IF the receiver is turned off. When the receiver is turned on, then the Bal. Ant. input is connected to chassis ground. The reason for this mod seems to be prevention of using the Bal. Ant. input. Check April 4th for correction.

March 19, 2018 - Mod to B+ fuse and HV winding CT found. This mod removed the wires from the B+ fuse holder and soldered them together to eliminate the fuse in that circuit. Then the power transformer CT (pin  6) was disconnected from chassis ground in the power supply module and a wire routed from the CT to pin 15 (unused in ps) of J-118. This pin 15 P-118 connection was originally to the DC 20A fuse but was now routed to the B+ fuse holder and then to chassis-ground (on the Local Audio ground terminal.) This mod may have been installed because of the power supply module conversion to solid state rectifiers. It's likely that the "instant on" HV to the electronic regulator circuit tended to blow the 3/8 Amp B+ fuse. With the mod, fuse blowing would be at the power transformer HV winding current draw rather than at the output of the HV rectifiers to the input to the voltage regulator circuit. The mod also changed the fuse to 3/4 Amp.

March 20 - April 3, 2018 - I had to set aside the R-389 project temporarily. A Collins 32V-3 was acquired that needed testing, servicing and clean-up. I'll get back to the R-389 when the V-3 is completed (a few days, hopefully.)

April 4, 2018 - Well, two weeks (two other projects in addition to the V-3) and back to the R-389. De-mod'd the Power Supply by removing wire CT to pin 15 J-118. Reinstalled the correct bare 14 gauge, "tinned-copper" (TC) wire from chassis to both CT pins on power transformer as original. This completed the Power Supply.

Correction - Checked the Antenna Relay Box again and found that it is correct and original. The relay contacts are actually for grounding the antenna inputs when Break-In is actuated.


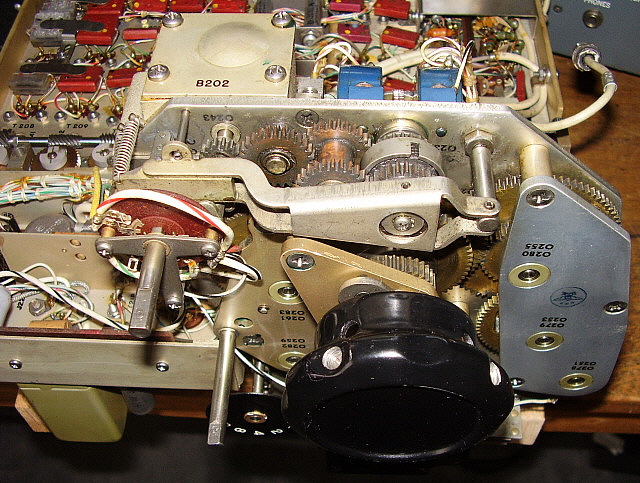
photo above: The gearbox after cleaning out all of the dried grease. The tuning knob has a built-in slip-clutch that's adjusted by the four recessed screws in the flutes of the knob (two screws are visible in the photo.) Behind the knob is the motor-drive clutch that is engaged when the motor drive switch is turned. This pushes down the lever which pivots against the adjustable standoff to the right and presses the clutch in which then drives the gears for motor tuning. Manual tuning is accomplished with the tuning knob and runs the gear train if the motor drive clutch is disengaged (that is, receiver not in "motor drive.") The tuning knob does "spin" while motor drive tuning.

April 5, 2018 - The B+ fuse mod had actually broken the side terminal off of the DC 20A fuse holder. I had to remove the TC (tinned-copper) wire and the large gauge stranded wire from the to rear terminal in order to remove the broken fuse holder. I located a duplicate of original, good condition, original fuse holder to install.

April 6, 2018 - Removed all wires from non-original connections. Cleaned, straightened and re-tinned all lead ends. Installed DC 20A fuse holder and connected and soldered original wires. Re-wired B+ fuse to now have the original connection to the HV rectifier output. Cleaned all "mod writing" off of the back panel using WD-40 and "Goof-Off." This completed mod removal on the Main Frame.

April 8, 2018 - Performed the check on the mechanical alignment for the RF module. This check involves setting the lower frequency readout to specific frequencies and then checking the height that specific slug racks have been raised. All checks are verifying the each of the nine slug racks are at their maximum lifted height and also at specified heights from the top of the RF coil shields at the specified frequency readout. There are silk-screened frequencies and lines that measure the specified height on the back of the rear panel of the RF module. The test starts at 14.8kc and goes through eight other settings ending with 565.0kc. Though the written procedure is in the manual, it's easier to just use the silk-screened information on the back of the RF module. All nine slug racks were at the proper height at the specified frequency. This check only assures that the slug racks are traveling correctly. The electronic alignment will assure that the slugs themselves are at the correct position for accurate gain tracking.
April 10 - 14, 2018 - Another distraction. This time it was checking out the W6MIT-built "1625 Rig" - a homebrew transmitter. Acquired on April 10 and had it "on the air" on the 14th.

April 15, 2018 - Back to the R-389. I double-checked some of the RF module mechanical alignments just to verify that everything was correct. Cleaned up some residual grease and splatter that I'd missed earlier. Cleaned the Main Frame bedplate. Cleaned the Veeder-Root counter and repainted the decimal point. Reinstalled the RF module into the Main Frame. This has to be carefully done because there are four cables that have to be routed through holes in the bedplate as the module is lowered into place. The position of the module has to be slightly moved so that the three bedplate captive screws thread in along with the two side screws and the one rear screw. When all six screws have been partially threaded into their pem-nut receptacles then all of the screws can be tightened. Don't over-tighten. Just snug is enough.

Mounted the front panel. The only unusual item to remember to install is the spring-loaded shaft that couples the Frequency Range switch to the mechanism that operates the dial mask. There is a steel brace that screws between the bottom of the RF module at the gearbox to the Main Frame that has to be installed. There are eight 10-32 FH screws that mount the front panel to the Main Frame that have to be installed. The motor drive power cable has to be plugged in. The two harness connectors have to be plugged into the RF module. The three antenna coax cables that come from the RF module and are routed through the Main Frame have to be plugged into the Antenna Relay Box. The remaining coaxial cable connects to the VFO.

I noticed that several of the knobs were the incorrect size for where they were installed based on the panel nomenclature size. I referenced the manual artwork and the manual front panel drawing to install the correct size knobs in their proper locations. Went to my R-390A spare knobs box to find nice condition replacements as needed.   

April 16, 2018 - Touched-up the chips on the knobs that had problems. Not all had chips. About five needed touch-up. I used black nitrocellulose lacquer applied with a small brush.

I found a correct style, good condition Line Level meter on eBay. This was cleaned up and installed. Apparently, when the original R-389 meters were removed the meters were "chopped" out with a cold chisel. On both meters, three of the mounting screw holes had paint scraped off however one hole on each meter mounting was severely "gouged" with a huge aluminum burr that prevented the meter from setting flush against the panel. I used masking tape to protect the panel and then used a file to remove the gouge's deformed metal to allow the meters to mount correctly. Once the Line Level meter was installed, the wires were soldered to the terminals. NOTE: It's odd that the original meters would have been removed for radiation since the original R-389 meters didn't have radium coated needles or scales. I've found out that this isn't true. All R-389, R-390, R391, R390A, etc. meters had the radium-phosphorus mix applied to the pointer and scale. Although the phosphorus in the coating can become depleted and not "glow" (age and exposure to sunlight depletes the phosphorus,) the radium in the mix remains radioactive for centuries (radium's half-life is 1600 years. Full details in Part 2 "Carrier Level and Line Level Meters.")

More grease! This time on the VFO front gear driven switch. Also the oldham coupler was all greased up. The only reason for the grease on the oldham coupler is to hold it in place while installing the VFO. Only a very small dab is necessary on one side only. Once the greasy mess was cleaned up, the VFO was installed. I had set the frequency to 780kc (no particular reason but it's easy to remember - KOH's freq) so, since the VFO position wasn't moved and the RF module was set to 780kc, then the oldham coupler was in the correct position to allow the VFO to mount easily. The VFO is mounted with five captive screws. (I later had to actually synchronize the VFO for the correct output frequency of 470kc at 15.0kc.)

Installed the Audio Module and installed the Power Supply Module.

There was a brass blade screw used on the front panel to mount one of the resistor boards. Replaced this screw with the correct stainless steel flat head Philips screw.

Cleaned IF module as it seemed to have a light coating of oily dirt on it. Installed IF module and connected the three coaxial cables and the power input plug.

The R-389 was now ready for power-up, testing and electronic alignment.

Powered up the R-389  - Everything is working. Motor drive is now fast and not bogging-down at all. Manual tuning is very light and feels like a clean R-390A gear box. Seems like there's a lot more audio now. Operated the receiver for about an hour. Tuned AM-BC KOH, then went to 60kc WWVB and 24.8kc NLK. Alignment is next after several more hours of "burn in."
 

photo left: The RF module with the cover removed. The two tubes between the slug racks are the RF amplifiers. Note the motor-driven bandswitch behind the tubes. The two left-most slug racks tune the VFO and Mixer Output Stages and Output Coupler. The remaining seven slug racks tune the bands 15kc-27kc, 27kc-56kc, 56kc-128kc, 128kc-255kc, 255kc-500kc, 500kc-855kc, 855kc-1500kc. Below the slug racks are the 34 RF transformers. Four for each band (28,) four for the output coupler and two for the VFO-Mixer output. Note the threaded rods that lift the various slug racks and the associated return springs (visible in the foreground openings.) The threaded rods are gear-driven by the two line shafts that are below the RF module chassis.


HINT: There are two 6BH6 tubes located under the left-most slug rack. It is impossible to remove these tubes for testing unless the receiver is tuned to the highest frequency on either tuning range - 500kc or 1500kc. That lifts this slug rack to its maximum height and allows easy access to these two tubes.

April 18, 2018 - Ran the R-389 for a couple of hours. I'm sure this receiver was rarely operated by its former owner. It was in a small storage room located under the house when I picked it up. I believe that getting some "hours" on it will help reveal any latent problems and should result in a better alignment.

April 19, 2018 - Aligned the IF module. 455kc IF transformers slightly off. Gained about 1 vdc on Diode Load after 455kc IF transformer adjustment. Crystal Filter off quite a bit, especially the core adjust that equalizes the output on the .1kc and 1kc positions. AGC adjustment off quite a bit. About one full turn of the adjustment to attain maximum AGC voltage. Ended up with increase of +10db on CL meter. Performed the alignment on the VFO output stage, the Injection Mixer stage and the Output Coupler stage. This requires a RF probe and VTVM to monitor the test jack level and adjust for maximum output. The RF signal generator is not required because the circuit's crystal oscillator is used as the signal source.   >>>

>>>   Alignment was fairly close but still some improvement was gained. Another note,...this was a good test for the motor drive system because alignment points are at the extremes of the tuning range. Motor drive worked great with no hesitation or bogging-down - just fast and easy to go from 15kc to 500kc or from 500kc to 1500kc in about 30 seconds or less.

April 20, 2018 - Aligned First Mixer Output Transformer, Second Mixer Output Transformer and the 10,455kc Crystal Oscillator. This entire section of the receiver was out of alignment. The Crystal Oscillator requires using a VTVM to read maximum RF voltage. One adjustment is accessed from under the receiver and the RF Module brace has to be removed (just two screws.) This adjustment was quite a bit out from peak. The secondary (top side adjustment) was severely out from peak. These adjustments resulted in another +10db increase in signal level on the CL meter. The next step is to align all of the slugs and trimmers for the seven bands that cover from 15kc up to 1500kc.

April 21, 2018 - The original style Carrier Level meter arrived today in excellent condition. Didn't need any cleaning as it looked almost new. Installed CL meter using correct type of hardware. Adjusted the CL meter pot for showing +5db with no antenna (just slightly above zero.) Tuned in local AM BC station and the CL meter went up to +70db. Tuned off of station and noise level showed about +20db. Nice improvement. Still have to align the slugs and trimmers on the seven bands. Since the signal generator has to be able to produce a sine wave down to 15kc, I'm going to have to use my HP Function Generator for signal inputs below about 50kc. I'll probably switch over to the HP 606B at 50kc or so. Most RF signal generators only operate down to about 50kc, some only go down to 100kc or so. For VLF applications it becomes necessary to use a Function Generator and produce sine wave outputs as low of a frequency as required. Most Function Generators will produce wave forms as low as 1hz or lower. They are ideal for alignments and checking signal response on the VLF range and the lower LF regions. (I actually found that this HP Function Generator was very unstable at 15kc up to 50kc. Both frequency and amplitude varied so much and so quickly it was difficult to align the receiver.) April 22, 2018 - Performed the RF tracking alignment. There are two tuning ranges but there are five bands in the 15kc to 500kc range and two bands in the 500kc to 1500kc range. Each band has four slugs and four trimmers the need to be adjusted. I didn't need a spline-wrench for adjusting the slugs as with a R-390A. Just a blade screw driver, like the R-390. I used a function generator from 15kc up to 50kc. From 50kc and up, I used the HP 606B RF generator. (Read update at the bottom of this section for problem encountered due to using the HP Function Generator.) After the RF tracking alignment, I gained another +5db on the Carrier Level meter when tuned to a local AM BC station. Off frequency CL measures +15db and on frequency CL measures +75db. Checked NLK, the USN MSK station from Jim Creek, Washington on 24.8kc. This station measured about +20db on the CL meter. NPM (USN MSK from Hawaii on 21.4kc) also measured about +20db. Listening was all on loudspeaker.

April 23, 2018 - Adjusted R-260. This adjusts the balance on the First Mixer with one signal from the 2nd RF amplifier and the other signal from the Mixer Driver (VFO plus other stages.) This adjustment was off causing about a 2 volt increase over the minimum setting. Reduces Mixer noise.

Performance - On Wire Antenna - Late-April isn't the best time for testing on Long Wave, especially using a wire antenna, but, the testing was done at 10PM in the evening to help with signal levels and with the noise. I used the 135' CF Inv Vee with 96' of ladder line with the lines tied together. This wire antenna usually provides adequate signals although the noise level is pretty high. I tuned from about 410kc down to 320kc. I had the Audio Gain at about 5 or 6 and the RF Gain at about 7 or 8. MGC was used and the BFO was on. The Unbalanced Antenna input was used. I heard MOG 404kc very loud, it's in Montegue, CA and runs about 50 watts. Also, very loud was BO 359kc in Boise, ID. Many NDBs were heard from Oregon, like MF, OT and MEF. Canadian NDBs copied were XX, NY and DC. All pretty easy ones. Conditions were okay for late-April but the noise level was very high. The R-389 seems to be operating like a typical, high performance Long Wave receiver in that many stations can be tuned in and it is capable of decent copy even though the antenna and the conditions weren't ideal.  - April 23, 2018 Antenna Testing - When first acquired this R-389 didn't receive signals if the Balanced Antenna input was used. I wanted to test that the problem was repaired (the bent pins on the BNC connector P110 and receptacle P110.) Connected a Twin-ax to UHF coax adapter to the Balanced Antenna input and hooked up the wire antenna. Local BC station KOH was showing +75db on Unbalanced and +72db on the Balanced input so the problem was corrected.

The next test was to check the remotely tuned loop antenna operating with the R-389. When first acquired this R-389 didn't receive any signals using the loop antenna. I now connected the loop to the Balanced Antenna input and tuned to 314kc which is the frequency of a nearby DGPS node (read - "very strong signal.") The DGPS signal was received and could be tuned with the variable bias control on the loop. I noticed a significant improvement when the shield of the remote tuner was grounded to the receiver chassis. I also used the HP 606B RF signal generator (connected to a small antenna) as a signal source that could be tuned. This verified that the remote loop could be "peaked" or "tuned" to various received frequencies and that the Q of the antenna was fairly sharp. The higher Q with a sharp peak will give good signal strength with low noise since the antenna is only responding to a very narrow tuned frequency.

Next tests will be with the remotely tuned loop on the Balanced Input and listening at night.  - April 24, 2018

Performance on Loop Antenna - I tested the remotely tuned loop antenna at 10PM in the evening so it would be fairly close to the conditions that were present when I tested the wire antenna. The loop was attached to the Balanced Antenna Input. I first tuned to 314kc for the local DGPS signal. It was strong and could be "peaked" with the loop's remote tuner. I proceeded to tune from 325kc up to 405kc. Only the very strong NDBs could be heard. BO 359kc and MOG 404kc. I tried the Unbalanced input with even less response. I switched back to the wire antenna but with it connected to the Balanced input. Signals were much stronger and all of the usual NDBs were tuned in. Signals from Oregon, Montana and Idaho were copied. Also WL 375kc in Williams Lake, BC, Canada.

Further testing will be required to determine why the Loop Antenna performance is not as expected. I did modify the Loop to perform best with the Hammarlund SP-600VLF. I may have to do further modifications to the Loop to attain best performance with the R-389.

Another possible explanation is the time of year. Late-April isn't the best time for MW or LF signals. Most of the time, I quit listening to this part of the spectrum by late-February because of much higher noise levels and low signal levels, even at night. -  April 24, 2018

Signal Generator Test - A quick test used the HP 606B directly connected to the Balanced Antenna input. I used a fully shielded coaxial cable to input the signal. I set the HP 606B to the 0.1v scale and set the meter to read 1.0. This signal read 100db+ on the CL meter at 200kc. I used the attenuator to lower the signal level in steps. At 1uv input the CL meter was just at the internal noise level and the signal was easily audible on loudspeaker. I repeated the test at 300kc and at 700kc with the same results. This isn't a true sensitivity test, it's just to see that the receiver does respond to very low level signals.

So, what I can say right now is that the R-389 seems to be performing well. It does better on a wire antenna on LW. On the AM-BC band signals are very strong and push the CL meter to nearly +80db. The USN MSK VLF stations also will move the CL meter to about +30db. A comparison test with the SP-600VLF might be an interesting experiment.  -  April 25, 2018

Comparison Test - I tuned in a few signals using the SP-600VLF using the wire antenna (during mid-day.) I could just barely hear MOG 404kc. DGPS 314kc was strong. WWVB 60kc strong and NLK 24.8kc and NPM 21.4kc were strong. I tuned in the same signals with the same antenna using the R-389. The results were nearly identical. The exception was I could easily hear the carrier of MOG but I could only hear the MCW signal a few times. My conclusion is that the R-389 performs just about like the SP-600VLF. See September Performance Update below.

Minor Problem Corrected ? - This R-389 had this unusual problem that when first powered up the received frequency was about 20kc low. The former owner told me at the time of purchase that the receiver would have to "warm up" and after several minutes it would jump to the correct frequency. I experienced exactly what he described in that after the receiver "warmed up" for twenty minutes, the tuned frequency would jump up 20kc and then everything was ready to use. This didn't seem normal but it wasn't too much of an issue since one usually allows a receiver to "warm up" anyway and it always took the same amount of time for the frequency jump to occur.

After all of the repairs and the alignment, I used the receiver for awhile. When installing a new Twin-ax to BNC adapter on the Balanced Antenna input, I happened to notice that the OVEN was turned ON. I checked the manual and read that the oven was only on the VFO and was designed to raise its internal temperature up to 167ºF - Wow! Anyway, I started testing the R-389 with the VFO oven off. The frequency "jump" never happened after I turned the OVEN off. I left the receiver turned on for hours and always the tuned frequency remained 20kc low.  >>>

>>>  In thinking about this problem, I knew that I hadn't synchronized the VFO as I always do on any R-390A that I align. On the R-389, at 15kc, the VFO output should be 470kc - exactly. I used a tube extension to access pin 5 of V702, the VFO buffer output tube. I used a digital frequency counter to measure the frequency exactly. It was 482kc at 15kc on the Frequency Dial. I had checked the mechanical limit-stops prior to this and those were okay. I assumed that in the past during an alignment someone skewed the VFO to correct the frequency readout with the VFO oven ON. I loosened the clamp on the VFO coupler behind the gear-driven mechanical limit-stops. This allowed me to just change the VFO only. I set the VFO for 470kc output with the frequency set to 15kc and tightened the clamp. I then checked the DGPS node at 314kc and it was at 313kc (BFO on) and I also checked local AM BC KOH 780kc and it was at 780kc with the 2kc bandwidth. A "touch-up" on the alignment was going to be required. Actually, the adjustments below about 150kc were pretty far out. The higher the frequency, the less the alignment was affected. More details in the next section below.

Is this "Oven Induced Frequency Change" a component that fails under heat? Or, is it a component the suddenly "gets better" with heat? With the instant nature of the change, I'd think the component fails with excessive heat. I'm just going to leave the VFO oven turned OFF and use the receiver. In hours of operation the VFO never gets as hot as when its oven is ON (167ºF - that's hot!)   May 10, 2018  -  See Jan 2019 Update on VFO below

A Different RF Signal Generator - I wasn't very confident that the HP Function Generator provided a very stable signal for alignment below 50kc. It seemed to be very erratic in both amplitude and frequency. The HP 606-B would only tune down to 50kc. I happened to look at my General Radio Type 1001-A RF Signal Generator and noticed that it would tune down to 5kc. It's a top-notch generator dating from about two decades before the HP 606B. I had tested and serviced it a few years ago so it still was operating quite well. I decided to use the GR generator for the next alignment which was after the VFO had been synchronized as mentioned in the section above. The signal from the GR 1001-A was super stable both in amplitude and frequency. I found that the alignment I had done using the Function Generator was off by quite a lot. It's important to remember that adjusting the slugs doesn't affect the accuracy of the frequency readout. That's a function of the VFO and the 10.445mc Crystal Oscillator. You have to set the receiver frequency as specified and then "rock" the signal generator frequency and set it to the "peak" output as measured at the Diode Load. Then adjust the slugs for that band at that frequency. Do the same for adjusting the trimmers for the top end of the same band. Most of the errors in adjustment were below 150kc. Above 150kc there was very little error. The end result is much more gain in signals below 150kc and especially below 50kc.     May 13, 2018 PERFORMANCE UPDATE:  September 24, 2018 - Finally the Autumnal Equinox has arrived and conditions on LW, especially in the early mornings are improving dramatically. All summer-long, I'd perform tests on the R-389 trying various LW signals using combinations of antennae from loops to wires. Barely any signals were audible. Once in a while, the carrier of MOG 402kc in Montegue, California could be heard but usually the MCW was not audible. At night, the static crashes and other atmospherics seemed to mask all of the LW signals except for the DGPS nodes which were about the only thing that assured me the R-389 was at least receiving some types of LW signals.

With the Autumnal Equinox approaching, I began by listening in the early evening on 9/21/18, which was the day before the Equinox. Only two NDBs were heard, MOG and ULS (392kc, Ulysses, KS) and the noise was still pretty severe. I decided that in the next couple of days I would have to try early morning to see if the noise was down and maybe the signals would be up.

At 0530 on 9/24/18 I started listening using the 100'x135' "T" antenna. Right off, I tuned in ZZP 248kc from Queen Charlotte Islands, BC. Multiple NBDs were heard on many frequencies. I tuned around 390kc and heard what sounded like a voice transmission. I widened the bandwidth to 4kc (from 2kc) and at 394kc I easily copied voice weather being transmitted. With BFO turned off, I could hear in the background RWO being sent in MCW. This was the NDB on Kodiak Island that transmits TWEB or Voice Weather. In about 30 minutes of listening, I had tuned in about 30 NDBs, three of which were newly heard NDBs, ZZP 248kc, RWO 394kc and POY 344kc (#328, #329 and #330, respectively.)

I guess this illustrates that besides a quiet location, a large antenna and a superb receiver, good receiving conditions are absolutely necessary for successful LW DX copy and that my concerns about the R-389's abilities to cope with the modern LW reception issues were unfounded. As conditions continue to improve, I'm looking forward to the "peak LW reception" which will be from mid-November thru mid-January.   

UPDATE: VFO Problem - January 9, 2018 - This problem started out with just a defective tube in the IF module but seemed to evolve into a major issue. The initial bad tube was the second IF amplifier that had an open heater. Besides the second IF tube, three other tubes then don't have heater voltage since these tubes are connected in series-parallel. I went ahead and tested all of the tubes since it had been about nine months since the last complete test. I found a few more weak tubes - not bad but reading about half of minimum acceptable. The receiver worked fine on the bench. Then I installed it into the CY-979A cabinet and had planned on listening that evening. The evening session turned up another problem. The VFO was now 40kc low. Since the VFO was way off frequency, the rest of the receiver front end was essentially not in alignment so no signals were heard on MW. On the AM BC, strong stations could be heard but they were 40kc lower than they should be. This was the problem I had been having when the VFO oven was turned on. Now it was happening at ambient temperature except there was no "frequency jump" after a "warm-up" as before. I could "tap" on the side of the VFO and the frequency would sometimes jump the 40kc other times it wouldn't. It seemed that something mechanical had happened inside the VFO.

Pulling the VFO, removing the outer cover and oven, then the inner cover provided access to the VFO circuit. At first everything looked normal except that it was obvious that the VFO had been opened before and the desiccant packets removed. Closer examination with magnification showed that the rotor of the the trimmer capacitor was covered with white oxidation. Most of the metal parts inside the VFO had some contamination.   >>>

>>> The oxidation seemed to brush off easily using a small stiff paint brush. I thoroughly cleaned the trimmer capacitor including cleaning both sides of each individual plate of the rotor and stator using a thick paper pulled thru the gap of the plates. All solder joints were checked. After a complete cleaning, I reassembled the VFO and installed it into the receiver. Upon power up, the tuned frequency was about 40kc off. I left the receiver turned on for a couple hours and no changes occurred. I then resynchronized the VFO (470kc out at 15kc) and performance was pretty much back to normal.

I suspect that corrosion was "growing" on the plates of the trimmer capacitor and intermittently contacting an adjacent plate. The semiconductive nature of the oxidation may have caused a slight capacitance change rather than a short. The heat would cause expansion to increase the clearance enough to eliminate the "contacting" condition. The receiver was originally calibrated for this "non-contacting" condition. When I turned the oven off, the expansion took much longer to occur and I thought that the problem was solved. So, I had calibrated the VFO for the "contacting" condition. For nine months the receiver operated fine and I didn't experience any change in calibration until the IF tube failure and subsequent repair effort.

Cleaning the oxidation in the VFO seems to have cleared up the problem. Since the "contacting" condition was hopefully gone for good, I had to recalibrate the VFO to the new, hopefully permanent, "non-contacting" condition.  

More Info on the R-389 VFO - This VFO has been nothing but trouble. After a few weeks of correct operation the "40kc jump" happened again. Another disassembly and thorough cleaning of the trimmer capacitor has ended up with a significant frequency excursion at the high end of travel, in excess of 30kc. I waited several months while I thought about what to do next. I decided in August 2019 (before the LW season started up) to go ahead with a disassembly, examination and "tuning" of the VFO. The following are some observations and test methods.

I ended up adding 260pf of capacitance to the VFO LC circuit in order to have the trimmer at "half mesh" and to have the upper limit of the frequency be around 977.5kc. Low end is close to 470kc. One thing to remember is in the low tuning range the upper limit of VFO frequency is 955kc (at 500kc on the receiver) which actually occurs at turn 49. The 977.5kc is the VFO upper frequency at 52 turns from 470kc (turn 0) which should be the "start" frequency at the low end of the 500-1500kc range. In testing, the upper limit VFO frequency is 968kc instead of 955kc which results in about a 10kc error at the upper end of the range. The overall accuracy of the R-389 tuning is dependent on the VFO tuning being exactly 470kc to 977.5kc in 52 turns. The f-change per turn is 9.76kc upon which the linearity of the tuning range depends.

So, why was 260pf of additional capacitance needed? I doubt any of the components in the LC of the VFO changed value. Another possibility is the ferrite core itself. This VFO had its oven turned on as a method to instigate a change in the LC. Heat seems to be one of the factors that can permanently change the characteristics of ferrite over time. This would change the permeability and therefore the L of the coil. R-388 PTOs are notorious for problems with the ferrite core causing end point error problems that require compensation L trimming to correct. I think long term heat has changed the ferrite core in this 70H-1 VFO and the 260pf padding was necessary to compensate for the decreased permeability of the ferrite core.

Comparison to the R-390A PTO - In comparison to the R-390A PTO, the R-389 VFO is significantly different. Although it's labeled a VFO, it is a PTO, that is, a ferrite core does travel through a coil to change the frequency of the oscillator. But, since the output frequency of the R-390A PTO is 2.455mc to 3.455mc and the output frequency of the R-389 VFO is 470kc to 977.5kc (or 977.5kc to 1955.0kc in the high tuning range,) the method of adjusting the end point error is different. A small trimmer inductor is used on the R-390A PTO because the amount of frequency change is very small compared to the operating frequency. With the R-389 VFO, a fairly large, 95pf max C, air trimmer capacitor is used. This is because the lower frequency requires a greater change in either L or C to adjust the end point and C is the easier to use to affect that greater change. Linearity is adjusted with an adjustable stack of shims on the R-389 VFO.

The procedure for EPE adjusting is basically the same for either VFO/PTO. Trim the high end for an accurate frequency and adjust the low end mechanically for accuracy. Each adjustment affects the other so you have to work "back and forth" until the EPE is as low as possible. The mechanical low end adjustment is similar to the R-390A but the coupler between the VFO gear box and the VFO tuning shaft is loosened to adjust the VFO shaft to the correct lower frequency and then the coupler tightened to test the upper end frequency.

R-389 VFO Test and Adjusting Problems - It's useless to run the VFO outside of the R-389 receiver. There are two output networks that are external to the VFO. One for the low range and one that is 2X output for the high range. Although you can power up the VFO removed from the receiver, the frequency output will be very high and not close to any calibration frequencies. The networks are necessary for correct operation (even though for testing they aren't tuned.) It might be possible to introduce some isolation in the form of a resistor on the B+ connection to the Buffer plate but I haven't tried that. I think the easiest method is to first disassemble the VFO by removing the oven shield, the oven and the VFO shield. By having the receiver on its side and using a small cardboard box (6"x6"x6") to set the VFO on, the oven can be placed inside the oven shield and then that placed where the VFO normally is placed in the receiver. The open VFO then sets on the small cardboard box next to the receiver and is connected via the coax and the power cable. This allows the VFO to function correctly with the output network connected. The large "O" ring seal for the VFO shield should be removed. It was needed when the VFO was pressurized with nitrogen but all of that leaked out the first time the trimmer plug was removed. All the "O" ring does now is make shield removal difficult. The shield has to be in place for test-measurements as its removal will lower the VFO frequency about 10kc.

The initial starting point is to set the VFO mechanical stop on the low end to 470kc output as measured on the plate of the buffer tube, V2, with a digital frequency counter. I use a seven-pin test extension socket to access pin 5 of V2 easily. Be sure to have the frequency counter capacitively coupled since there's +180vdc on the buffer plate. Next, count 52 turns of rotation using the oldham coupler mechanical projection as a reference. At 52 turns, the output of the VFO should be at 977.5kc and the upper end mechanical stop will engage. Adjust the trimmer to the correct frequency and then recheck at zero turns again. It should be 470kc but if it isn't, the mechanical zero relationship needs to be changed for 470kc at zero turns on the mechanical stop. Rotate to 52 turns to the upper end mechanical stop and check, frequency should be 977.5kc. Adjust trimmer if it isn't. This back and forth must be repeated until the zero turn mechanical stop is 470kc exactly and the 52 turn mechanical stop is 977.5kc exactly. This sets the correct span of frequencies for both the lower range and the upper range. I've only been able to get close,...never exact. Remember to always slip the VFO shield on when making measurements.

With the VFO back together and installed in the receiver, I ended up with an EPE of about 8kc at the top end. Accuracy is great from 15kc to about 70kc and then the error begins to show. About 300kc the error is just about 6kc and by 470kc the error is 8kc. The plan is, since I've had so much trouble with this VFO maintaining a dependable calibration, I'm going to run the R-389 through this LW season. If the calibration holds reliably then, after LW season, I'll go back into the VFO and carefully get the EPE and linearity to within 1kc.

UPDATE: Sept 27, 2019 - Tested new VFO set up with R-389 performance. Listened at 0505hrs to 0545hrs tuning from 300kc up to 410kc. Logged 45 NDBs. Two newly heard Alaska NDBs, JNR 382kc and EEF 391kc. Also, copied both Hawaii NDBs, POA and LLD. Alaskan RWO TWEB Voice WX on 394kc. DB 341kc at Burwash Landing, Yukon. It's a little difficult to remember to subtract about 6kc from the dial readout for the actual frequency but otherwise the R-389 is performing very well. Sept 30, 2019 - 0510 to 0545 hrs, logged 30 stations, two newly heard, X2 328kc at Athabasca, AB and PR 218kc at Prince Rupert, BC.

UPDATE: Dec 6, 2019 - Another Frequency Jump - I was getting ready to test a newly acquired (but used) Pixel Loop antenna's performance with the R-389. Tuning around I didn't hear anything, hmmmm. I already knew that the Pixel Loop worked great on a couple of other receivers. I finally heard a station at 356kc. Expecting to hear NY 350kc, I was disappointed to hear "DC" which transmits on 326kc. A 24kc error. There's no doubt that the VFO is at fault. When the VFO output is correct the R-389 performs great but I've had nothing but trouble with the VFO. It looks like this last VFO rework (padding the C by 262pf to get the EPE somewhat close with the C trimmer set at mid-range) lasted a little over two months. It's been suggested that the ferrite core might be cracked which results in the sudden change. I'm almost sure the problem is long-term heat damage to the ferrite core but why the sudden frequency change happens might be either cracks or maybe the mechanical mounting of the core itself.    More info to come,...
 
UPDATE: June 29, 2022 - Well, here it is two and a half years later and I guess I've gotten over my frustration with the R-389 VFO problem since I put the R-389 back on the workbench. For the past couple of years I've been watching for a spare 70H-1 PTO for sale - hah!,...none, of course! Also, watching the sales of "parts set" R-389 receivers. I probably saw three or four come up for sale in that time period. I've come to the conclusion that there are no R-389 "parts sets" at least as far as sellers dealing in Collins equipment think,...maybe Collins gear buyers too,...every piece of junk is restorable. All R-389 receivers are being sold with the caveat "I got this from an estate and don't know anything about it,..." or, "For parts or restoration,..." or some other obvious obfuscation of the actual condition of the receiver. However, even the worst condition, most incomplete and obviously non-functional R-389 still seems to sell for over $1500. Of course this is on eBay. Although, I do know of a local ham that has two consecutive serial number R-389 receivers but their actual electronic condition is unknown since the ham is more of a collector than anything else and he's never powered-up either receiver (or almost anything else in his collection.) At the present time these two R-389s aren't for sale at any price. So, rather than essentially pay a minimum of $1500 for a 70H-1 PTO, I've put my R-389 back on the bench to see what else I can come up with for a long-lasting fix to the 70H-1 problem.

Since it's summertime, I decided to just skip LF and go to the AM-BC band right off. I was surprised that after 2.5 years the R-389 powered-up without any issues other than some random noise that seemed to disappear after about five minutes of operation. I connected an end-fed wire antenna of about 162ft length to the Unbalanced Antenna Input. As I tuned around, it seemed like the AM-BC stations were pretty close to their correct frequency. I checked the Carson City AM station on 1300kc and it was on 1310kc. KOH 780kc was on 785kc. KPLY 630kc was on 632.5kc. All three of these AM-BC stations were pushing the CL meter up to 80db+ with the clear BC frequencies reading about 10db on the CL meter. So, on the 500-1500kc band, the R-389 seemed pretty normal. Next, the 15-500kc band. 

I tuned in WWVB 60kc on 61kc. NPM 21.5kc was on 21.5kc and NML 25.2kc was on 25.2kc. Since the USN MSK stations are so close to 15kc and that is the mechanical calibration point of 470kc from the 70H-1VFO it's normal for these stations to be very close to "on frequency." As the tuning approaches past the middle of the VFO span and higher then the error becomes more apparent. One can extrapolate that the 10kc error on 1300kc would probably be a 5kc error at 400kc in the 15-500kc band, which was very close to what I was experiencing a couple of years ago when the VFO was "on frequency." More accurate testing using a RF Signal Generator showed that maximum error was about 8.5kc at the top of 15-500kc and about 17kc at the top of 500-1500kc. This was very close to what I was experiencing a couple of years ago when the VFO was "on frequency" or as close as I could get it. Next testing will be operation of the R-389 until the VFO again goes "off frequency." I'm really surprised that it's back "on frequency" now because when I stored it away it was reading 25kc high at 326kc (DC 326kc was tuned in at 352kc) in the "failure mode" and the receiver's current condition implies that the VFO problem "corrected itself" just setting around for two years. That's pretty hard to believe, unless the problem is entirely thermally induced and possibly mechanical in nature. This could be a cracked ferrite core or it could be something as simple as a bad solder joint. More testing,...

July 1, 2022 - I've been running the R-389 several times during each day trying to induce the VFO frequency "jump." So far, there's been no change and the receiver seems to operate very well. However, today I noticed something different that might be VFO-related. The R-389 had been operating for about a half-hour and was tuned to WWVB. I was in the adjacent ham shack room but could still hear the R-389. I thought I heard the audio tone caused by the heterodyne BFO changing randomly. The tone change was very slight, maybe a few hertz, so I thought it might be just a "hearing anomaly" caused by my location in the other room. But, carefully listening at the R-389 and the heterodyne tone was definitely changing slightly. Only a few hertz random change would probably go unnoticed but since the VFO is certainly a likely candidate for the cause, I will look into this indication and possibly use the DFC to verify that the VFO is what is changing frequency and if it might be related to the f-jump problem.

July 2, 2022 - R-389 on for 45 minutes before the random few hertz changes were noted. Since the initial problem of VFO frequency jumping always had occurred when the receiver was installed in the CY-979A cabinet, I wondered if heat might be involved. I've been running these tests with the receiver out of the cabinet and with the top and bottom covers off. To further reduce the heat, I installed a line bucking transformer into the hook-up to reduce the AC line voltage from 124vac down to the specified 115vac. Although the B+ is electronically regulated at +180vdc, the series-parallel tube heaters aren't. It might help but probably not. Incidentally, the CY-979A is now home for the Arvin Industries R-725 receiver, so I won't be putting the R-389 into a cabinet in the future (that changed July 3, 2024 with a third CV-979 showing up.) It's probably not a good idea anyway since the tremendous heat from the electronic voltage regulator seems sort of "trapped" when the R-389 was housed in the CY-979A. Same goes for installing the top and bottom covers in that it seems to really trap the heat on the left side of the receiver. Also, I placed spacers under the main frame of the R-389 to elevate it about 1.5" to allow better air flow underneath the receiver.

July 5, 2022 - Continued daily operation for about 30 to 60 minutes with no changes. The few hertz frequency instability was traced to the BFO. A signal carrier was found on LF at around 130kc. Using the BFO, the heterodyne produced was very unstable varying every few seconds by a few hertz but always returning to the set frequency. I then coupled the HP 606B RF signal generator to the receiver to heterodyne with the 130kc carrier. Of course, the difference is that the BFO heterodynes at 455kc while this setup heterodynes at 130kc. The R-389 BFO was turned off. The carrier plus heterodyne producing signal didn't vary at all. Both were solid. This isn't the VFO frequency jump problem but it's something else that has turned up. First replace the BFO tube but that probably won't help - and it didn't. I'll have to use a tube extender for the BFO tube to access the pins to see what is really happening.

July 12, 2022 - Slight screen voltage changes on BFO seem to indicate that the bypass capacitor is probably leaking (also, screen voltage is about 11vdc lower than expected at +74vdc instead of +85vdc.) Minor problem that can wait. Since the R-389 won't go into VFO failure I decided to go ahead and move it to a listening position where I can power it up from time to time. It seems typical that once I had it moved to its new location - it would fail! This was different though in that no signals could be tuned in, just lots of noise. Turning the receiver on its side I just touched the VFO tube and all signals returned. I pulled the VFO and BFO tubes and swapped their positions. Also swapped the 3TF7 with another ballast tube. The receiver seemed to be back to normal. I'll keep an eye on the VFO tube socket as a possible contact problem. But, for now, I'm just going to listen to R-389 probably about once a week or so and see how long the "self-healing" VFO lasts.  July 22, 2022 - Tests okay.  Aug 1, 2022 - Tests okay.  Aug 17, 2022 - Tests okay.

Aug 31, 2022
- Tests okay. With this test, I checked operation on the 500kc to 1500kc band tuning in several AM-BC stations - all close to "on frequency." On the 15kc to 500kc band, I tuned in NPM 21kc, NAA 24kc and NLK 24.8kc along with the normal reception test signal from WWVB on 60kc. All stations were close to frequency on both bands. Incidentally, KKOH on 780kc drove the CL meter up to +95db using 160' wire antenna.

Sept 24, 2022 - The R-389 has been setting, unused due to some station reorganization. So, prior to this test, the R-389 had not been powered up for about three and a half weeks. It was then moved to a different desk and moved from side to side and back and forth until I was satisfied with its position on the desk. At this time, it was connected to the wire antenna and powered up. The tuning was where I had left it on 780kc and, within a short time, KKOH came in with a +90db signal. I tuned to the lower range (15kc to 500kc) and tuned in WWVB at 60kc, coming in with a strong signal. I left the R-389 powered up for about 30 minutes with no problems encountered.

Oct 12, 2022 - I used the R-389 a few times now in its new location. The receiver isn't in the CV-979A cabinet and both top and bottom covers are removed. Also, the receiver is slightly elevated to induce more cooling. So far, no problems.  Other Tests in Oct - okay.

Failure Nov 2, 2022 - VFO f jump about 20kc high on low band. Interestingly, I tried a heat gun to warm up the VFO but only for a minute or two. Then I turned on the oven. After a minute or two, the VFO instantly changed back to the correct frequency. It wasn't a slow drift, it was an instant change as soon as the VFO had gotten warm enough. All through the summer, the VFO had been working fine. Within the last couple of weeks, with Fall, the temperature has significantly dropped. Last check in the ham shack was 62F. Not cold but a lot cooler than in the summer when it's usually minimum 75F in the ham shack. There are only a few parts in the VFO that could be affected by temperature, unfortunately the ferrite core could be one of them. More testing required to see if the oven temp instigates the frequency jump every time.

Test Nov 4, 2022 - Cold start off frequency 20kc. Turned oven on. 4 minutes later, the frequency jumped down 20kc to the correct frequency. Next test will see what happens if the oven is left on for 30 minutes which is the normal listening time period.

Test July 2, 2024 - It's been a while. Since it's summer and the room temp upstairs is running about 78F, I thought I'd try the R-389. The VFO oven was turned ON. I had KKOH 780kc tuned at 781kc. The receiver operated correctly for about 15 minutes and then jumped frequency about 40kc (20kc on 15-500kc Range.) Later in the afternoon, I turned the oven OFF and powered up the R-389. It came up on frequency at 781kc for KKOH. I let the receiver run for about 15 minutes and no f change occurred. This frequency jump certainly appears to be temperature related. Incidentally, I was given another CV-979 cabinet. It had been left outside under a carport in Yerington, Nevada for years. The paint was faded and a little bit oxidized, but otherwise, it was in nice condition. I cleaned it up and polished the stainless steel inside slides. I removed two wooden skids that were bolted to the bottom of the regular steel skids. The wood was somewhat deteriorated but it appeared to have been a professional-level addition. So, I've installed the R-389 into this CV-979 (contractor Barker & Williamson) since I don't really think it makes very much difference in the VFO versus heat operation. I did leave the top and bottom covers off of the receiver.


Dynamotor Retrofit for the R-648/ARR-41

The R-648/ARR-41 is the so-called "Airborne R-390A." Certainly the nickname comes from the intended use of this Collins-design/build along with its many similarities of construction and operation to this receiver's "bigger brother," the R-390A. However, Collins' engineers borrowed a lot of the circuitry from the 51J Series of receivers. Since the R-648 was destined to be used in aircraft, it had to be light-weight. Rather than the 80 pound, hefty-weight of a R-390A, the R-648 weighs-in at about 30 pounds. To achieve this lighter weight package, the receiver is much smaller, with reduced-size mechanics and components. Of course, most of the R-390A features and circuits are not even present. Still, with 17 tubes that provide two RF amplifiers, three 500kc fixed-frequency IF amplifiers, frequency coverage from 190kc to 550kc and from 2mc to 25mc, two mechanical filters (9.4kc and 1.4kc - the 9.4kc MF was later changed to 6.0kc) and a mechanical digital frequency dial, the R-648 does have a few "R-390A" features. The circuit conversion methods were borrowed from the 51J/R-388 by using a dual variable IF and fewer crystals in the Crystal Oscillator along with the 500kc IF. Double conversion is used on all frequency ranges except for the 2-3mc band and the 3-4mc band where single conversion is used. Audio output has three stages and was designed for a headset of 300Z ohms or greater. Typical antenna input Z is 50 ohms.


photo right:  R-648/ARR-41 SN: 816 COL from 1957 contract NOas57-438. The shock mount is not original but is homemade. It does have the correct type metal and cushion shock feet installed although they can't be seen because of the front piece of the mount.   


photo above: Top of the chassis showing the various plug-in modules.

The R-648 operated on +28vdc battery-charger buss available on the aircraft. The +28vdc buss supplied the series-parallel connected tube heaters, the dial lamps and also operated the "on-board" dynamotor. The dynamotor supplied +250vdc at 100mA. A regulator tube type 0A2 was used to also provide +150vdc from the +250vdc. A divider network also provided +31vdc for the AVC bias. Unfortunately, like a lot of the dynamotor-operated military gear, many R-648 receivers have been converted to operate on an AC power supply. Some modifications were well-designed and their incorporation into the receiver was accomplished with minimal modification to the receiver while still providing the necessary voltages. Most AC power supplies utilize the original dynamotor module chassis since this then has all of the circuitry for the 0A2 regulator and the divider network for the +31vdc. Usually two power supplies and two transformers are necessary, one for the +250vdc supply and one for +24vdc for the tube heaters. Some better conversions utilize a DC-DC converter to provide the +250vdc and then the receiver is operated on +24vdc input. In essence, providing a solid-state substitute for the dynamotor only. If you don't have the original dynamotor, this is probably the best solution to keeping the R-648 as original as possible.

Shown to the left is the top chassis of the R-648. Directly behind the front panel is the gearbox and the RF module containing all of the RF transformers, VIF transformers, slugs and slug racks. To the right of the RF module is the PTO. To the right of the PTO is the dynamotor module that provides +250vdc, +150vdc (via the 0A2 regulator tube) and +31vdc. Behind the Dynamotor is the Audio and RF Spectrum Oscillator modules. To their left is the Crystal Oscillator module and to its left is the IF module with the two mechanical filters. The front panel also "plugs in" and has enough wiring to be considered another module. The front panel hinges down for easy access.

photo above: The NARF NORVA sticker on the front panel. There is also another NARF NORVA sticker on the chassis.

As to the R-648 operation, the GAIN control operates RF gain when in CW and AF gain when in AM. The Sensitivity is a screwdriver adjusted pot accessible on the front panel behind a "toilet seat" cover. The overall Audio Gain is a screwdriver adjusted pot accessible on the rear panel. The audio output impedance works well with 600Z ohm loads and a loudspeaker with a 600Z ohm matching transformer will have plenty of volume. The manual doesn't specifically give an output impedance only stating that the load should not be less than 300Z ohms.

Selectivity is controlled by two mechanical filters. On early versions, the AM filter is 9.4kc. This was later changed to 6.0kc to improve selectivity in the Voice mode. CW selectivity used a 1.4kc mechanical filter. The selectivity is automatically switched between the two mechanical filters when either VOICE or CW is selected by the EMISSION switch. The "SHP" positions are "sharp" selectivity and add an audio filter to reduce bandwidth to improve copy in noisy conditions.

Although the R-648 is called "The Airborne R-390A," don't expect the receiver to have the robust construction or all of the capabilities of its namesake. The R-648 has ample sensitivity, adequate selectivity in most circumstances, a minimal amount of knobs to adjust and lots of volume available if the proper load impedance is supplied. Its light-weight and small size make it easy to find a place for on the bench. 

NARF NORVA - NARF stands for "Naval Air Rework Facility" and NORVA stands for "Norfolk, Virginia." These stickers showed the receiver rework dates. The first quarter of 1975 is marked on this tag. Also note "IRAN." This isn't the country Iran, it's an acronym for the facility's process of "Inspect, Repair As Needed."

Dynamotor Retrofit - In 2017, I purchased an original R-648 dynamotor. It was just the dynamotor, not the entire power supply chassis. When looking at the AC power supply that had been built and installed in the R-648, it was apparent that it was built on the original dynamotor/power supply chassis. Even the regulator tube circuitry and many other original parts were still within the chassis. I purchased the dynamotor with the idea that I could rebuild the AC power supply back into the original dynamotor configuration.

This particular R-648 had been severely "hamstered" in that the original front panel power box connector was removed and a Jones plug installed to allow a 120vac power cord to be plugged-in the front panel. Much of the "behind the panel" wiring had been "hacked" to incorporate this modification. Luckily, I was able to obtain a good condition, original R-648 front panel from Fair Radio. This panel was complete but had a slight bend that needed to be straightened before it fit correctly. 

Unfortunately, the AC power supply couldn't be wired into the front panel unless I wanted to incorporate some modifications and that was what I was trying to avoid. The only solution was to rebuild the power supply into the "original dynamotor" unit and run the R-648 on +27vdc, as originally done.

I removed the power supply module from the R-648 and removed all of the parts that were not original. This left the chassis, the 0A2 regulator, the 11 pin connector, a choke, a couple of resistors and a couple of ground lugs.


photo right shows the R-648 when it had the homebrew AC power supply installed.

Servicing the Dynamotor - Most dynamotors found today haven't had anything done to them in several decades. The R-648 dynamotor only needed a servicing. This consists of removing the end-bells to access the brushes, the commutators and the bearings. I mark the brushes for location and orientation so when reinstalled their fit to the commutator is correct. With the brushes removed, I use a small piece of 400 grit Al-Ox paper to clean the commutator surfaces. I wash the commutators afterward with denatured alcohol. I run some light-weight oil through the bearing to clean out the old grease. I then work new grease into the bearings. These bearing are somewhat "sealed" but it's still possible to push new grease into the bearings. I then reassemble and test. My test was to run the dynamotor for 15 minutes while monitoring its output voltage (+260vdc) and the running current. No problems were experienced so the dynamotor was ready to mount to the stripped chassis.

Finding Components - One thing I found out was that none of the R-648 manuals, that I had copies of, provide a parts list. Only one photo of one side of the dynamotor chassis is in the manuals. The schematic for the module is called "simplified" but it's the complete schematic. Luckily, the sheet metal had silk-screened component locations that helped in getting the correct locations for remounting the new (replacements for the missing originals) components. Fortunately, the 1.0H choke was not removed but the other three chokes were missing. The original 4K regulator load resistor, about a 5 watt resistor, had been replaced with a 1/2 watt carbon resistor that had become severely burned. Once I had found all of the replacement parts I was ready to rebuild the dynamotor chassis. 

Building the Dynamotor Circuit - Without a good photo of an original R-648 dynamotor chassis, I was pretty much left with fitting everything into the small front area. I used ground lugs and tie points as necessary. I followed the silk-screened positioning if it was possible (most of the time, it was.) Of course, the components aren't anything like the originals in appearance but they are the correct values. The +250vdc chokes were easy but the +27vdc chokes had to carry 2 amps so the wire for those chokes had to be at least 18ga or so. Once the circuit was built, I had to test the operation and voltages. With +27vdc input on pin 10 (+) and pin 11 (chassis and -) I had +260vdc, +150vdc and +33vdc on the proper pins of the connector. This completed the test and the dynamotor chassis was then installed into the R-648. Building the Power Cable - I gave KØDWC some measurements and pin orientations and he was able to find the correct seven pin power connector identification number. From this, he located a used connector on eBay. Upon receiving the connector, I removed the wires from the pins. Only four pins are used for the R-648. Audio output is on pin A, +27vdc is on pin E, Chassis Ground is on two pins, B and D. The wires need to be 16 gauge on the power pins and 22 gauge is large enough for the Audio Output. The proper size wires were taped together and then a braided shield (harvested from old RG-8 coax) was installed and the entire cable wrapped with electrician's tape. I made the cable six feet long. The connector was installed on one end with the shield connected to a chassis-ground pin. On the other end of the cable spade lugs were soldered to the wire to allow a good connection to a +27vdc power supply. I used an old linear supply good for 10 amps - overkill, no doubt, but solidly stable.
Routine Problems - Before going any further, I needed to test all of the tubes. I was surprised to find that three of the 5749 tubes in the IF module were bad and both 5726 tubes were bad. All other tubes in the receiver tested good. Odd that most of the tubes in one module were defective. Anyway, a quick test of the receiver with ALL good tubes installed and the performance improvement was very good but there was a problem that involved all of the bands below 4mc.

Weird Problem - I had run the R-648 a little when it operated on 120vac so I thought that it was performing correctly. Now, with the dynamotor installation complete and good tubes in the set, I tested performance more thoroughly. Reception from 4.0mc on up to 25mc seemed normal with plenty of sensitivity and dial accuracy. Below 4.0mc, the sensitivity dropped dramatically to where no 75M ham signals could be heard. On 2.0 to 3.0mc no signals were received. Oddly, on 190kc to 500kc an AM BC station was tuned in at around 350kc. With the receiver on the bench, a signal generator was used as a signal source to confirm that below 4.0mc, the R-648 was not operating correctly.   >>>

>>>   Further testing revealed that 2-3mc and 3-4mc bands seemed to be "tuning backwards." This had to be some type of mechanical problem. I checked over the description and the drawing of the gear box. The description said that below 4mc, the receiver tuned counter-clockwise to increase frequency. Hmmm. Mechanically, the tuning was the same on all bands - clockwise to increase. Finally I read the description in the section before the low frequency mechanical tuning. I read that the gearbox always tunes the same direction and that the "appearance" of tuning counter-clockwise was due to a sliding mask over the dual, opposing dial scaling. The mask switching was cam-driven and changed scales at 4mc. In my case, the dial mask wasn't moving at all. The problem was caused when I had replaced the front panel with an original condition panel from Fair Radio. I hadn't noticed that inside the dial cover the spacing between the dial mask and the left side dial lamp was really, really small. I had the dial cover too close and too low and that was blocking the dial mask from moving. I installed a second dial cover spacer taken from the old "hacked up" front panel to give a slight bit more clearance. Upon reassembly, the dial mask now operated correctly and the tuning followed exactly what the manual instructed it should.
Test and Alignment - I noticed that the slug rack for the 190kc to 550kc was way out of mechanical synchronization. This particular slug rack is very easy to realign only requiring pushing the spring-loaded gear rack back and sliding the slug rack into the correct position. All other mechanical synchronizations were correct. The IF alignment requires accessing the switch arm S402D to input the 500kc signal, otherwise it's straight forward. There's also a PTO output transformer that needs to be matched to the IF frequency. The Variable IF consists of two bands, 2-3mc and 3-4mc and the alignment is by slugs for the low-end and trimmers for the high end. The various 1mc wide bands are set-up by the various crystals in the Crystal Oscillator that are operating at either the fundamental, 2nd and 3rd harmonics and then mixing with the PTO and the Variable IF. The exception is the 2-3mc band and the 3-4mc band which both are single conversion and bypass the Crystal Oscillator. Alignment of 190kc to 550kc and the bands from 4mc to 25mc are via slugs and trimmers in four sets of RF transformers. Once all of the mechanical issues were resolved the actual alignment was easy,...well,...sort of. Alignment Using Nav Manual - To say that the Nav manual is difficult to use is an understatement. First, errors abound. The alignment procedure has so many misidentified components that a significant amount of time is spent looking for the non-existent parts and then trying to figure out what the actual part ID is. Even when the procedure is correct, the user is jumping from the alignment page to tables in other sections of the manual. The most serious error is the synchronization of S402 as the instructions list the wrong switch tab for mechanical alignment. The test points locations are shown in another section of the manual rather than with the alignment section. I read thru the alignment instructions first (a couple of times) and then added (in pencil) the actual locations of the specified test points before doing the alignment so I wouldn't have to keep jumping back and forth between sections. Penciled corrections were also added "as found." Certainly, after one has gone thru their first alignment of a R-648 and all of the test points and errors are then known, any subsequent alignments, of course, would be much easier. Be prepared doing your first R-648 and read the instructions first, make notes and that should ease the frustration somewhat. Probably the Navy figured that only their experienced techs that had been sent "to school" on the R-648 were going to be working on the receivers so the convoluted and inaccurate instructions wouldn't be too serious of a problem.
Performance - The R-648 does have a lot of gain and is a very sensitive receiver. The automatic switching for the GAIN control in CW or VOICE is actually very practical and makes the switch from CW (or SSB) to VOICE (AM) easily accomplished. Since in CW the GAIN controls the RF gain, SSB is easy to demodulate. Selectivity with the mechanical filters is excellent. The IF bandwidth has such steep sides that strong AM signals suddenly are heard and suddenly aren't heard as the receiver is tuned through the entire 9.4kc bandwidth (late-build receivers have a 6kc Voice MF.) The action of the AVC time-constant does sometimes block AM signals if they are tuned through their passband rapidly. Slow tuning in AM allows the AVC time to control the receiver sensitivity. Even though the CW bandwidth is only 1.4kc SSB signals sound just fine. Audio quality is pretty much communications-grade and it's easy to drive a 600Z ohm speaker to loud volumes. There's no "break-in" provided. If used as a station receiver you'll have to provide good isolation during transmit and reduce the GAIN as necessary (this would be for voice only, in CW the receiver can be used to provide a sidetone.) It's small size and light-weight makes the R-648 easy to locate within the station landscape. I'm using my R-648 set up with my DY-12 operated ART-13. The receiver operates on a +26.5vdc 6A power supply and transmitter dynamotor operates from a PP-1104-C DC power supply (+28vdc at 50+amps.) Pseudo Shock Mount - The mount that can be seen in the top photograph came with the receiver. However, it didn't really look this way when I got it. It had rubber feet and wasn't painted. I replaced the rubber feet with the proper type, metal and cushion type shock feet. I painted the shock mount black to sort of match the receiver. On the whole, while certainly not as "cool" as an original would be, it is better than having the receiver cabinet set directly on the table. Or worst, having rubber feet installed on the bottom of cabinet. Original R-648 shock mounts are rare but maybe one will turn up someday. Until then, this one provides the necessities well enough.   NOTE: An original R-648 shock mount did show up on eBay a couple of years later. The seller also had the receiver but that was on a separate auction. Needless to say, the shock mount sold for double the price of the receiver. The shock mount went for $300 and the receiver went for $150.
 

R-392/URR - Component Receiver for the AN/GRC-19

AN/GRC-19 - The AN/GRC-19 was a portable transmitter-receiver that utilized the Collins-designed T-195 transmitter, a 100 watt output, completely auto-tuned antenna matching marvel that was combined with the Collins designed R-392/URR receiver, also a marvel of packaging most of an R-390 receiver into a cabinet about half the size of the standard R-390. Although separate units, the T-195 and the R-392 were interconnected via a Power Input-Trans Cont cable that allowed the T-195 to power the R-392 receiver. The T-195 operated on +28.5vdc at 40amps and internally had two dynamotors (original configuration.) Later, the dynamotors were replaced with DC to DC power units. Both units mounted to a large shock mount that was typically bolted to the back-seat area of a Jeep or other type of vehicle. The GRC-19 had to be virtually weather-proof and the R-392 is completely a sealed unit (it was claimed that a R-392 would actually float in water - for a while at least.) Most R-392 receivers are in great condition inside because of the weather-proof housing. The entire receiver operates only on +28vdc.

R-392 Circuit - A stout, small and fairly lightweight receiver, the R-392 still has a lot of the features found on it's big brother, the R-390. Frequency coverage is .5mc to 32mc in 32 tuning ranges each with 1mc of coverage. Permeability tuning using slug racks driven by a complex gear train with a PTO, variable tuned IF and fixed Crystal Oscillator providing double and triple conversion is very similar to the R-390 receiver's front end as is the frequency read out provided by a Veeder-Root digital counter. 25 tubes are used in the double and triple conversion circuit that also provides 2 RF amplifiers and 6 IF amplifiers. Also, the IF stages are similar to the R-390 in that mechanical filters are not used for the selectable 8kc, 4kc and 2kc bandwidths. Data modes, e.g., portable RTTY, could be received via the IF output connector (the T-195 was capable of FSK transmission.) The Audio Output is 600 Z ohms and accessed from either of two twist-lock type connectors marked AUDIO or it can also be accessed from the POWER INPUT-TRANS CONT (PI-TC) connector. There is no phone jack on the R-392 because in the GRC-19 configuration the audio was routed to the T-195 (via the PI-TC connector) where typically a telephone handset, the H-33, was used for both transmit (microphone) and receive (earpiece.) The typical field speaker, if used, was the weather-proof (and terrible sounding) LS-166 (shown in photo.) A Noise Limiter circuit is activated with the Function switch and a Squelch function is also available. When operated as the GRC-19 there is a short interconnecting cable between the T-195 transmitter and the R-392 receiver using the PI-TC connector that allows the two units to function together with the T-195 providing Break-in or Stand-by functions along with receiver to transmitter Signal Relay capabilities.

AN/GRC-19 Portable 100W Transmitter & Receiver shown on its Jeep mount
 

photo left: This is the upper deck of the R-392. The modules are the RF Module that has all of the RF transformers, the tuning slug racks and slugs along with the variable IF transformers and its slug racks and slugs. The module the has all of the trimmers is the Crystal Oscillator module. Although reduced in size, these modules are very similar to the R-390/URR receiver.


photo right: This is the lower deck of the R-392. The tuning gear box is visible behind the front panel. Center left is the Crystal Calibrator module, then the PTO and center right is the Audio module. At the rear top is the IF module. Like the R-390/URR, the R-392 modules interconnect using cables and plugs. All modules are secured using captive screws that have their heads painted green. The blue dots on the tube tips are my indication that the tubes have passed a tube test.


photo below-right: This R-392 photo was taken about 2012 using a 3.1mp Olympus digital camera. I had to flash the photos then to get enough detail. Where I took the photos generally had several tungsten-filament lamps on at the same time. The tungsten lamps tended to "yellow" the photos and I was using a very crude photo editor at the time that couldn't correct for it. The olive drab is not represented correctly in this photo. However, the GRC-19 photo at the beginning of this section does shown the correct OD color and that is the same WE contract R-392.

Operation of the R-392 as a Stand Alone Receiver - To operate the R-392 as a "stand alone" receiver, a separate +25vdc to +28vdc power supply will be required and it should be capable of at least 3 or 4 amps. The typical +24vdc computer-type power supply with the voltage adjusted up to +26.5vdc will work fine.  BE SURE TO USE AT LEAST +25VDC - - - +26.5VDC IS BETTER!  Receiver performance will begin to drop off as the supply voltage is reduced below +25vdc and the R-392 will barely function below +24vdc. The GRC-19 system was designed to operate with the vehicle running or with some sort of charging system used with a 24 volt battery set-up. The typical battery-charging system voltage would have been around +28vdc (although this depends on the engine RPM and the condition of the batteries.) The GRC-19 will only operate marginally at +24vdc since the T-195 is spec'd at +28.5vdc input. When operating the R-392 as a "stand alone receiver" the operating voltage is applied directly to the receiver power input rather than through the GRC-19 system (which usually had some IR drop in the cabling to the receiver power input, thus the +28.5vdc was somewhat less at the receiver power input.)

More "Stand Alone" Info - When the receiver was in active use with the military in a GRC-19, it wasn't really a problem that the supply voltage to the R-392 was a bit high. After all, better gain was then available at the receiver and, at the time, the tubes were easily available. Today, the tubes are still fairly cheap but why abuse them unnecessarily? Although the apparent gain of the receiver can be increased by running the supply voltage at +28vdc, most of the tubes utilized in the R-392 are 26.5 volt filaments and a properly operating R-392 will function great at +26.5vdc supply voltage. This assumes that only one power supply is going to be used and LINE and PLATE are connected together. Increased performance is possible by operating the LINE at +26.5vdc and operating the PLATE at a slightly higher voltage, up to maybe +30vdc. This requires two power supplies and separate voltage wires in the power cable going to the PI-TC connector.

IMPORTANT NOTE ON TESTING 26.5 VOLT TUBES: When testing the 26.5 volt tubes, be suspicious of readings using a typical mutual-conductance tube tester, e.g., the TV-7, etc. Some tubes will show very little gain, perhaps as much as 60% lower than minimum specified useable test level, and yet these tubes will function fine in the R-392. This is probably due to the tube tester's method of powering the tube versus the R-392 circuit's application of DC voltage on the heaters with +28vdc plate voltage. The best indicator of the tube's usability is by substitution in an operative receiver. Naturally, tubes that read high on a tube tester are going to work best but don't necessarily discard the 26.5 volt tubes just because they show "bad" in a tube tester. Try them in the receiver, you might be surprised.


1963 Western Electric R-392/URR

Servicing the R-392 - Since the R-392 circuitry is essentially sealed from the outside world, most of the examples found are in excellent physical condition. Since the environment has been kept out, the typical corrosion or oxidation is not normally encountered. This results in a receiver that is usually very easy to service and get operational. Here's a list preliminary tasks,...

1. Test all tubes on a quality tube tester. Be aware of the caveat on the 26.5 volt tubes and how they will test on mutual conductance tube testers. Clean all tube sockets with De-Oxit. This is probably not necessary on most R-392 receivers but is a routine problem preventative measure.

2. Disconnect all cables and clean sockets and plugs with De-Oxit. I usually pull all of the modules and check everything over. I clean the bed plate although usually it's not all that dirty. If the interior of your R-392 is dirty or the receiver has been out of the cabinet for a very long time, you may want to pull some of the RF transformers to inspect their contacts. If cleaning is necessary, the procedure is very close to that used on the R-390A RF module and is covered extensively in this web-article in the "RF module" section further above.

3. Check operation of the gear box. The feel of tuning the receiver should be fairly light but probably not quite as light as a recently lubed R-390A gear box. It's pretty much the same box and the Veed-Root counter is exactly the same as the one used in the R-390A receivers. If the R-392 gear box seems tight then it might benefit from a cleaning and light lube. They are usually pretty well preserved since the receiver is in a sealed cabinet. Again, the gear box cleaning and lube procedure is above in the section "RF Module" further up this web-article.

4. Check operation of all switches and pots. Lube switches with De-Oxit. Pots are usually sealed (Allen-Bradley types) but if they aren't then give them a shot of De-Oxit.

5. Reinstall the modules. Connect all of the cables. Reinstall the tubes. Power up the receiver.

Alignment of the R-392 - If you've aligned the R-390 or R-390A receivers then aligning the R-392 will seem very familiar. It's essentially the same receiver but packed into a much smaller case. Use the alignment procedure in the military manual. Essentially, these are the steps for alignment.

1. Check mechanical alignment. Make sure the PTO and the gear box are close +/-15kc between maximum and minimum span.

2. Adjust Carrier Level Meter first, then proceed to IF alignment. This is like the R-390 (non-A) in that the IF is peaked rather than stagger-tuned. This is because there are no mechanical filters in the R-392.

3. Synchronize the PTO. Check that the Crystal Oscillator is adjusted to give very little error when going from band to band.

4. Variable IF alignment, then the RF alignment.

5. Adjust Calibration Oscillator.

Variations in the R-392 Receivers - The initial contract in 1951 was from Collins Radio Co. but soon, just like the R-390 and R390A, many other contractors built the R-392 receivers. There are some variations from early production to the later receivers. Early receivers will use 26A6 tubes for the RF amplifiers while later production used an improved version of that tube, the 26FZ6. The change to the 26ZF6 was to help with cross-modulation problems when using the receiver near operating transmitters. Most of the later manuals specify that either the 26A6 or the 26ZF6 can be used as RF amplifiers. Early panels have silk-screened nomenclature while later panels are engraved. The 2kc-4kc-8kc BANDWIDTH nomenclature layout is closer together on early panels but spaced at 90º on later panels. Cabinets on early models have large flutes that run front to back while later cabinets have five "ribs" that entirely encircle the cabinet running parallel with the front panel. These "ribs" strengthened the cabinet significantly. Like many contractor-built items, the color tint of the olive drab paint used varies from contract to contract with some receivers appearing very light brownish-OD while others appear dark greenish-OD. R-392 production ended in the mid-1960s. Ample sensitivity, super-accurate frequency readout and decent audio (from a good speaker - not the LS-166) not to mention the "extreme" military looks along with a small and lightweight package (well,...52 lbs) have made the R-392 a popular receiver with many military collectors and even some BA collectors.


Other R-390 and R390A Versions and Variations

R-390/URR Upgrade Kit - There was a "Motor Drive Kit" designed for field installation but it may not have actually been produced.

R-391/URR - Motor tuned, seven channel presets, if selected. Manual tuning also. R-390 based. 500kc to 32mc. Requires a separate power supply for the motor drive. Has receptacle on rear panel for connecting the motor drive power supply. There is a specific, Collins or Motorola built, rack mount power supply for the R-391 motor drive.    

R-391A/URR - same as "non-A" except based on R-390A. May have been a conversion.

R-390A/URR - Squelch Addition - If you've wondered why there is a blank position when turning the knob fully CW on the FUNCTION switch, it was to add a Squelch circuit like the R-390 had. There was also a blanking plate on the Audio module that was intended for the location of the Squelch circuit if it was ever added. I've never seen this option or mod installed on any R-390A. Usually, there's a knob stop installed under the FUNCTION switch mounting nut that prevents rotating to the "blank" position but many times the knob stop is left off during reassembly by those who don't know its function.

R-390A/URR - Navy Power Input/Signal Input-Output Connector Kit - This was a metal chassis with three box connectors that mounted to the rear panel and covered the two terminal strips. When installed it allowed for quick-disconnect of the receiver from input/output connection harness.

USN "DIODE LOAD" Pin Jack - This is an US Navy modification that's encountered once in a while. It added a front panel mounted green colored pin jack to the front panel, usually between the PHONE jack and the LOCAL GAIN control. The front panel was black ink-stamp ID'd "DIODE LOAD" by the pin jack. This jack was added by the Navy to make a routine check on the receiver easier. The Diode Load voltage, essentially the detector voltage resulting from a specific signal level, could be measured at the front panel without removing the receiver from the rack mounting (or the necessity of somehow gaining access to the rear panel.) Apparently this was a part of a monthly requirement to access the tested receiver's operating condition.

U.S. Army Security Agency and other Military Security Groups R-390A - Some R-390A receivers will be found with a turns-counting dial with a 10:1 reduction called a "Microdial" installed on the BFO shaft. Sometimes this is referred to as the "NSA" conversion since collection of worldwide signal intelligence is the primary duty of that agency. The reason for the Microdial was for precision adjustment of the receiver to allow the proper bandwidth and placement within that selected bandwidth for either FSK or Dual FSK signals. The Microdial allowed adjustment of the BFO to +/- 13kc rather than the normal +/- 3kc. Since the Dual FSK signals had two Mark and two Space frequencies, the total of four separate frequencies had to be properly placed within the narrowest bandwidth that allowed for no attenuation of the signal - and this was at a time when 850hz shift was the normal military FSK used. The AN/FRA-86 was one such FSK/DFSK demodulator used. These receivers were used in listening and DF facilities where banks of special recorders would monitor and record various types of signals that were of interest to the agencies. Certainly there were many other uses for these types of R-390A receivers since the variety of enemy clandestine signals seemed endless.

Likely source of the variation would be the military intelligence and security agencies. Interestingly, the "Microdial" is also shown and described in the USN publication "Cryptologic Collection Equipments" (Ch. 3 "Introduction to Receivers, Fig 3-3) for Naval Security Group personnel. Photo shown to the left is from that publication which is viewable as a PDF, Chapter 3 only, from www.navy-radio.com   Also, I have a "parts sets" Motorola R-390A that has the remains (the base) of the Microdial still present. It has two large stickers on the rear panel titled "United States Army Security Agency" with places for noting installed MWO numbers and the date of installation. This surely indicates that the ASA (1947-77) used the Microdial R-390A receivers. The ASA was part of the NSA.

NSA, CIA or "Black Panel" R-390A - The Black Panel R-390A receivers were used a Clark Air Base in the Philippines and perhaps at other installations. The vintage original panels were black "grained and anodized" finish not painted. Close examination of the Morse Hall Clark AB photo (shown to the right) reveals that the Microdial on the BFO is definitely installed on the two R-390A receivers that are nearest the camera. It's very likely that all of the receivers are equipped with the BFO Microdial but the other receivers are too far from the camera to verify that. In the B&W Morse Hall photo one can see that every station is set up with TTY machines with some of the machines appearing to be "read only" machines (the two M28 machines about the center of the photo.) The widely adjustable BFO (+/- 13kc) was necessary for Dual FSK (DFSK) reception with the AN/FRA-86 that utilized two separate FSK signals that required precise adjustment for each of the four components of the DFSK signal (two Marks and two Spaces.) An interesting observation is the severe wear on the KC and MC knobs - it looks like the paint is just "worn off" of the tuning knobs. Also, not every R-390A at Clark AB was fitted with a black panel. The majority of Clark AB R-390A receivers had the standard gray panels. There was a huge listening DF post near Clark that employed a Wullenweber or "Elephant Cage" DF antenna system for intercept, identifying and recording of signals of interest for subsequent decrypting.

It's possible that some of the panel nomenclature was filled in red, usually all of the "CAUTION" nomenclature along with DIAL LOCK, ZERO ADJ, STAND BY and CAL. This type of red fill has been seen on two different "black panel" receivers. Note in the Morse Hall photo that there is a white area in the lower left corner of the panels on each receiver. Its location below the PHONE jack might be of significance but its actual purpose is unknown at this time.

It's certainly possible that black panel R-390A receivers were used elsewhere but the Clark AB Morse Hall photo is the only photographic evidence (that I know of) showing their actual existence, use and location. Since the function at Clark AB was to intercept and decrypt signals of interest, it's likely that most of that function was by military agencies that were under the NSA. So, the "NSA-CIA" connection to the "Black Panels" is probably not too far from reality.  


Morse Hall at Clark Air Base - Philippines

R-1247/GRC-129 - An entire upgraded SSB comm system for the USAF. Used Manson Labs modified R-390A receivers. Apparently, not all receivers were modified exactly alike. Some had external oscillator inputs. Some receivers had Manson Labs synthesizers installed along with Manson Labs Product Detector modules. Some receivers ended up being used by NASA but these receivers weren't built for NASA. USAF was the source and primary user. The SBM-1102 Stabilizer Kit is the synthesizer that was installed in some of the Manson Labs installations. Apparently these synthesizers weren't reliable and use was limited. Unknown if the SBM-1102 could be purchased separately. Manson Labs was a subsidiary of Hallicrafters.

R-9xx - No details other than possibly a R-390A with LED dial readout installation.

R-1981/TSC-25 - Modified to operate with external frequency synthesizer built by TMC.

R-5076/GRR - This may have been a Canadian version assembled by Zenith Corporation. No specific details known.


R-390, R-390A  Accessories

Security Dial Cover

The Security Dial Cover is found installed on R-390A receivers once in a while. The "cover" mounts using the two upper screws of the dial cover and is hinged with spring-loading so it can be placed in almost any position and remain there. All are painted black and all have a cream-color felt pad on the inside to prevent damage to the receiver dial cover itself.

What were these used for? The most-often-heard purpose is for preventing unauthorized (or unintentional) observation of a listening frequency by radio surveillance room visitors that didn't have the necessary security clearance. This didn't necessarily mean "spies" or "moles," it was just that in certain radio surveillance rooms, the frequencies monitored were classified and not everyone that might have a valid reason to come into that radio room had the necessary security clearance for knowing the frequencies monitored.

The usual procedure for the radio operator was to raise the cover, tune to the desired frequency and then lower the cover back down. That way the actual tuned frequency was only visible for a short time. Sometimes the covers were left up but immediately lowered if anyone entered the room.

It was also possible to use these covers in a "lights out" situation where the receiver had to be kept in operation. The lowered cover would block the light from the illuminated dial and kept the area darkened.


LS-206A/U Rack Mount Dual Speaker

So-called "Diversity Speaker" - These dual speakers were built by several different contractors, Crosley Radio Corp. was one and Oneida Electronics, Inc. was another as was TRW. The Crosley versions are the earlier versions and have circular cut-outs with a maroon grille cloth. The later Oneida and TRW versions have a pattern of holes that create a square opening for the speaker with a beige grille cloth behind the hole pattern. Both types of speakers have matching transformers that provide a 600Z ohm load for the input. The channel switches will silence that speaker selected by switching from the speaker line to a 600 ohm load resistor. The front panel to the housing mounting is entirely sealed with gaskets and the nuts used are all nylock types. One would think that the LS-206 cabinet is sealed but it isn't. The cables exit out grommet holes to attach to the terminal strips. Also, the speakers aren't water-proof.

If you have an LS-206, one use for it is to connect one speaker to the LOCAL AUDIO output and then connect the other speaker to the LINE AUDIO output. That way you can run both audio outputs from your R-390A and also operate both speakers in the LS-206 simultaneously.

The LS-206 was a component part of the AN/GRC-26 Mobile RTTY Communications Hut. The receiving portion of the GRC-26 had two R-390 receivers that were rack mounted with a CV-116 Diversity RTTY Converter and the LS-206. The dual speakers allowed the operator to monitor the signal while tuning in each receiver. Once the RTTY signal was tuned in on each receiver the speakers could be turned off.


photo above: The Oneida Electronics version of the LS-206A/U. The contract number on this LS-206 is 15488-PP-63 implying that the contact date is 1963. Serial number on this unit is 19.


CY-979/URR  Cabinet, Electrical Equipment, CY-979A/URR


photo above: 1951 Collins R-390/URR Receiver in CY-979/URR table cabinet

The CY-979/URR cabinet was specifically designed for the R-389, R-390, R-391 and the R-390A receivers. All versions of these receivers will fit into the enclosure perfectly with a "wrap around" fit to the back of the receiver that provides a good seal along with screened ventilation holes and louvers to keep out most live insect invaders. The cabinet is made out of aluminum painted smooth gray. The original CY-979 included "skids" that were part of the mounting system. Each skid had a slight up-bend on each side that would slide into the receiving part of the mounting system and thus secure the cabinet in position. The skids were made out of heavy gauge steel painted gray. The CY-979 was specifically referred to as a "mobile table cabinet" and was primarily used in towed huts or vehicles. There was also a CY-917 "light duty table cabinet."

The CY-979 shock mounts were identified as MT-1179(A)/U and were made by several different manufacturers. Barry, Lord Mfg, and Sani-Cap were some of the mount contractors. The mount flange is bolted to the skids with four flat-head screws the are threaded into tapped holes in the mount's flange. In some versions, each the screws also had nylock nuts installed to keep the screws from loosening. The cabinet mounts to the top of each shock mount with a single bolt. Some versions of the CY-979 have a metal data plate that is mounted top-center of the cabinet. Other versions will have a decal data tag in the same location. The decal data tag is shown in the photo above (note the 1955 contract date.)

 By the late fifties, the CY-979A/URR was being produced. This type of cabinet changed the way the rear opening was made. Apparently, the rounded corners of the earlier versions were expensive to produce so the newer "A" versions of the CY-979 cabinets have a rear opening with square corners. The CY-979A cabinet shown was built by Taffet Electronics, Inc. and the ID is silk-screened on the inside-bottom of the cabinet. This silk-screened ID is quite large and very easy to find and see. Taffet was originally "Taffet Radio and Television, Inc." but changed their name to "Taffet Electronics, Inc." around 1962 because of a law suit.

photo above: The photo above is of the rear of a CY-979 cabinet with R-390 installed showing the "wrap around" fit to the back of the receiver that provides a good seal. In addition, note that the opening has "rounded" corners which is standard for the non-A cabinets.

In the 1990s, W5MC offered CY-979 cabinets in an ad that ran in Electric Radio magazine. The price was between $150 and $200. These cabinets apparently were from either a large collection or some storage depot. The cabinets were "restored" by W5MC and this generally included a new powder coat paint job. Then they were offered for sale. Since the "restoration" removed the original manufacturer's ID, W5MC added a small ink-stamp ID placed on the inside bottom of the cabinet with a "1990s date." Sometimes these are referred to a "reproductions" but even in the 1990s the cost to manufacture an exact reproduction of the CY-979 with shocks and skids along with screened vent-holes would have cost much more than the $200 selling price. These are more accurately called "restored" versions.

Many times you'll run across CY-979 cabinets that are missing the shock mounts and the skids. This seems to have been commonly done to make the cabinet look less "military." If the CY-979 is missing the shocks and skids, it is INCOMPLETE and should be priced substantially less than what the complete CY-979s sell for (which is a lot, these days!)

NOTE: Prices paid for items always changes. I thought that an incomplete CY-979A cabinet shouldn't be too expensive but,...just recently (8/2022) a nice condition CY-979A cabinet that did have the shocks but did not have the skids sold for $675 (plus shipping) on eBay. I guess, draw your own conclusions on the price of a complete CY-979. 

photo left: The rear opening of a CY-979A cabinet. Note the squared corners as the major change in the construction.


photo right: The silk-screened ID of the Taffet Electronics, Inc. CY-979A/URR cabinet.

 
Conclusion - The R-390A was literally "the best" vacuum tube receiver that could be built in the 1950s and 1960s. Virtually no expense was spared and it used absolutely the best parts available at the time in its construction. Its design and build-quality provided the best performance available with highly reliable construction. Ease of maintenance was designed into the receiver with fully interchangeable modules and component parts regardless of contract builder or date of construction. The R-390A was able to cope with any reception conditions from terrible atmospheric noise to deliberate interference and was almost always able to successfully achieve good copy under the worst imaginable conditions. The R-390A was used extensively by the various USA security agencies for intercept, recording, decrypting and identifying Cold War adversaries' signals that were sent to their agencies. The R-390A receivers as communications receivers were used in mobile huts for diversity RTTY signals providing accurate copy regardless of poor conditions or deliberate signal interference. The ability of the R-390A to function reliably in some of the worst environments is legendary.

Operating a properly rebuilt and aligned R-390A today is a pleasure. Pride of ownership is derived from knowing that your receiver was originally built to exacting specifications by some of the foremost American electronics companies and that its performance is the best that could be achieved using vacuum tube technology. Also, in knowing that it would be literally impossible to produce such a receiver today. The cost would be staggering and complexity something most companies would either be incapable of building or something they would definitely want to avoid building due to the excessive cost versus limited profit factor.

Admire your R-390A in knowing that it could only have been built during one specific era - when vacuum tube technology and vacuum tube receiver designs were at their zenith. At a time when this country produced the most advanced electronics apparatus in the world and our government was willing to provide the military with the very best equipment, regardless of cost.

References

Hard Copy Material:

1. Military TMs, Navy Manuals, etc. - the originals provide detailed information on all aspects of receiver design, operation and repair. There are several manuals available and the proper one for your receiver depends on when the receiver was manufactured. Check the publication date of the manual versus your receiver build-date. Army manuals for procedures,...Navy manuals for schematics

On Line Material:

1. www.r-390a.net - the most complete instructions for gear box teardown and reassembly, lots of other information, too.

2. www.navy-radio.com has lots of information on R-390A receivers from a USN perspecitive.

3. Literally, there is so much data on the R-390A on the Internet it's impossible to list it all. Just do a search on "R-390A" and you'll have pages and pages to look through not to mention photographs galore.

Eyeball, On the Air, E-mail:

1. Thanks to Craig McCartney W6DRZ for all of the data on CD on the R-390A variations.

2. Thanks to Moe Sellali CN8HD/W9 for the detailed R-725/URR information along with the data plate and the proper IF output connector for the R-725/URR.

3. Thanks to Mike Student W7MS for providing the information on the USMC R-390A with OD front panel and many other contributions

4. Thanks to John Svboda W6MIT for the PTO test fixture along with lots of other R-390A info and for many other contributions.

5. Thanks to Les Locklear for sending the Chuck Teeters R-725 article published in Electric Radio January 2006

6. Thanks to Paolo Viappiani for information on many of the R-390A modifications-variations and details on the Microdial.

7. Thanks to all of the many R-390A enthusiasts that have provided information over the years either by e-mail, eye-ball or over the air conversations.

Henry Rogers/Radio Boulevard-Western Historic Radio Museum © March 2012-2022        Major additions July 2012, trimmer cap info May 2013, R-390 Slug Problem Aug 2014, add 1967 EAC restoration Aug 2016, add sections on R-392, R-648 and LS-206 Aug 2016, '67 EAC #2 added July 2017, R-725 info Nov 2017, R-389 info Feb 2018, more R-389 VFO info Sept 2019, more R-389 VFO experimenting June 2022, added NSA Black panel, ASA Motorola and edited the entire write-up with minor additions and corrections July 2022, USMC OD Panel R-390A write-up and photos added Aug 2022,  Blue Striper write-up with photos of St. Julian's Creek Annex added Aug 2022,  added "Building a R-390A from Parts" Dec 2022,
 

R-390A PART 1                    R-390A PART 2                    R-390A PART 3                    Return to Home Index


Radio Boulevard
Western Historic Radio Museum

 Vintage Radio Communication Equipment Rebuilding & Restoration Articles,

 Vintage Radio History and WHRM Radio Photo Galleries

1909 - 1969

- 60 years of Radio Technology -


This website created and maintained by: Henry Rogers - Radio Boulevard, Western Historic Radio Museum © 1997/2025