Radio Boulevard
Western Historic Radio Museum


 WWII Radio Communications Equipment  


Information in Part 1
USN Shipboard & Shore Radio Comms Gear
USN Air Comms & Air Nav Radio Gear
USN Shipboard & Shore Entertainment Radios

Information in Part 2
US Army Signal Corps Gear
, USAAF Air Comms & Air Navigation Radio Gear 
Radiomarine Corp. Shipboard Gear, US Coast Guard Shipboard Gear
WWII Test Equipment

Information in Part 3
WWII Ally Radio Gear


photo right: USS Buck DD-761 - Destroyer - Radio Room 3 (emergency radio room) - late 1940s
or early 1950s. The USS Buck was launched during WWII in March 1945 but wasn't
commissioned until June 1946. Most of the USS Buck's action was in the Korean War.
Receivers are RBA (left) and RBB (being tuned.) The mill is an Underwood SII.
The equipment in the left foreground is a TBS transmitter-receiver for VHF "ship-to-ship" communications.


WWII Radio Communications Equipment - Part 1


U.S. Navy

U. S. Navy Shipboard and Shore Communications Equipment


RAK-7


RAL-7

Navy Department - RCA, Andrea Radio Corporation, The Magnavox Company 
RAK and RAL Series

Designed for the Navy by RCA in 1935, the RAK and RAL receivers were intended to replace the Sylvania-built RAG and RAH receivers designed in 1933. The RAK/RAL cover the same frequencies as the RAG/RAH and are about the same approximate size. Although the Navy had RCA design superhets for both LW and HF (the RAA and RAB from 1931) there seemed to be a reluctance to use the superhet on VLF or LF and the Navy receivers that followed were all TRF with Regenerative Detectors or TRF with Tracking BFO (or heterodyne detector) receivers until after WWII. The RAK and RAL were used in various shipboard applications (also submarine) up through WWII. The two receivers were ruggedly built and reliable in their design simplicity. The RAK is a six tube TRF receiver with regenerative detector that covers 15 kc up to 600 kc in six tuning ranges. The RAL is also a six tube TRF  receiver with regenerative detector but covers 300 kc up to 23 mc in nine tuning ranges. Tube line up is the same for both sets with four 6D6 tubes and two type 41 tubes however the RF amplifier sections are somewhat different in each receiver. The RAK uses autotransformer style RF coils while the RAL uses standard RF transformer style coils. Both receivers use a dual dial readout (0/100 with one rotation incrementing the 0/10 one digit) that must be correlated to a graph in the manual for tuned frequency.

Each receiver has its own separate power supply, the CND-20131, which provides power through a ten foot long cable that connects to a terminal strip inside the receiver. The power supply uses a 5Z3 rectifier, an 874 regulator tube and an optional 876 ballast tube that was supposed to be used when the AC line voltage was subject to fluctuations (can cause frequency instability in the RAL receiver at higher frequencies - usually higher than 10mc.) The AC supplied on ships wasn't always stable and fluctuations could occur with just about any switched load on the line. The 876 ballast compensated for the fluctuations in the AC voltage. Meters on each receiver monitor the tube heater voltage (right) and the audio output (left.) The RAK receivers were intended for CW or MCW reception only as a low pass filter is permanently connected in the circuit to limit the upper audio response to about 1200 hz. The RAL had the option of allowing the low pass filter to be switched out of the circuit (switch in "BROAD" position) and can therefore can be used to receive voice transmissions along with CW and MCW signals. An elaborate audio AVC system is employed in both receivers that was a common RCA circuit that performed as an "output limiter" to cope with atmospheric noise, static, lightning bursts and to limit overloading from strong signals. A selectable audio frequency narrow bandpass filter system is also employed in each receiver that allows the operator to switch to various audio frequency tone ranges to enhance a specific CW note for better copy during noisy conditions (or interference.) The audio output Z is 600 ohms and is intended to drive earphones (but it will drive a 600 ohm Z speaker quite well.) The RAL and the RAK receivers were designed to work together through a separate control box CND-23073 that allowed the operator to monitor two frequencies simultaneously (each receiver tuned to different frequencies with the audio from each combined) and also to control power to each receiver. Navy designation for RCA-built receivers will use CRV prefix with the same numbers for identification. Prefix CND was used for Andrea-built equipment.

The RAK and RAL receivers are surprisingly good performers and interesting to operate. The RAK is a first-class longwave receiver and can easily pick up NDBs from all over North America, WWVB or JJY (Japan's LF WWVB equivalent at 40KC) along with LW BC stations (I used to receive Radio Rossii from Sakhalin Island 279kc before it and most other LW BC stations went off the air in 2014.) Any of the VLF Navy MSK stations worldwide are easy to receive. The RAL is also an excellent TRF receiver that will function quite well on the HF ham bands providing good quality audio for voice signals. For stable copy of CW or SSB signals on 20M and shorter wavelengths the 876 ballast tube should be installed in the Power Unit. Frequency fluctuations when tuning stations above 10mc are not noticeable when receiving AM signals, only CW or SSB signals will exhibit some slight frequency fluctuations with power line voltage changes. SW BC and AM BC can also be received with reproduction quality that can easily be considered good communications-grade audio. The RAK-7 and RAL-7 pair shown in the photo are from 1945. There was also a RAK-8 and RAL-8 produced with The Magnavox Company as the contractor. (See "Vintage Longwave Receivers - Part 2" webpage for an in-depth article about these receivers.)


NAVY DEPARTMENT - BUREAU OF SHIPS

National Company, Inc.   and   Wells-Gardner & Co. 

RAO Series

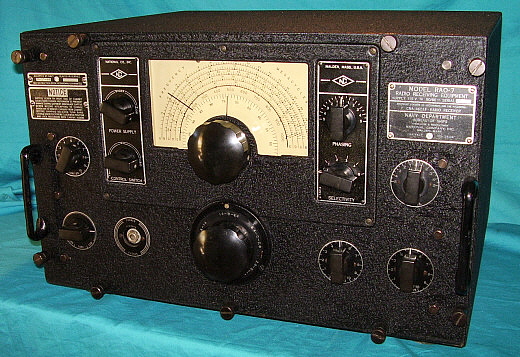
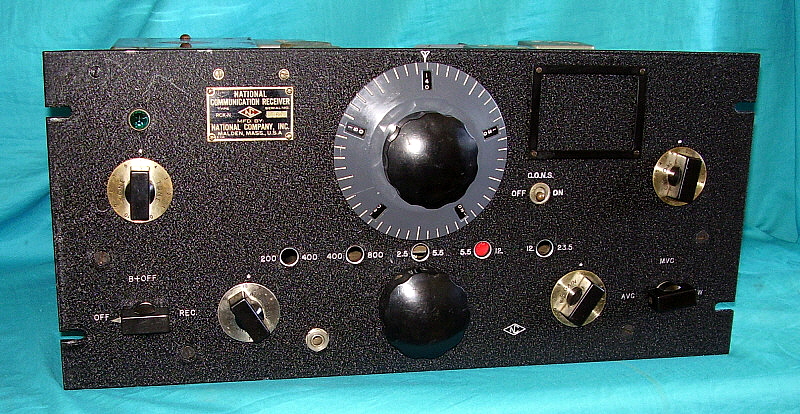
RAO, RAO-1 - National began supplying the U.S. Navy with their NC-100XA direct dial readout, coil catacomb band switching receiver by mid-1941. Designated as RAO, the first versions are somewhat similar to the standard NC-100XA receivers that National had introduced in June 1938. The early RAO circuit used 10 tubes and tunes AM BC up to 30MC and also features a crystal filter, a S-meter, a tone control and a noise limiter. The RAO was a 19" rack mount receiver with a 20,000Z, 2 watt output and a 500Z phone output at 500mW. The RAO-1 was a table model receiver that had a 5000Z ohm audio output transformer and a 600Z ohm phone output. Both receivers had single-ended audio output. Also, the field coil speakers were eliminated and an extra choke was added to the power supply to replace the field-coil which doubled as a choke in the civilian models. The civilian NC-100XA had push-pull audio employing eleven tubes. Since the push-pull audio was eliminated, these early RAO versions employed ten tubes.

RAO-2 - Before WWII began, the Navy wanted minimal radiation from the receiver's Local Oscillator on the antenna. This was primarily to allow the receiver to be used in the presence of other shipboard radio equipment without interference, although that probably didn't sound as important as the most publicized reason, that of stopping enemy direction finding and locating efforts. Beginning with the second of the numbered suffixes, the RAO-2, National added an extra TRF Amplifier with an additional coil catacomb and tuning condenser housed in a bolt-on rear chassis and cover. The extra RF preselection stage provided the isolation necessary to keep the LO radiation on the antenna below the designated level  of <400pW. The USCG R-116 receiver contract dates from May 15, 1941 and it incorporated double-preselection in the same manner that the RAO-2 does. The engineering and design upgrade to add double-preselection (two TRF amplifiers) to the RAO probably dates from late-1941 and the initial contract was issued in April 1942.  The second TRF amplifier was set-up for unity gain, so, ideally, the RAO-2 would have similar sensitivity to the single-preselection versions but image rejection was improved and LO leakage to the antenna reduced.

1941 RBH MW-SW Receiver

The 1941 RBH receiver was identical in physical appearance to the RAO-1 receiver.


1943 - Wells Gardner & Co. - RAO-3 installed on original shock mount

The RAO-2 was also set-up to use the improved Crystal Filter that had been introduced with National's NC-200 receiver (in late 1940.) This Crystal Filter used a stepped-switch for Selectivity and a variable condenser for Phasing. With the new Crystal Filter, the IF was changed to 455kc, the industry standard and the IF of the NC-200 receiver. The additional RF amplifier increased the RAO-2 tube-count to eleven. 

RAO-3, 4 & 5 - Most WWII equipment was built under contract and not all RAOs were built by National. Wells Gardner & Company was the second contractor for the RAO series, building the RAO-3, 4 & 5. There was a myth that the Navy considered the Wells Gardner versions to not be suitable for duty onboard ships and had them only installed at shore stations. The WG USN manual (NAVSHIPS-900,359-1B) specifically states that the receivers are suitable for shipboard use since the LO leakage to the antenna is <400pW. Construction is just as robust as the RAO-2 or RAO-6. The RAO-3 and RAO-4 were built on the same contract, NXss21446, which was dated Jan. 11, 1943. The RAO-3/4 manual specifically mentions that the audio output impedance is 600Z ohms. The RAO-5 was a later contract that included a loudspeaker (built by Jensen) as accessory equipment. As with all RAO receivers, the speaker terminals on the rear and the PHONE jack on the front panel are connected in parallel so any 600Z ohm load (phones or 600Z loudspeaker) can be connected to the front PHONE jack for convenience. 

Although many of the parts and components used to build the RAO-3, 4 & 5 appear to be National Co. parts, these "look-alike" parts were actually built to "spec" by subcontractors and suppliers from around the Chicago area. For example, the coil contact insulators were made of R-39 material in National RAO receivers but are made of molded bakelite in the WG RAOs. The bar knobs look exactly like National's but a side-by-side comparison reveals that the WG versions are very slightly smaller with squarer edges and a much narrower pointer. The paper-wax capacitors were built by John E. Fast & Co. located in Chicago. The NAVSHIPS manual lists each component used to build the RAO with a manufacturer code. Another list cross-references the code to the actual manufacturer. Conspicuous in its absence is National Co., Inc.

RAO 6, 7 & 9 - National continued on with the Navy contracts building the RAO-6, 7 & 9 (the designation RAO-8 ended up not being used.) RAO-2 and RAO-6 receivers will have an ID from National of NC-120 located on the crystal filter control nomenclature plate. The first couple hundred RAO-6 receivers had S-meters and were very similar to the RAO-2. But, the majority of RAO-6 production receivers were set-up for panadaptor and didn't have the S-meter but did provide a rear connection using a SO-239 UHF receptacle for the panoramic adaptor hook-up. The USN identification of the panadaptor version RAO-6 was CNA-46187-D.

The RAO-7/9 receivers were even more robust in construction and had increased shielding to further allow their use with other shipboard equipment without interference. The audio output Z remained at 600 ohms. The RAO-7/9 eliminated the S-meter in favor of panoramic adaptor connections as most versions of the RAO-6 did.  The RAO 7/9 simplified the maintenance of the receiver by designing the chassis so that it was easily removable from the cabinet (handles were added to the receiver front panel to assist removal.) The cabinet itself was redesigned for better shielding and easier mechanical construction by making it a one piece unit. The early RAOs had used a separate shock mount cradle system but the new cabinets mounted the shocks directly to the bottom of the cabinet further easing construction and maintenance. The RAO-7 & 9 receivers are physically larger than the earlier versions with full 19" rack width panels although the receivers are not designed for rack mounting since the copper-plated steel (painted black wrinkle) cabinet was part of the shielding necessary. The earlier RAO versions are 17.5" wide, with an integral panel-cabinet-chassis construction that requires major disassembly to service or repair.

The RAO receivers have impressive sensitivity even though the second RF amplifier is running at unity-gain. The stability is also impressive with very little drift after a short warm-up. The tuning rate is quite fast (same as the stock NC-100A) which allowed for quick band scanning for signals. The fact that the later RAOs have provisions for panoramic adaptor operation seems to confirm that they were used more for surveillance rather than communications.

1944 - National Co. - RAO-7, sn:10 on tag, chassis sn: H720. This receiver is from the first contract of RAO-7 receivers. This receiver was in storage for decades at the Alameda Naval Air Station near Oakland, California. It was never put into service. It's immaculate and all-original condition has allowed its use as a "reference" as to "what is correct?" when restoring other RAO-7 receivers, J444 for example, which is shown in the next photo down in this section.

The receiver shown in the photo to the right is RAO-7 SN:J444. This receiver was destined for the South Pacific and, as a consequence, it was given a heavy moisture and fungus preventative coating (MFP.) The MFP was applied to the chassis, front panel tags and knobs giving the receiver's tags a gold appearance. The data plates are from a "junk" RAO-7 receiver and don't correlate to the J444 chassis serial number. The chassis serial number is National's identification while the data plate is the Navy's identification. "Tag swapping" was sometimes performed at Navy depots but the most common reason is for later (recent) restorations that have required "tag harvesting" from junk receivers to complete a RAO rebuild.

The receiver shown in the above-right photo is the National RAO-7 SN: 10. The contract date is Sept. 22, 1943 and the Navy acceptance date is in 9-30-1944. National-chassis stamped serial number is H720. This receiver was stored for many years at the Alameda Naval Air Station in California though it was never installed or put into service. It was never MFP'd. It is in excellent condition and is an all original example that functions beautifully. SN:10 was used as a reference as to "what's correct?" when restoring SN:J444.


For the ultimate source of detailed information on all versions of the USN RAO receiver go the website-article "Navy Dept. RAO Series of Radio Receiving Equipment" - Use Home Index at the bottom of this page for navigation.


RAO-7  SN: J444

NAVY DEPARTMENT - Model RCX Panoramic Adaptor SN:46
contractor: Panoramic Radio Corp.
 

WWII panoramic adaptors aided surveillance by allowing the radio operator to see instantly if any unknown signals appeared within the slice of the spectrum he was monitoring. This eliminated the constant tuning that was necessary for receiver-only surveillance or for "guarding frequencies" using multiple receiver set-ups. The panoramic adaptor was primarily used for intercept of unknown signals. It wasn't necessarily used for signal analysis other than it was obvious to the radio op if the signal was CW or if it was somehow modulated. Surveillance and intercept was the panoramic adaptor's main role in WWII.

Panoramic Adaptor Model RCX was to be used with receivers that had an IF in the range of 430kc up to 480kc. The most popular use for the RCX was paired with the RAO-7. Shown to the right is Navy RAO-7 SN:10/H720 operating with Navy RCX Panoramic Adaptor SN:46. The RAO-7 is tuned to Radio Havana on 11.75mc in the 25M Shortwave Band. Radio Havana presents a strong AM signal as shown by the peak at the center of the display. Up frequency (to the right on the display) are two more shortwave BC stations very close to each other's operating frequency (common in the shortwave BC bands.) The total slice of spectrum showing is about 100kc or +/- 50kc each side of center. This setting allows the graduations at the bottom of the scale to be used to estimate where in the spectrum other visual signals are located. In this case, the two higher frequency SWBC stations are about 20kc up band from Radio Havana.

The RCX Gain is usually adjusted to just show a slight indication of noise at the bottom of the display with the receiver not tuned to a transmitting station. This setting will allow any signal above the noise level to show on the display. Extremely strong signals may require a slight reduction in the RCX Gain to allow visual observation of the peak of the signal. Also, receiver RF gain can be reduced if necessary. If the sweep is expanded, e.g., reduced to near 0, more details of individual "tuned" signal can be observed. At +/- 50kc sweep only general characteristics can be observed. Modulation can be easily seen although its rapidly changing display characteristics doesn't photograph well. Comparative amplitudes can be easily seen.

The adjustments behind the "toilet seats" are for setting the display to be positioned correctly within the graduated scale. Intensity and Focus adjust the quality of the trace. Center Frequency allows other receivers with somewhat different IFs to be used. The RAO-7 IF is 455kc but the HRO receivers used 456kc and the Hammarlund Super-Pro receivers used 465kc. Any of those receiver's IF are well within the adjustment range of the Center Frequency control. Sweep allows setting the approximate spectrum range of display from 0kc up to 200kc. The setting of ~ 100kc allows the display's graduated scale to be used to measure where other signals are located in reference to the tuned signal. There were other graduated range scales available depending on user's requirements. The RCX is very similar to the Signal Corps panoramic adaptor version, the BC-1031-B.


Navy Department - Bureau of Ships  -  Radiomarine Corporation of America 

RAZ-1 (AR-8503, AR-8503-P, RM-6)

RAZ-1 was the Navy designation for a group of equipment consisting of a four tube longwave TRF receiver with regenerative detector, a matching one tube preselector and a one tube AC power supply - all built for shipboard use. The Navy number for the receiver is CRM-46092 but it was also known as the AR-8503 in commercial applications. The AR-8503 was in use as early as 1938, mainly in commercial shipboard radio rooms. The receiver circuit uses one 6K7 RF amplifier, a 6K7 regenerative detector, a 6K7 1st AF amplifier and a 6F6 AF output amplifier. The one tube (6SG7) preselector is Navy number CRM-50092 or commercial number AR-8503-P and the AC power supply is Navy number CRM-20096 or commercial number RM-6 (5Z4 rectifier tube.) Both the preselector and the AC power supply were developed later in production being introduced around 1940. Tuning is from 15 KC to 600 KC in four bands. The Preselector was used to reduce regenerative signal radiation to the antenna in addition to increasing sensitivity and selectivity. The National Type "N" dials are 0-100 scaled with 180 deg. rotation and a calibration chart is included in the manual. The RAZ-1 could be operated from batteries if necessary. The receiver and preselector panels are beautiful machine-textured brass with a matte-chromium finish. The receiver case is copper-plated steel under the gray wrinkle finish and uses "shock-mount" feet that were screwed to the operating table, (the pre-selector and power supply were normally screwed directly to the operating table.) The Navy contract is dated December 2, 1941 - just five days before the attack on Pearl Harbor. The RAZ-1 equipment shown are all assigned identical serial numbers - SN:65. Performance of this operational RAZ-1 is a pleasant surprise with an ability to extract weak signals out of the noise that is impressive. NBDs from all around North America, LW BC stations (not any more -2022) and Navy VLF MSK stations from around the world are easily received. Output is to a set of Western Electric 509W earphones as recommended in the manual. (See "Vintage Longwave Receivers - Part 1" webpage for an in depth article about this receiver and also its commercial counterpart, the AR-8503.) 


RBA, RBB & RBC Series

Considered by many military radio collectors to be the ultimate in WWII receiver design, the RBA, RBB and RBC receivers were "cost-no-object" in design and construction. The resulting performance was so good that these incredible receivers were still in-use by the USN (in some locations) two decades after WWII ended. Today, many vintage military radio amateurs use either the RBB or RBC as their station receiver while long wave enthusiasts consider the RBA one of the best vintage low-frequency receivers available.

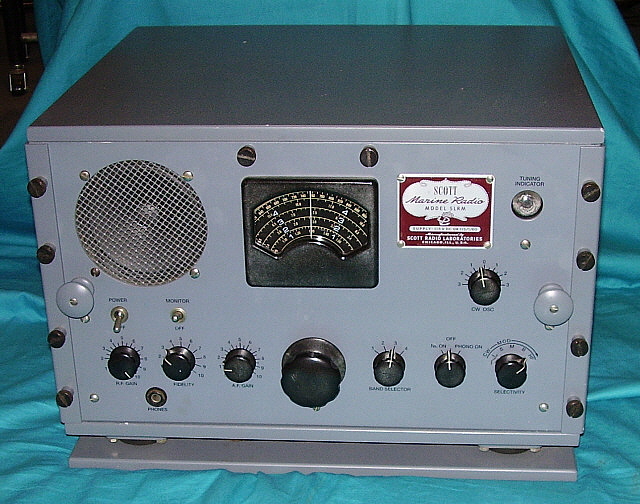
RBA-1 CFT-46154
Navy Department - Federal Telephone & Radio Corporation (for RCA) - RBA Series

In the late thirties, it was becoming apparent that a replacement receiver was necessary for the aging RAA series of superhet longwave receivers that were initially designed in 1931. Also, the Navy was still using the RAG (1933) and the RAK (1935) LF receivers in some installations. RCA's and the Navy's new design was going to blend the advantages of the TRF designs of the RAK with the TRF and non-regenerative detector with tracking BFO of the RAG. For shipboard operation an effort to keep the radiation on the antenna to a very low level that prevented enemy DF of the receiver location was necessary. Additionally, the low-level of radiation allowed the receiver to operate in the presence of other receiving and transmitting equipment and radar without interference. In order to allow demodulation of CW signals a "tracking" beat frequency oscillator (BFO) like that used in the RAG was incorporated into the design. Since the new receiver was not a superheterodyne, the BFO had to track the tuned frequency, providing a 1kc heterodyne which allowed CW to be readily copied. There were a couple of reasons for not designing the new LF receiver as a superheterodyne. First was to allow complete coverage of the tuning range of 15kc to 600kc. The 1931 solution to this problem had been the expensive RAA receiver that used four different IFs and BFOs to allow complete LF coverage. The second was that the conversion process in a superheterodyne can create a lot of internal noise in the receiver - a problem when operating in an already noisy slice of the spectrum.

Federal Telephone & Radio Corporation had years of experience in building shipboard equipment for Mackay Radio and they were selected as the contractor to build the RBA receivers for RCA. Federal T & R Corp. was owned by ITT and had grown out of the old Federal Telegraph Company that was originally located in Palo Alto, California. FTC's chief engineer was Frederick Kolster, sometimes credited inventor of the directional loop antenna. Lee DeForest was associated with the company at one time. During the mid-twenties, FTC built consumer radios under the "Kolster" brand name. Mackay Radio & Telegraph Company had close ties to FTC and all early Mackay maritime radio equipment was built by FTC. When Mackay was purchased by ITT in 1928, it was not very long before FTC also was added to the growing list of companies owned or controlled by ITT. The purchase took place around 1931 and at this time FTC moved to New Jersey. In New Jersey, FTC continued to build maritime radio equipment, usually for Mackay Radio. Around 1940, Federal Telegraph Company's name was changed to Federal Telephone & Radio Corporation.

At $3000 each, the new RBA receiver was certainly expensive and a look inside the receiver reveals an incredible level of electro-mechanical design and construction. The tuning ranges from 15kc up to 600kc in four bands. The illuminated dial readout is direct in kilocycles along with a two-dial logging scale. The mechanics of the design allow for super-smooth operation of the tuning system. The Gain adjustment controls the sensitivity of the receiver and a gear-driven auxiliary gain control operates from the tuning dial and provides constant gain levels across the tuning range. Two meters are provided, one to monitor Output Level in db and one to monitor the B+ voltage. An Output Limiter is provided for noisy conditions or unexpected strong local signals with the Output Level adjustment setting the output limiter's maximum level. Two levels of selectivity are provided, Broad selectivity is limited to about a 1300kc audio roll-off via an internal LP filter and the Sharp position is provided by a 1kc bandpass filter for CW in noisy conditions or in cases of interference. Audio output is 600 ohms Z and is intended for earphones although the RBA will drive a matched loud speaker if necessary.


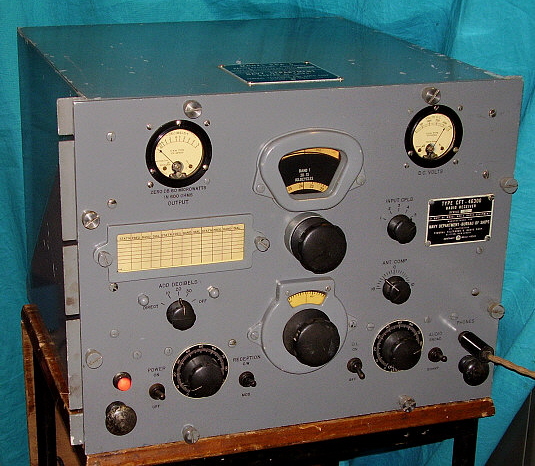
photo right: CFT-46300, RBA-6 from 1945


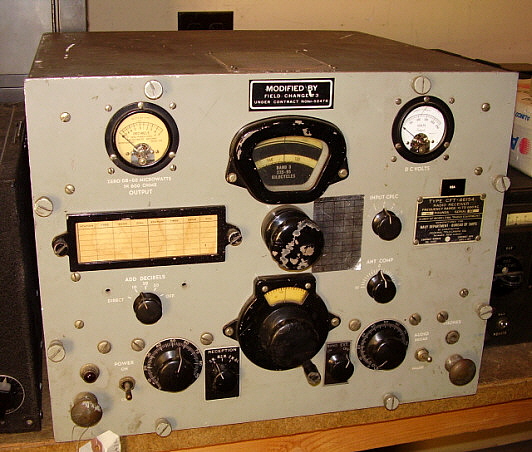
photo above: RBA-1, CFT-46154, Modified by Field Changes installed that removed the toggle switches for CW OSC and Output Limiter (changed to Freq Ext control to allow tuning to 14.5kc) and replaced them with two position rotary switches. Front panel repaint but cabinet is still black wrinkle on this receiver. This mod is fairly common and was incorporated into the RBA-7 versions as standard circuitry. The Simpson D.C. VOLTS meter is fairly common as a field replacement meter. These meters are almost identical to the stock USN Weston 506 that was original equipment. The exception is the white painted scale. I owned this RBA-1 for a short while. I traded it off for some other piece of gear. It didn't have the 20130 power supply or the armored cable with it, just the receiver.

The separate power supply, CRV-20130, provides the filament voltage and B+ requirements via an armored cable with heavy-duty connectors. The power supply will easily operate two receivers for emergency conditions and two separate connectors are provided. This is the same power supply used for the RBB and RBC receivers (although the 17vac required for the RBB and RBC is not used by the RBA receiver.) The power supply has a cold-cathode regulator tube (OC3) and a HV rectifier (5U4.) The RBA uses eight tubes, three 6SK7 RF amplifiers, one 6J5 Triode Detector, one 6SK7 BFO, two 6SJ7 AF amplifiers and one 6K6 AF Output.

The table top versions of the RBA receiver are identified as C(FT)-46154 or 46154-A (FT identifies Federal Tele.&Radio Corp. as the contractor) but rack mount versions use CFT-46300 as the receiver identification. Shown in the header photo is the CFT-46154 RBA-1 from 1943. All versions of the RBA's receiver circuitry are identical. RBA-1 to RBA-5 were black wrinkle finish but the RBA-6 and RBA-7 were smooth gray paint as supplied to the USN. Many early RBA receivers were later repainted by the USN so it isn't uncommon to find early versions that were originally black wrinkle finish but are now smooth gray paint.
The RBA receivers are impressive performers with incredible sensitivity, direct dial read-out with illumination and a tracking BFO rather than regenerative-autodyne detector. The tracking BFO actually works quite well for finding the carrier on NBDs. The dial accuracy is excellent and allows tuning NDBs by frequency rather than constantly referring to charts or graphs. The LP filter does limit the audio frequency response on BC stations but not to the point where the voice is incomprehensible. The OL works quite well at limiting the maximum output and not distorting the signal (unless advanced too far.) The RBA is a first-class longwave receiver capable of receiving any of the LW signals found below 500kc.


See "Vintage Longwave Receivers - Part 2" webpage for an in-depth article about the RBA and how to achieve the best performance from these incredible receivers.


photo above
: RBA-2 CFT-46154 SN:168, from 1943 (as found condition.) This RBA-2 was being hauled around Carson City, NV in the back of a Ford Explorer for several months or more. I purchased it and 20130 Power Supply right out of the back of the Explorer in October 2019. Unfortunately, there was no armored cable but there was a spare connector and there was no AC power connector or cable. The overall condition is mostly complete, very good but dirty and restorable. The interior appears excellent. The brass tag is a Navy asset tag.
Navy Department - Radio Corporation of America
RBB (CRV-46147) and RBC (CRV-46148)

In 1939, the Department of the Navy contracted with RCA to build the ultimate military communications receiver. The design was to replace the aging RAB superhet receivers with new receivers of the same rugged construction but with much more modern design and performance capabilities. RCA utilized input from engineers from 17 other companies during the design phase of the new receivers. By 1940, the RBA, RBB and RBC were ready for production. The RBA was a TRF LW receiver that matched the RBB and RBC in size and power requirements (description above.) The RBB and RBC were double preselection superheterodynes using 15 tubes plus a 991 neon bulb voltage limiter in the antenna input, a 6-8B Ballast tube for the Local Oscillator heater and the separate CRV-20130 power supply also used two tubes, a 5U4 rectifier and a VT-105 (0C3) regulator - 19 tubes in all. The RBB receiver covers 500kc up to 4.0mc in four bands and the RBC covers 4.0mc to 27.0mc, also in four bands. The Local Oscillator's filament is operated from a 17vac tap on the power transformer through the 6-8B ballast tube also the LO's plate is operated from the regulated 105vdc supply. This design effort allowed the RBB/RBC receivers to exhibit very little drift.  >>>


photo above: This photo shows the McMurdo Station in Antarctica in 1956. The RBA, RBB and RBC were still in active use by the USN at this time over ten years after WWII ended.
photo from:  https://photolibrary.usap.gov/Tools/DrawImage.aspx?filename=RADIOSHACKB1956.JPG

>>>   Three IF amplifier stages were used along with a three step selectivity control, a noise limiter control and a switchable audio bandpass filter. Since the AVC could not be on when receiving CW signals, an Output Limiter circuit could be switched in (CW-OL) to keep static bursts or unexpected strong signals from overloading the receiver or the operator's ears. An adjustable squelch control called a "Silencer" was also included. The construction of the receivers were as much as possible alike allowing many of the same parts to be used for each model. There are some tube and component differences in the preselector section of the RBB/RBC but the IF/AF section is identical for either receiver. Three panel meters provided monitoring of Signal Level in db, Audio Output in db and B+ in volts dc. The audio output was designed for 600 ohm Z earphones and up to 20 pairs could be connected in parallel, (who knows why but that's what the manual indicates - 30Z ohm load.) Some of the later RBB/RBC receivers will have an additional 6AB7 tube installed along with a SO239 connector on the back of the receiver. This was an amplified IF output source generally used for a panadaptor. An internally mounted switch allowed the operator to select this IF amplifier output function if desired. The entire cabinet was mounted to the operating table by four shock mounts.

Unlike many earlier USN receivers, the RBB/RBC had accurate direct frequency readout dials that were illuminated and there was also a "power on" pilot lamp. The CRV-20130 power supply was connected via a heavy-duty, "armored" (metal braided) cable with huge nine-pin MIL connectors. Although the CRV-20130 power supply does provide two connectors to allow operation of two receivers with only one power supply, this was considered as "emergency only" operation. When operating two receivers from one power supply, both receivers will be "ON" regardless of which receiver's power switch is activated. The load of both receivers on one power supply drops the B+ voltage and the filament voltage by about 10 percent but any decrease in performance is only slightly noticeable. Super-smooth tuning with large, easy to read dials that are masked for band-in-use readout make the RBB/RBC series a pleasure to operate. The 600 ohm Z audio output will easily drive a matched loud speaker but the design intent was for earphone operation so don't expect thunderous volume. Sensitivity and selectivity are typical of the best designs of the day. >>>

>>>  The 1940 selling price (to the government) for these incredible receivers was $2400 each - a staggering amount of money. An internal examination shows why the price was so high. These rugged, over-built receivers had to withstand the constant mechanical vibration while at sea in addition to the mechanical shock of firing multiple 16" guns (along with firing all of the other artillery present on battleships.) Also to be rugged enough to hopefully be able to withstand the shock of a possible torpedo or bomb hit and still keep communications operating. Since the ship had to supply its own power, the receiver circuitry and power supply stability had to withstand the severe power fluctuations that happened when gun turrets were rotated. Additionally, everything had to have maximum shielding to prevent stray emissions from the LO getting to the antenna and also to allow the RBB/RBC to operate in the presence of other receivers, transmitters and radar without interference. In many instances, the RBA/RBB/RBC receivers were so well-respected and their performance so good, they not replaced with more modern receivers until the late-1960s - a testament to their magnificent design and construction. Shown in the photo above is the RBB-2 on the left and the RBC-3 on the right - both built by RCA. The McMurdo Station Radio Room photo shows three receiving stations. The nearest (#3) is using rack mount type RBB and RBC. The next station back is set up with three RBB/RBC receivers and one RBA receiver. The furthest station back is using two RBB/RBC receivers and one RBA receiver.

Using either the RBB or RBC as the receiver in a vintage military amateur radio station requires some thought since neither receiver has any standby function, either on the front panel or remotely. Most USN operations had the receivers and transmitters on separate antennas and operating on "split frequency," that is, one receive frequency and a different transmit frequency. Most ship daily operations were in the receive mode only anyway. To use the RBB or RBC as a station receiver will require good isolation between the transmitter and receiver if they are using the same antenna. A dow-key relay will switch the antenna and some dow-key relays have an extra switch inside the coax barrel that further isolates the receiver. Other military type transmitters will have their own internal send-receive relay. Usually, isolation is good on these types of TR relays and some will ground the receiver contacts when in transmit. Check your transmitter's TR relay, if you're going to use it, to make sure that it does ground the receiver antenna input when in transmit. If you're going to use an external TR relay then utilize the auxiliary contracts to achieve a "receiver antenna input ground on transmit."  There is a neon bulb and some other protection circuitry but grounding the antenna input is good added protection. As to muting the receiver, in CW there's no need and the receiver can act as a CW monitor. In AM, the gain control will have to be reduced to mute the receiver if you're using a loudspeaker. When using a headset, you'll probably hear yourself but you probably won't experience feedback. There are other methods to achieve "mute on transmit" but that would require internal additions to the the receiver and then a control line would have to be brought out the back of the receiver. Not necessary and it only compromises the receiver originality. 


Since almost every vintage photograph of a shipboard radio room shows the following mechanical device as equipment necessary for radio communication, here's a write-up on the 1942 Underwood Mill


photo above: 1942 Underwood Elliot Fisher Co. Model S I I "Mill"

Underwood Elliot Fisher Company

Model  S I I    Communications "Mill" Typewriter - 1942
 

As seen in vintage B&W photos of Navy radio receiving set-ups, the radioman always had a typewriter directly in front of him for providing "hard copy" of incoming messages. These weren't normal typewriters however. They were referred to as a "Mill" and, although based on civilian models, these typewriters had special size fonts that featured all capital letters (either lower case or upper case are capital letters,) a numeral one (1, not a lower-case L,) a slashed zero (Ø,) minimal punctuation on the keyboard and side chrome trim that's painted black.

The mill was used to copy all incoming radio messages or orders. During WWII, all USN or fleet communications messages were sent in CW International Morse as encrypted five-letter word groups that had to be decoded to read the message. The radioman didn't do the decoding, he only copied what was sent. The hard copy of the message was then taken to the decoding room. The actual encryption code changed everyday. The first five letter group identified the encryption code used and that same five letter group ended the message. Intercept worked differently since it dealt with enemy transmission monitoring. Some later (Cold War era) intercept installations had special metal platens installed on the mills to prevent previously typed "top secret" messages from being read by looking at imprints on the platen. Also, some installations had continuous feed paper supply that was sprocket-driven fed by the mill.

NOT ALL mills were used by the Navy. ALL branches of the military had uses for these special typewriters.
Thomas Underwood started Underwood Typewriter Company in 1895, producing typewriters in New York City. After WWI, Elliot Fisher Co. became Underwood's parent company. In 1927, the company was reorganized as Underwood Elliot Fisher Company. During WWII, Underwood also produced M1 carbine barrels for the war. They stayed in business up to 1959 when the company was bought-out by Olivetti (deal finalized in 1963.) Olivetti last used the Underwood name in 1980.

The Underwood Model S I I is serial number 5692361 dating it to late-1942. The tag is shown to the right.  >>>


>>>   The Model S I I is based on the civilian Model S with the special "communications" changes indicated with the "I I" stamped after "S." Note the "UEFCO" on the tag's background (Underwood Elliot Fisher Co.)


Navy Dept. - General Electric - RBD (CG-46132)

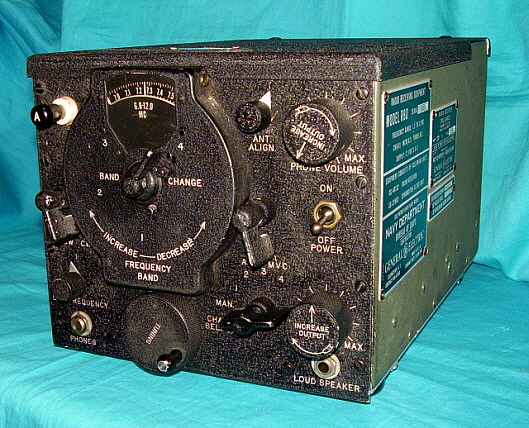
The RBD receiver was used with the TCX transmitter as low-power, two-way communication equipment intended primarily for small open boats or launches. The TCX provided CW at 32 watts output power and Voice at 9 watts output power. Antenna was a 24 ft. whip. The RBD receiver was a seven-tube superheterodyne that provided continuous tunable frequency coverage of 1.5mc up to 12 mc in four tuning ranges with an additional four crystal-controlled, fixed-frequency receiving channels that could be selected with a front panel rotary switch. Crystals were inside metal cases that resemble metal octal tubes and plug into octal tube sockets on the receiver chassis. A headset output was provided as well as a separate loud speaker output - both with individual output level controls. The circuit uses single preselection (one RF amplifier stage) along with a converter stage (mixer combined with LO in one tube) and a separate oscillator for the crystal controlled channels. Three IF amplifiers operate at 915kc. A combination BFO and Detector/AVC tube is used in the circuit. A single 6V6 provides the audio output. The bottom cover had shock mounts installed. Power requirement is +12vdc for the tube heaters and +220vdc for the B+. A dynamotor set-up could be provided for either +12vdc or +24vdc input. There was also a power supply available for either +110vdc or 110vac operation. Remote operation was possible using a 30 foot long cable provided with the equipment. The RBD (and the TCX) were not produced in large quantity and the serial numbers only go up to 500. The contract dates from 30 June 1941 however the "acceptance" tag is dated in 1944. The RBD shown in the photo is original finish with black wrinkle finish front panel and top, olive-drab sides/back and bare aluminum bottom cover.

When operating the RBD today it's possible that a strong AM broadcast station operating on 910kc or 920kc might "leak" into the IF which is tuned for 915kc. Since the RBD has only one RF amp there isn't too much isolation although the receiver does have built-in adjustable wave traps for 915kc on the Antenna and 1RF tuned sections. If AM BC stations are being received via the IF be sure to check the adjustment of these wave traps. The RBD is a good performer although there isn't a lot of selectivity. Sensitivity with a short antenna is pretty good. Using a tuned ham type antenna, e.g., a tuned or resonant dipole, will provide extra isolation and should eliminate any AM BC leaking into the IF problems. However, using an untuned large antenna (like an end-fed wire without a tuner) will increase the possibility of strong AM BC leakage into the IF. The receiver was designed for a 24 ft whip and it works best with a fairly short antenna or a tuned/resonant antenna. Audio output impedance is 600 Z ohms.
 

photo left:  Paul, N6FEG, owns this original TCX transmitter and RBD receiver set-up - photo by N6FEG


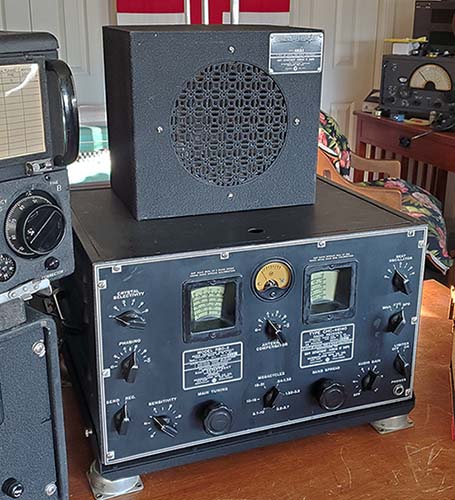
RBG-2 sn:519 installed on its shock mount

Navy Department - Bureau of Ships  -  Hammarlund Mfg. Co., Inc.

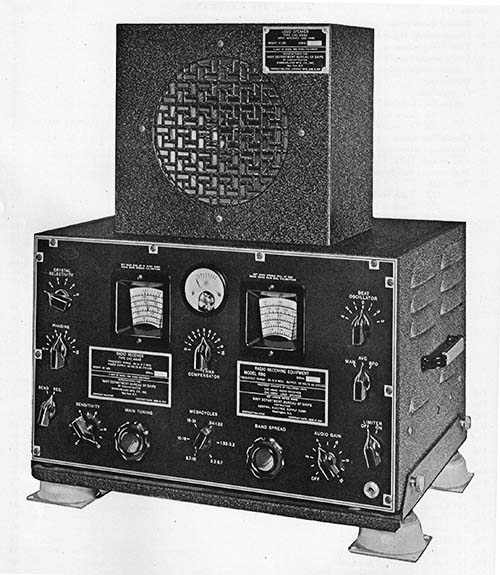
MODEL  RBG, RBG-2  -  TYPE  CHC-46140


Hammarlund introduced their HQ-120X in October 1938. From mid-1935 up to October 1938, the only receiver Hammarlund built and sold was the Super-Pro. Customers were commercial users, the military and affluent hams. The mid-priced HQ-120X was for a different market and to have their new receiver be affordable to the ham users, Hammarlund retained some of the Super-Pro looks but scaled down the circuitry and eliminated many of the Super-Pro features. The HQ-120X made up for lacking the Super-Pro's double preselection front-end, variable-coupled IF and 14 watt high fidelity audio by offering ham band calibrated band spread, tuning coverage from .54 up to 31mc and a built-in power supply with a regulator tube. The HQ-120X circuit used 12 tubes that included one RF amp, a Converter tube, three IF amplifiers, a five position Crystal Filter, a true S-meter with proper scaling, a Noise Limiter, single-ended audio output tube and a built-in audio output transformer that had a 6Z ohm output impedance.

The HQ-120X receiver was a good seller, so just before WWII began, the Navy decided that they could use a relatively small receiver that had a lot of practical features. The intended use was for shore stations and other applications where the LO radiation from the antenna wouldn't cause interference to other radio equipment. Of course, the "Navy" HQ-120 would have to be built with more robust components and some of the ham-features would have to be eliminated, or at least, modified. The resulting receiver was the RBG/CHC-46140 and the first contract was NOs 87147 from June 14, 1941. The actual contractor was General Electric Supply Company (Washington D.C.) who, in turn, had Hammarlund design and build the RBG and the RBG-1 receivers. The contract for the RBG-2 was NXss 20831 from January 5, 1943. With contact NXss 20831, the USN worked directly with Hammarlund to supply the receivers. From collected serial number data, it appears that between 1500 and 2000 RBG-2 receivers were built. Highest observed serial number from a RBG-2 (so far) is 1473.

The RBG and the RBG-2 are virtually identical with only minor changes to the S-meter housing style, some panel nomenclature and the size of the panel data labels. The RBG-1 was for operation on 25 cycle 115vac. The RBG band spread was modified from ham band calibration to frequencies that the USN needed. Band spread calibration is for the top four bands, so Band 3.2-5.7mc has BS cal'd 4.00-4.60mc, Band 5.7-10mc has BS cal'd 8.00-9.60mc, Band 10-18mc has BS cal'd 12.00-13.60mc and Band 18-31mc has BS cal'd 15.0-18.0mc. The square-flange bakelite S-meter of the HQ-120X was replaced with a metal case, Super-Pro Carrier Level meter that included the arbitrary "1 to 9" scale that was used on the then current Super-Pro models (the 200 Series Super-Pro.)

The RBG tube types were upgraded from the HQ-120X to use all single-end tubes (except the converter tube, a 6K8) and the circuits were slightly redesigned which ended up reducing the total tube count to eleven. Audio output impedance was changed to 5000 ohms Z (it had been 6 ohms Z in HQ-120X.) Components were mil-spec with oil-filled paper caps for power supply filters, potted transformers and chokes along with tub caps for bypass applications. 

The "data plates" aren't actually removable tags. The data is embossed as part of the front panel nomenclature. The serial numbers are stamped into the panel. With the "militarization," the RBG-2 chassis is about 2" deeper than the HQ-120X had been.  The 8" loudspeaker and cabinet were part of the RBG package and identified as CHC-49154.

Shown to the right is the artwork picture of the RBG from NAVSHIPS 900,004-JB, the Instruction Book for the RBG, RBG-1 and RBG-2 receivers. This artwork shows the shock mount in very good detail and how the receiver mounts into the cradle using the side thumbscrews. One side handle is shown in this artwork. Also shown is the CHC-49154 eight-inch loudspeaker with 5000Z ohm matching transformer installed in a black wrinkle finished cabinet. Note the nomenclature on the Antenna Compensator control is different on the RBG than on the RBG-2. Note that the S-meter is a full-glass front style (early 200 Series Super-Pro style meter) where the RBG-2 has the later style Super-Pro meter. The other difference is the size of the data labels with the RBG labels being much wider than the dial escutcheons while on the RBG-2 the labels are about the same width as the dial escutcheons.  
The RBG receiver was only used at shore stations or in the direction finding equipment designated as DAW (RBG receiver and DF gear in a large truck.) The minimal shielding and high LO leakage to the antenna prevented the Navy from using the RBG as a shipboard receiver. Generally, a single preselection front-end will result in images becoming apparent around 10mc if the signals are strong. With a careful IF/RF alignment and proper adjustment of the Antenna Compensator along with using a resonant antenna, image-free reception is possible up to about 15mc. Most of the USN shore uses were much lower in frequency where the RBG did a fine job. A reasonable size and weight with incredible "bench presence" make the RBG an excellent choice for a vintage military radio receiver.


RBG-2 sn: 519 w/ CHC-49154 in the ATC/ART-13 station
RBG-2 Repair, Rebuilding and Operational Tips - The iron used in the RBG receivers is from Chicago Transformer Company. All of these are high-quality, potted-types of transformers and chokes. The resistors, on the other hand, are IRC brand and many of these have likely drifted in value over the past 75 years. Be sure to check the resistance values for tolerance (most were 10% components but 20% is acceptable.) I had to replace six resistors in SN: 519 and some of those had drifted 100% in tolerance. Six large, chassis mount, can-type capacitors are oil-filled paper dielectric types used as power supply filters. These are very reliable units and should only be replaced if they are leaking oil or are defective. Most of the bypass capacitors are multi-units in tubs. These are probably also oil filled and seem to be very reliable. The easiest way to verify these caps for leakage is to measure the voltage drop on the associated resistor. If excessive, likely the capacitor is the cause. I didn't find any defective in SN: 519.

The 5000Z audio output impedance is high enough that any loudspeaker with a single-ended audio output transformer can be used. An original LS-3 is suitable (8000Z) and I've also used the National MCS-8 (7000Z) although the Audio Gain will have to be advanced slightly when using these loudspeakers because of their higher impedance. The Hallicrafters PM-23 (5000Z) sounds fabulous (10" speaker in a large cabinet) and the original CHC-49154 also sounds pretty good (8" speaker in a relatively small cabinet.) Both of these types of loudspeakers provide a good impedance match. If you use 'phones, the impedance is 600Z ohms at the PHONES jack.
SN: 519 had an inoperative crystal filter. The filter itself was found to be mis-wired internally. The crystal filter had been worked on sometime in the past and had certainly not functioned since that time. The wiring problem was probably due to the very similar-looking color codes used on the type of wires used in the entire receiver chassis. All of the wire insulation is white with very small, various color tracers that can hardly be seen. Any troubleshooting involving tracing of the wiring should also be carefully rechecked against the schematic and verified with an VOM.

Alignment is very easy but the LO high end is adjusted with compression trimmers so don't expect the alignment to stay put very long. Also, the inductor adjustments use a compression threaded spring washer to adjust the tension on the L slug threaded adjuster rod. Many times these loosen when the L adjustment is made. Be sure to check these spring tension adjusters and tighten as needed (I found several had loosened.) The 18mc to 31mc band is fraught with images so be sure to keep the signal generator at the lowest possible input level to avoid mistaking an image for the proper frequency adjustment. Check the tracking from 18mc to 31mc. If you're aligned to an image the tracking will not be accurate. If the receiver tracks closely on the top band, you're aligned correctly on that band. Once RF tracking is aligned, the dial accuracy is very good. It was spec'd for 1% of the highest frequency on each band and it achieves this easily.

Performance - Overall, the RBG-2 performs quite well up to about 18mc. It's an excellent receiver on 160M, 80M and 40M. Signals on 20M are down a bit but copy is usually pretty good and there normally are very few (if any) images (a yagi or other directional gain antenna would really help 20M performance.) The top band (18-31mc) is limited in both sensitivity and image rejection. Trying to use the RBG-2 at these frequencies, other than for casual listening, would absolutely require a resonant antenna with some gain, like a yagi or a quad. IF Bandwidth is pretty narrow, I'd guess it's around 4kc at -3db down. The crystal filter works quite well at narrowing the bandwidth even more. Audio reproduction is fairly bassy due to the narrow IF bandwidth. If a wider bandwidth would be desired, then the IF section should be sweep aligned. Overall, a very nice receiver with great visual appeal for a vintage USN military radio station.

NOTE: I've used RBG-2 SN:519 many times as the station receiver when operating on the amateur mil-rad nets on 75M. It's an impressive performer on 75M with ample sensitivity and lots of selectivity. Audio output quality is quite pleasant and easy to listen to for long periods of time. The one minor issue is the lack of a remote standby and that requires the user to manually operate the SEND-REC switch for the standby function. But, the impressive bench presence, overall great performance, its small size and fairly light-weight (~60 lbs) more than compensates for the lack of a remote standby.


photo right: close-up of a portion of a WWII Navy Shore Station showing "stacked" RBG receivers


NAVY DEPARTMENT - BUREAU OF SHIPS

Model RBH   Type CNA-46144

Contract NOs-87668   Date: June 28, 1941

General Electric Supply Corporation, National Company, Inc.
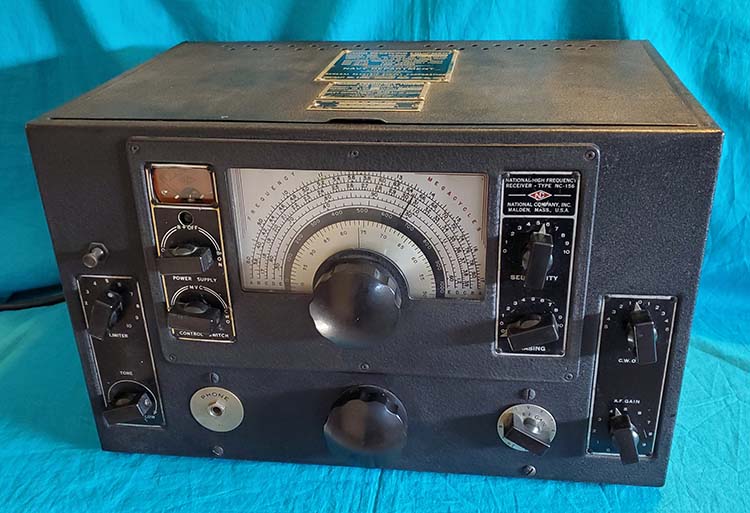
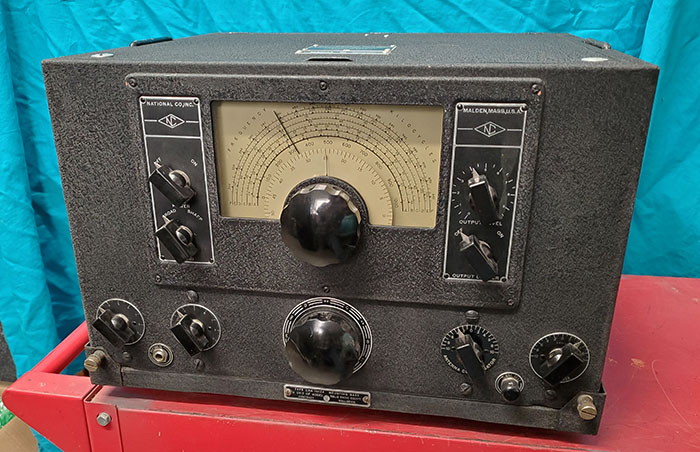
National NC-156


RBH-1 to 8 Series   Type CNA-46188

National Company, Inc., Wells Gardner & Company
National NC-156-1


Model RBH SN:840

There were two specific types of receivers that were given the USN designation "RBH." The earliest is the RBH Type CNA-46144 built for contract NOs-87668, dated June 28, 1941, with General Electric Supply Corporation (Washington D.C.) as the main contractor for the radio equipment for the Navy Department - Bureau of Ships. General Electric Supply had National Company, Inc. act as a sub-contractor and actually build the receivers.

The initial build of RBH receivers were 10 tube superhets that covered 300kc to 1200kc and 1700kc to 16mc in five bands utilizing National's famous moving coil-catacomb bandswitching system. Though the data plates show a "rounded-off" frequency coverage, the receiver's dial is scaled for 285kc to 1220kc and 1660kc to 17.3mc. The receiver was a "modified for the USN" version of the civilian NC-100XA that allowed continuous coverage of the 300kc to 500kc range by having the IF operate at 1500kc (which is why there is a gap in the tuning from 1200kc to 1700kc.) The receiver also featured single preselection, two IF amplifiers, crystal filter, S-meter, BFO and tone control. The dial used the articulated pointer that indicates band in use by its alignment with the proper tuning scale on the illuminated dial. These initial RBH receivers had "NC-156" on the National Co. nameplate (part of the Crystal Filter panel.) The Crystal Filter has to operate at 1500kc and an internally mounted 1500kc crystal is utilized with the filter itself operating like that used in the NC-100XA, that is, with two variable capacitors controlling Phasing and Selectivity. It's interesting that the RAO receivers were supplied with Crystal Filters that operated like the then current National model, the NC-200, that is, with a stepped Selectivity switch and variable Phasing (it's not too surprising since the NC-200 IF and the RAO IF both operated at 455kc while the RBH IF was at 1500kc.) 

It soon became necessary to modify the RBH for its use at sea during WWII and a second, different type of RBH receiver followed. The RBH-1 and all of the subsequent "numbered" suffix models that followed were given the Navy designation CNA-46188. With the later "numbered" receivers, the Navy contracted with National Company directly for these versions. All of the RBH series with number suffixes, e.g. RBH-1, RBH-2, etc., have an additional stage of preselection added with a bolt-on chassis and cabinet attached to the rear of the receiver to house the additional catacomb section for the coils and an additional tuning condenser for tuning the stage. This "bolt-on" addition was very similar to the RAO receiver change and might have actually pre-dated it, as the USCG R-116 did. The second RF stage was for increasing LO isolation and reducing the LO radiation from the receive antenna (<400pW on the antenna.) The second RF stage increased the tube total to eleven for the RBH-1 and later RBH receivers. The Crystal Filter design remained unchanged on the RBH-1 (probably not upgraded due to the 1500kc operating frequency.) The dial system changed on the RBH-1 and later receivers, eliminating the articulated pointer and painting the dial background white rather than silver. Wells Gardner & Co. was an alternate contractor for some versions of the numbered-suffix RBH receivers. The last of the RBH receivers incorporated the same improved cabinet as the later RAO-7 and 9 receivers, that is, a one-piece 19" wide cabinet with permanently attached shock mount feet. The designation shown on the National Co. nameplate (Crystal Filter panel) became "NC-156-1" for the numbered suffix RBH versions.

The RBH frequency coverage was necessary for the Navy and general maritime use. 500kc was an emergency call frequency for all types of distress signals. The 400kc to 500kc part of the spectrum was where most of the ship-to-shore communications took place. Air navigation also used MW frequencies. The USN RAS receiver (also built by National) achieved coverage in this part of the spectrum by moving the receiver's IF to 175kc. The RBH takes another approach and moves the IF higher than the standard 455kc, up to 1500kc. This not only allows the 400kc to 500kc spectrum to be covered but it also reduces image effects to a certain extent. This is because the image frequency would be 3000kc away and usually out of the RF amplifier passband selectivity. However, there are other problems the might affect the operation of the RBH today,...


photo left: Close-up of the data plates on RBH SN:840 showing that General Electric Supply Corp. was the original contractor.

When operating an RBH today, strong AM-BC stations on 1500kc will resonate with the RBH's 1500kc IF amplifiers and can cause strong heterodynes to be heard when tuning in any stations or, if the 1500kc AM-BC station is local and particularly strong, it may dominate the IF system of the RBH and only allow the AM-BC station to be heard, regardless of where the RBH is tuned. Bands D and C are the most likely to affected. Since the RBH uses a Crystal Filter, it isn't possible to align the IF to a slightly different frequency so other methods have to be tried. A resonant or tuned ham band or SW antenna will help since the resonant antenna doesn't respond well to AM-BC frequencies. With a local 1500kc AM station, a 1500kc wave trap on the antenna lead-in along with the resonant or tuned antenna will be the best solution. The higher frequency bands A and B aren't usually affected since the Ant/RF stage selectivity on those bands puts 1500kc outside their passbands. The ham band bothered most is 160M since it isn't too far removed from 1500kc. A wave trap is necessary on 160M. 80M may be affected at night when using a non-resonant, random length antenna and that might require the addition of a wave trap. For 80M, 40M and 20M using a tuned or resonant antenna will usually be sufficient. Using the RBH for daytime listening with a non-resonant antenna will usually not be bothered with 1500kc leakage (unless there's a local 1500kc AM-BC station) but that limits listening to 40M, 30M and 20M along with daytime SW. A 1500kc wave trap is the best all around solution. As to why there's no internal wave trap in the RBH? Probably the antenna installation onboard the ship either incorporated a wave trap into its design or the ship's antenna itself was resonant for the frequencies used which were far-removed from 1500kc.

Audio output for the RBH is 5000Z ohms for the loudspeaker (matching transformer was mounted on the loudspeaker frame.) The designated loudspeaker was identified as CNA-49106 (RBH only.) If the original loudspeaker isn't available a suitable substitute is the Signal Corps LS-3 (8K,) the original HRO Sr. speaker (7K) or even a Hallicrafters PM-23 (5K.) The audio output for "PHONES" was 600Z ohms. The audio output impedance changed with the RBH-1 and later versions to be just a 600Z ohm audio output with the PHONE and loudspeaker terminals connected in parallel. A loudspeaker wasn't specified as necessary or supplied equipment for the RBH-1 thru 8 with normal operation using 600Z ohm 'phones for reception although there's sufficient power to drive a 600Z ohm loudspeaker if desired.


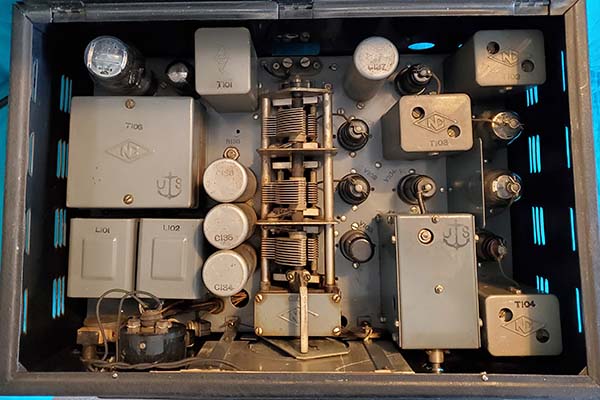
photo above: Top of the chassis of the RBH SN: 840


Navy Dept. - National Company, Inc.  -  HRO Junior Variants


The Navy found little use for S-meters or Crystal Filters so the HRO Junior receiver, which lacked these features along with amateur bandspread coil sets, was a good receiver to start with to create what the Navy needed for various communications and monitoring functions. First, the Navy wanted an HRO that would tune continuously from 50kc up to 30mc. The Navy was especially interested in uninterrupted tuning in the 400kc range. This required National to re-engineer the HRO IF section to tune at 175kc and also to modify the LO coils in the coil sets that were supplied with this variant of the HRO Junior designated the RAS. Seven coil sets were supplied with the RAS that allowed coverage from 190kc up to 30mc with complete coverage of the 400kc part of the spectrum. The RAS was installed into a 36" tall table rack that also included a coil storage unit and power supply. Sometimes a loud speaker panel is also installed in the rack. Most Navy HRO racks didn't have loud speakers because nearly all reception was done using head sets. If you run across any "orphan" coil sets that have the coil assembly insulator marked with the number range of 5,6,7 or 8, these are 175kc IF coils and they are for the RAS.

The RBJ is a similar HRO Junior variant that covers 50kc to 30mc with nine coil sets. Frequency coverage is actually 50kc to 400kc and 480kc to 30mc. The 80kc gap in the frequency coverage is around the IF of 456kc. The RBJ is also installed in a table rack.

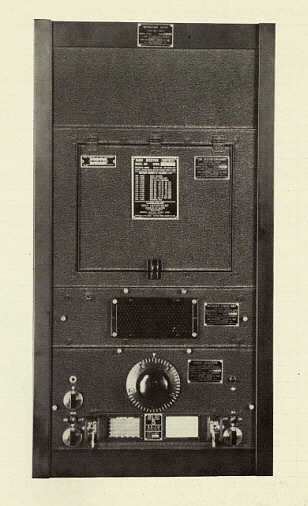
Shown in the photo to the left is the RBJ-2 receiver from an artwork illustration in the manual.


Navy Dept.-the Hallicrafters Co. - RBK series (S-36 and S-36A) VFH Receivers

The RBK Series of VHF receivers were produced for the USN by Hallicrafters. The RBK started out as what was essentially Hallicrafters' upgraded S-27 model, the S-36 (actually a new designation for basically the same model.) The RBK tunes from 27mc up to 145mc in three tuning ranges and will receive signals in AM, CW or FM. The IF is 5.25mc and two selectivity positions are provided, Sharp and Broad. Audio output is a pair of 6V6 tubes in P-P with 500 ohm Z and 5000 ohm Z outputs on early receivers. A 600Z ohm balanced output was added to the later S-36 at the front panel phone jack with selectable CT ground using rear chassis terminals. A four-position switch is used for the Tone control with Low, Normal, High Fidelity and Bass Boost positions. Toggle switches are provided for BFO, ANL and AVC. 15 tubes are used and features three acorn-type tubes in the front end, 956 RF amp, 954 mixer and 955 LO.

All of the earlier RBK receivers use the S-36 receiver circuit (the IF tubes are standard ID and the filter capacitor is a square multisection unit) but the tuning dial bezel will have "S-27" embossed on it. It's generally believed that Hallicrafters used up all of their S-27 bezel stock before switching to the S-36 bezels. Even the RBK-1 Navy manual artwork shows the S-27 bezel on the receiver and IDs the receiver as the S-27D. The Hallicrafters S-36 manual also shows the S-27 bezel in the receiver artwork. By the RBK-8, a different S-meter was being used that had a white scale and was non-illuminated. Later versions were designated as "S-36A" and this identification was also embossed on the later dial bezels. Some of the very late RBK receivers may have what appears to be an extra RF amplifier tube, however this is the "re-radiation tube" (a unity-gain buffer stage between the antenna and the RF amplifier stage) for increased isolation to reduce LO radiation leakage to the antenna. The "re-radiation" stage was required for certain countermeasures applications and many of the RBK receivers were used with panadaptors and various other equipment for enemy radar signal analysis, on shore, airborne and at sea. The panadaptors had to be compatible with the 5.25mc IF that the RBK used.


1943 RBK-1  SN: H-166844
 

It's possible that S-36 models used by the Army Signal Corps won't have military data plates on them and are identified by a metal Hallicrafters identification plate mounted to the left of the dial bezel and the presence of Signal Corps acceptance stamps. It's also likely that some S-36 models were used in civilian government applications,...airports for instance where there were a lot of VHF activities that had been going on since the late-thirties (airport towers used both HF and VHF in the early forties, also fan marker beacons were on 75mc in the early-forties.) It's likely these models would also have the Hallicrafters ID plate. The Hallicrafters ID plate was eliminated on the S-36A and subsequent post-WWII versions.

The following are some of the identifying characteristics of the S-27, S-36 and S-36A.

S-27 Model has IF tubes shown as "industrial tubes" 1853 (6AB7), 1852 (6AC7) and the standard 6SK7, frame-type power transformer, two individual filter chokes in power supply, filter capacitor is a standard round multi-section type electrolytic mounted on top of the chassis, 6C8 dual triode for phase inv/1st AF tube, the dial bezel will have S-27 embossed, the band switch knob is a small round knob with a skirt, S-meter is illuminated and has a yellow scale and is mounted behind the front panel with a small bezel, 500Z and 5000Z audio outputs only  (the S-27 is covered in Rider's XII.)

S-36 Model has IF tubes shown in the standard designation as 6AB7, 6AC7 and 6SK7, frame type power transformer, two individual filter chokes in power supply, filter capacitor is a square package multi-section mounted on top of the chassis, early S-36 has the 6C8 tube but later S-36 uses 6SL7 tube, early S-36 will still have "S-27" embossed on bezel and band switch will be round knob with skirt, later S-36 will have "S-36" embossed on dial bezel and will have the skirted bar knob on the band switch, S-meter is the illuminated, yellow scale type on most versions but very late versions were fitted with a non-illuminated, white scale meter that's mounted to the front side of the panel, two upper panel holes (for cabinet) between main and logging dials and between logging dial and S-meter, later S-36 will have a 600Z ohm balanced audio output line at the phone jack on the front panel with terminals on the back chassis apron with selectable grounded CT in addition to the 500Z and 5000Z outputs (the S-36 is not covered in Rider's)

S-36A Model has same IF tubes as non-A, uses a potted power transformer and a single unit dual filter choke that's mounted on top of chassis, square multi-section filter capacitor, 6SL7 phase inv/1st AF tube, location of the two 6H6 tubes changed, late versions will have "S-36A" embossed on dial bezel with skirted bar knob for the band switch, non-illuminated white scale S-meter mounted to the front of the panel (not the yellow scaled S-meter mounted behind the panel and a small bezel as in the S-27 and S-36), controls for AF gain, Tone, Send-Rec switch, BFO pitch relocated, only one upper hole (for cabinet) between main dial and logging dial, engraving ID moved from S-meter area to upper left panel area and metal ID plate eliminated, advertising artwork shows that cinch-plug not used to cover S-meter adjustment hole, the audio output includes a 600Z ohm balanced output at the phone jack on the front panel with terminals on the rear chassis apron for selectable grounded CT in addition to the 500Z and 5000Z outputs (the S-36A is covered in Rider's XV)

Most of the engineering upgrades were incorporated into the receivers as they were built on the production line. It's common to find an early version of the receiver that has one or some characteristics of the later version. Also, normal production methods would generally result in most existing stock being used up before new stock was installed on new production however intermixing of stock was also common, so all versions of the receiver may have a few characteristics of earlier or later versions.


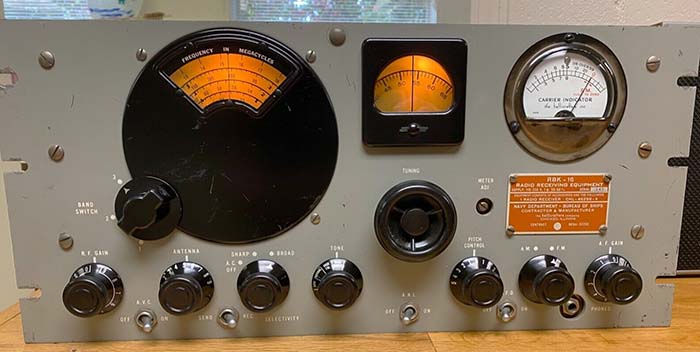
RBK-16 from 1952

The RBK series followed the S-36 to S-36A circuit evolution so expect the contract date on the RBK to somewhat determine what circuit variations will be encountered. The change to the S-36A would have happened by 1945. The installation of the "re-radiation" tube would be near the end of WWII and would continue on in the post-WWII RBK versions. Civilian S-36A receivers didn't use the "re-radiation" tube.

The RBK/S-36 somewhat followed the typical Hallicrafters SX-28 "physical evolution" in that early versions will have the shallow textured finish on the front panel while the later versions will have the very heavy textured finish on the front panel. Also, early versions use the open-spoke tuning knob while later versions have the webbed-spoke tuning knob. The band switch on the S-27 used a skirted round knob that was changed to a skirted bar-knob on the later S-36. As mentioned, by mid-1945, the S-meter changed and was the same as the meter used on the R-44/ARR-5 receiver. Very late versions, like the RBK-16 (shown to the left,) have a non-textured panel that's painted smooth gray finish with three rack notches per side rather than the two per side found on earlier versions. The Tone, the BFO pitch and AF gain controls along with the Send-Receive switch were all relocated and the data plate mounted where the Tone control had been. Also, the "S-36" and "h" logo embossing on the dial bezel along with the panel engraved "hallicrafters" and receiver ID were eliminated. The RBK-16 shown has the re-radiation tube installation. This receiver is also fitted with a very late version of the S-meter featuring a convex front cover. These very late versions of the RBK were actually built on post-WWII contracts,...1952 in the case of the RBK-16 shown.

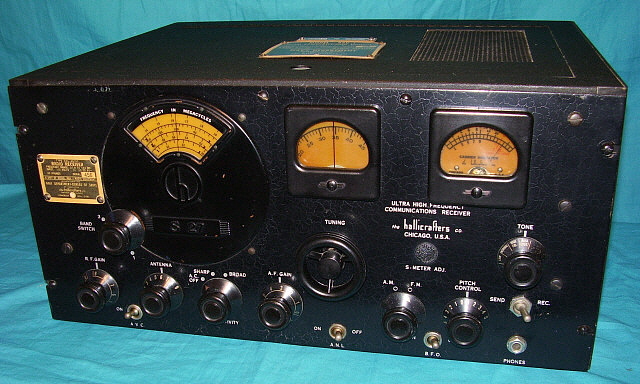
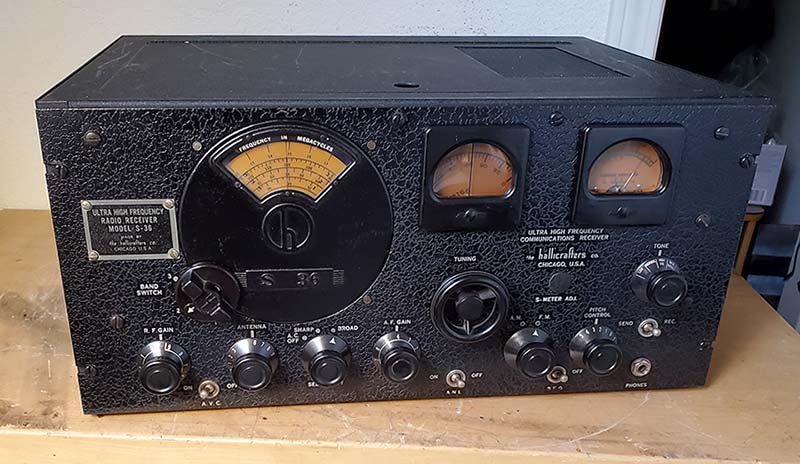
I have two versions of the RBK/S-36,...the RBK-1 shown in the top photo with a 1943 serial number of H-166844 with "S-27" embossed on the tuning dial bezel and a second version with "S-36" on the bezel but it's apparently a civilian-airport model with the late-1944 serial number HA-8187, shown to the right. HA-8187 was just acquired ($20 out of a large storage unit in Carson City - Oct 2021) so I haven't had time yet to do a "clean up" and "check out" although under the dirt, dust and sticker residue it appears in decent shape (refurbishment write-up is included below.) 

On the RBK-1, unfortunately, H-166844 was formerly owned by a ham-ster and, while he didn't destroy the RBK-1, it does have some non-original holes in the back apron of the chassis and had a "mounted on the chassis" audio output 500Z/8Z matching transformer (that I removed.) When acquired in 2003 (free - out of a backyard shed in Gardnerville, NV,) I put it back to original and got it functioning. I was able to receive FM-BC quite well, Reno Area Air Band traffic (~136mc airplanes as they few over Virginia City) and there was some 10-11 meter activity also. The RBK/S-36 was designed for a 75Z ohm antenna and the manual suggests either a "cut to frequency" dipole or an end fed wire antenna. The RBK-1 seemed to pick up more VHF signals using a large wire antenna rather than a small dipole antenna. I didn't perform an IF/RF alignment on the RBK-1. 

HA-8187 Inspection - Nov 26, 2021 - The S-36 wasn't secured in the cabinet so the chassis was pulled out to make moving easier. Since this came from a huge workshop that was being used for storage, there was considerable dirt on the chassis. I used a large paint brush to remove the loose dirt. I needed to dismount the front panel so all of the knobs, switch nuts, control nuts and mounting screws were removed.  >>>


1944 S-36 HA-8187 "as found"

>>>  I had wondered about the four tag screws and the pan head panel screw that was installed and would have been under a tag. With the pan head screw removed the countersunk hole for a flat head screw assured me that there had originally been a Hallicrafters identification plate mounted there (also, once the panel was clean a "shadow" of the original ID tag was apparent. I had a proper vintage S-36 ID plate to be used on this receiver.)

The S-meter had to be disconnected before dismounting the front panel. Once the front panel was off, further cleaning could be performed. I stripped the front panel of all remaining parts and began cleaning to remove the adhesive tape residue. The tape residue came off with WD-40. I cleaned the panel with WD-40 followed by Glass Plus (to remove the WD-40 residue) and then polished the panel with a dry flannel cloth.

The tuning dial bezel cleaned up with Glass Plus and dry flannel cloth wipe down. There are four pencil hand-written notations on the bezel that indicate the "Air W" frequency (about 120mc) and three other air nav frequencies in the 70mc region (logging scale notations - not actual frequencies.) I left these pencil notations on the bezel since they are part of the history of the receiver that show it was used at an airport. Another airport-use indicator an obvious "non-original" part which is the filter capacitor block. It's a semi-professional installation, which means it's much better work than a ham would have done but not at the level of military depot rework. That's typical of airport technician rework,...a little better than average but not at factory or mil-depot work.  During the rebuild I came across other indications of "amateur level" rework such as "junk box" mismatched replacement capacitors but the most indicative "ham-stering" was the BFO problem that was caused by an added (and unnecessary) 5pf trimmer added to a parallel LC that already had two adjustments to the same LC combination. Additionally, the trimmer installation created a solder bridge on the 6J5 tube socket,...real ham-ster work. My conclusions are that some of the repairs were performed by airport technicians and others were probably done after the receiver had been sold as surplus. >>>

>>>  An operational "worrying factor" are the 13 Micamold capacitors under the chassis. These are original components so they are 75+ years old which in the Micamold "expected usability" time-frame is beyond ancient. The three obviously newer replacement capacitors indicate that three Micamolds had failed in the past. Curiosity eventually got the better of me and I replaced all of the .01uf capacitors, Micamolds along with the replacements that had been installed in the past.

AC power cord is dried-out and cracked. IRC and ERIE resistors, so they will all need to be checked for value (unbelievably, all resistors were in spec.) Very small crack in main dial plastic window which difficult to notice.

Other minor issues,...the S-meter needs a lot of work,...plastic lens is loose and resting against the meter scale. There's a very small missing piece at the bottom of the scale and from that small notch location is a crack in the meter scale material (illumination required to see how badly the crack shows.) Lots of black electrical tape wrapped all around the meter housing which is probably to cover up the typical "split like an onion" condition that's typical for spun-brass meter housings. Meter scale is pretty worn but should be okay with a careful cleanup.

The knobs are a little oxidized but should cleanup okay. The white tape residue came off the front panel very easily and it was easily removed using WD-40 from the two small bezels.

Cabinet is very dirty but it's slightly bent in the top-front but it's not badly scratched overall so it should cleanup nicely. Straightened up nicely.

Pulled all of the tubes and cleaned the chassis with WD-40 followed by Glass Plus. Cleaned the oxidized condenser box cover with a brass brush and WD-40 followed by a Glass Plus clean up.

Nov 28, 2021 - Reassembled the S-36. I had to straighten the front panel since there were bends that prevented the panel from setting straight against the chassis and the side gussets. Cleaned all of the knobs. The oxidation was minimal and easily cleaned off with WD-40 and 0000 steel wool. This has to be done very carefully and gently to prevent removing the very thin black coating while still cleaning the nomenclature and the surface problems. Following the WD-40 treatment, the knobs were cleaned with Glass Plus and polished with a flannel cloth. The vintage screw boxes turned up a 10-24 FH blade screw for the mounting screw that is located under the Hallicrafters ID tag. Also, one other pan head 10-24 that was needed for the other missing panel screw (found in the box of used Hallicrafters' screws.) Four NOS trim nuts were needed for the toggle switches because someone in the past had tightened them to the point where I had to use a WD-40 soak and vise-grips to remove them which, of course, damages the trim nut beyond reuse. These are just trim nuts and only need to be "finger-tight" because the toggle switches are actually mounted to the chassis, not the front panel. A search through a parts-box of miscellaneous items and I found a perfect cinch-plug for the S-meter adjustment hole (and it was already painted black wrinkle finish.)

I tested all of the tubes and all of them tested "like new." This is somewhat common in gear that was used commercially and serviced regularly. Probably the receiver had been recently serviced just before it was pulled from active duty. If it was used after it had been sold surplus, it was used very little. Even the "acorn" tubes in the front end (954, 955 and 956) tested good. One has to be careful installing the 954 and 956 since they can fit into the socket two ways. The longer part of the tube faces forward towards the front panel (or, always install the "short" end of the tube going into the socket.)

Nov 29, 2021 - Disassembled S-meter and reinstalled the plastic lens into the housing. Cleaned lens and dusted the scale. Reassembled but rather than using tape to cover up the "split onion" housing, I used one wrap of 16 gauge TC and carefully twisted the wrap to tighten all around the split housing. The "twist" was located at the bottom of the meter to be out-of-sight and the TC wrap was painted black to further hide this clamping method. Installed the S-meter. Installed four good condition-used toggle switch trim nuts (finger tight, of course.)

Quickie Test - This tests just the tube heater voltage with load and the power transformer. I just pull the rectifier tube and power up the receiver. Without the rectifier tube installed, B+ won't develop. The HV AC can be measured between pins 4 and 6 on the rectifier socket (measures about 600vac.) I leave the receiver on for about 15 minutes to see if the power transformer develops any heat which would indicate a problem with shorted windings but after the time period the transformer was still cool to the touch.   >>>

>>>   The next step is to reform the electrolytic capacitors which tests and conditions them for use "at voltage." All resistors are given an "in-circuit" check. This will usually show the over-all condition of the resistors. If several have drifted in value, then heat in the form of leaking bypass capacitors would be suspected.

Power up had nothing but typical thermal noise. Rocking the band switch resulted in some FM BC stations being received on a ten foot long "test antenna." Since the receiver probably hasn't been powered up in decades, it will take some time to clean all of the controls for good contact and noise reduction.

Nov 30, 2021 - Used De-oxit and a small paint brush to clean the band switch. This was a tremendous help for the receiver that now functions on all three bands. Cleaned all of the other controls and switches.

Dec 1, 2021 - Cleaned and straightened the cabinet. Reconditioned the wrinkle finish with a 3 'n 1 oil rub. Installed the receiver into the cabinet. Considering that most of the parts are original, the S-36 operates pretty well (not for long.) Of course, FM-BC has extremely strong signals that are easy to receive even on a ten foot "test" antenna.

Dec 9, 2021 - I debated on whether or not to do this but eventually my curiosity won out and I replaced all of the Micamold capacitors (also, the fact that the 2nd IF screen bypass Micamold shorted within 25 minutes of powering up the receiver probably had some influence on the decision.) Surprisingly, there really wasn't a significant improvement. A little less distortion but signals still seemed lacking. I decided that the S-36 probably hadn't been aligned in decades and had certainly  "kicked around" a lot since that time. The 5.25mc IF alignment was way off and the IF realignment really boosted the output level. The FM Discriminator was also off since the IF had been so far off. I imagine that back in the 1940s the FM Discriminator was particularly difficult for service technicians to adjust but, with modern lab-quality test gear that can readout frequency exactly each and every time a frequency change is made, finding the balance setting is easy. The RF tracking was way off on Band 1 but not too bad on Band 2. Band 3 only has a RF trimmer adjustment so the factory-set tracking was pretty good. The only signals that are powerful enough to result in images are from the FM-BC band and result in tuning some FM-BC stations "out of the band" when using a large end-fed wire antenna. It turned out that the IF/RF Alignment was what was necessary to get the S-36 sounding good on FM-BC and picking up air traffic above the FM-BC band. I guess the new caps helped a little,...at least the power transformer runs pretty cool now. I used a PM-23 for the audio reproducer connected to the 5000Z output.

FM BC in the Forties - One thing to consider about the S-36,...at the time the receiver first became available, Armstrong FM was just beginning to broadcast (experimentally by 1939, officially in 1941.) This early FM was on 44-49mc approximately (top end of Band 1 and bottom of Band 2.) Above the Armstrong FM band, around 60mc, was experimental "wide-bandwidth" AM broadcasting (Band 2.) During WWII, the FCC notified Armstrong and the other FM broadcasters that after 1947 the 44-49mc FM band was going to be eliminated and the frequencies used for TV broadcasting (actually Channel One, which was never used.) The new FM band would be approximately 88-108mc and would start up in 1946. During part of 1946 and most of 1947, both FM bands operated concurrently (Zenith actually offered a couple of 1947 model entertainment radios that covered both FM bands.) After 1947, all FM BC in the USA was on 88-108mc (Band 3.) Luckily for the owners of the S-27 or S-36 and even the S-36A models, either or both FM-BC bands could be tuned when they were concurrently broadcasting. 

Performance - FM-BC in NW Nevada is a landscape of country music stations, rock&roll/hip-hop stations and various types of talk stations - in other words - just like AM-BC but with better fidelity yet still unlistenable program content. Other then FM-BC, all other types of transmissions on the frequencies covered by the S-36 are going to be sporadic at best. The 6M ham band, at one time, was used for Radio Controlled model airplane flying around here. The VHF-TV translators around here aren't in operation anymore so no more VHF-TV audio (VHF Ch.2 up to Ch.6 were below the FM-BC band.) In Dayton, I'm located quite a bit further away from the Reno AP flight path than I was in Virginia City BUT so far I've heard several transmissions on the Air Band which is about 118mc to 137mc in the USA. I copied an Air Canada flight coming into Reno on 136mc so there are some interesting signals at the top of Band 3. On a "contest weekend," I copied a fairly strong SSB signal on 10M calling "CQ Contest" and several 27mc CB heterodynes. Lots of beacons or frequency markers between 30mc and 45mc. Supposedly, 27.5mc up to 49mc is the "Business Band" with lots of Forestry Department user frequencies and also some water and power company user frequencies but I haven't copied any voice transmissions in the Business Band,...at least not yet. To successfully use the S-36 or RBK receivers, a little research into what VHF frequencies are being used in the area would certainly help to locate some of the sporadic transmissions. Also, using a resonant antenna would probably increase signals for specific portions of the frequency spectrum covered by the S-36.


1944 S-36 HA-8187 after the refurbishing. The cabinet straightened up very well as did the front panel. The heavy-texture of these later front panels really enhance the S-36's appearance. Luckily, I was able to find an original S-36 metal ID plate which really helps the overall look of the receiver. After the rebuild and alignment, now the S-36 functions as well as it looks.


Navy Dept. - National Company, Inc.  -  RBL Series

National produced the RBL series of longwave TRF regenerative receivers for the Navy during WWII. The RBL uses a seven tube circuit covering 15 KC up to 600 KC in six bands. The tube line up consists of three cascaded 6SK7 RF amplifiers, a 6SG7 regenerative autodyne detector, a 6H6 audio limiter with a 6K6G audio output tube and the 5Y3G rectifier (5U4G in earlier RBLs.) Unlike the RAO that it resembles, the RBL receiver's bandswitch does not operate a moveable coil catacomb, instead an intricate set of gears simultaneously actuates two large ceramic bandswitches. Also unlike many of the WWII longwave receivers, the RBL series has direct frequency readout on the tuning dial. The receiver also included a selectable "broad" or "sharp" audio filter and an adjustable output limiter for operation during intense static conditions. The limiter control was very well designed and works wonders at reducing static bursts. Audio output is via the earphone jack on the front panel and is for 500-600 Z ohm 'phones. Heavy duty construction through-out and the entire receiver is fully shielded with a cabinet that is copper plated under the black wrinkle finish. The RBL-5 shown in the photo is from 1944 and its excellent original condition is matched by its first-rate performance. The RBL-5 is a great performer, capable of receiving NBDs from all over North America and also signals from WWVB, JJY, Navy Sub-Comm Stations and almost all other types of signals in the LF spectrum. The contractors for the RBL Series is similar to the RAO Series in that National built certain versions and Wells-Gardner built other versions. Also, like the later RAO receivers, the RBL-6 used a 19" front panel and was mounted in a larger, one-piece cabinet for ease of maintenance. (See "Vintage Longwave Receivers - Part 2" webpage for an in depth article about this receiver.)  

Navy Dept. - Wells Gardner & Company - RBL-3

As mentioned above, Wells Gardner & Co. was also a contractor for the RBL receiver building the RBL-3 (and probably the RBL-4.) The W-G RBL-3 is almost identical to those versions built by National with the exception that WG used their own transformers and chokes along with their own sources for smaller components. Although many of the major parts look like they were built by National, Wells Gardner actually had Chicago-area contractors and suppliers build all of the National-designed parts "to spec." Close examination of the "look alike" parts would be necessary to spot the slight differences. The easiest to spot is a "side-by-side" comparison of the bar knobs. WG bar knobs are slightly smaller with more squared edges and a much narrower pointer. Performance is exactly like the National RBL receivers,...or is it?

This particular W-G RBL-3 has quite a local history around the Reno, Nevada area. At one time it was owned by a LW enthusiast in Reno. I obtained the RBL from him in a trade. About six months later, the LW enthusiast wanted the RBL-3 back, so it was returned to him. He subsequently sold it to a surplus dealer in Carson City, Nevada. Months later, that same LW enthusiast wanted the RBL-3 back again and had to purchase it back from the surplus dealer (at a 300 percent mark-up.) Later, with failing health, the LW enthusiast sold it to another surplus dealer, this time in Reno, from where it was purchased by its current owner, NU6F. I never thought that this RBL-3 performed nearly as well as my RBL-5 but I never investigated the reason for the lack of signals. NU6F did some extensive examination and analysis of the two audio filters and it seems that the cutoff frequency of the lowpass filter was around 200hz and the CF of the bandpass filter was up around 800hz. The result was most of the usable audio range was attenuated by the filters. Close examination and measuring of the filter components seems to confirm that they were correct as shown in the documentation and analysis of those values seems to confirm the filter's performance. A WG design problem? A comparison to the RBL-5 is in the future since it seems to function quite well. NU6F did change the LP filter cutoff to 600hz which improved the RBL-3 performance significantly. 


Navy Dept. - General Electric - TAJ-19


The TAJ-19 was a 500 watt CW and 250 watt MCW transmitter that operated from 175kc up to 600kc. The transmitter used only four tubes. The MO was a 860, the IPA was also a 860, the AF Osc was a 860 and the PA was a 861. The TAJ-19 was powered by a motor generator set up that provided 1500vdc, 3000vdc (PA plates,) 1200vdc and 115vdc (for control circuits.) AC voltage was applied to the tube filaments by way of slip rings that ran on the DC driver motor. The rack, chassis and panels are all aluminum.

TAJ transmitters were found on most larger Navy ships during WWII. Though the Navy catalog states that they were for cruisers or destroyers, they were also used on most large Navy ships for Medium Wave and Low Frequency transmission requirements.

This TAJ-19 was left in my driveway back when I was still operating the Western Historic Radio Museum in Virginia City. I had a telephone call some months before from a ham in Washington state who was "cleaning house." He said the next time he was down in Nevada he'd drop off some equipment that had been used at Grand Cooley Dam for guided tours and public address. I never thought too much about it since it sounded like it was audio gear that was mainly for parts. I really stopped thinking about it after I didn't hear anything for a month or so. Months later, I was coming home from running some errands and there in my driveway was a seven foot tall rack full of audio equipment like rack tape players and speaker panels. Also, a pile of audio cables and miscellaneous other types of PA-type audio equipment. To the side of the audio gear was the TAJ-19. The fellow had mentioned an old Navy transmitter that might be good for parts but not what type it was. It was odd that the guy didn't "hang around" town since it was Virginia City and there were all types of distractions (maybe I mean attractions) to pass some time. Not to mention, I had only been gone for a little over an hour. Perhaps he was in a hurry and just "dumped" the gear and left. Anyway, I never heard from him again.

Now, this TAJ-19 isn't complete. It has been severely scavenged for parts over the years. I'd estimate that around half of the transmitter is missing. But, the cabinet and the panels are excellent and complete with knobs, meters, switches and even all of the data plates. Only the very bottom front panel is missing. The sides, back and top are all present. The various chassis are present. Even a couple of the 860s are still installed but the 861 is gone. So, while this particular TAJ-19 will never again be operational, if another TAJ-19 ever showed up around here, who knows? Maybe between two of them, one functional transmitter could result. Of course, Medium Wave and LF CW for the amateur is somewhat limited with only two bands approved at this time - 630M and 2200M. 630M or 472kc to 479kc allows CW and data operation with a 5 watt EIRP limitation. It's not as low of power as one would think. Due to the inefficiency of most ham antennae at low frequencies, the effective radiated power can be rather low even though the input power is relatively high. Think of a dummy load. You can input a lot of power and it radiates very little. Most antennae on 630M are something like the dummy load. The typical ham antenna on 630M would have about 400 watts RF input before the EIRP would be about 5 watts. So, there may be hope for an operational TAJ-19,...if one can figure out how to power it up without the shipboard power and the motor-generator set-up. A fairly large homebrew AC power supply is the most likely solution.


USN Air Comms & Air Nav Radio Equipment

Navy Department - Western Electric Company

RU-GF Series of Aircraft Radio Receivers & Transmitters

Model RU-16  Type CW-46051A    -    Model GF-11  Type CW-52063A


The earliest RU Series of aircraft receivers date from about 1930 and the earliest GF Series of aircraft transmitters date from about 1932. The early models were built by Aircraft Radio Corporation. Both the receiver and the transmitter evolved throughout thirties and, although the design was certainly showing its age by WWII, the last contracts are from 1941 (for the RU-19 and GF-12.) Like all pre-WWII equipment, contracts were for very small quantities so the early versions are very rare. The most commonly seen RU/GF versions are the RU-16 and the GF-11 which were produced in fairly large quantities in the very early part of WWII (but apparently not used extensively in actual service compared to the contract quantities produced.) The contracts actually date from before WWII began for the USA, April 21, 1941 with Western Electric Company as the contractor. The RU-16 and the GF-11 both operated on +12vdc implying that the installation would be in earlier types of aircraft. By 1941, +12vdc aircraft power was quickly being replaced with the more efficient +24vdc power.

The intended use for the RU/GF equipment was in single-seater or two-seater airplanes (radio op/observer seated behind the pilot) but the manual also mentions "flying boats" as another possible user in the installation instructions. Each installation into an particular airplane was "custom fitted" with each of the connecting cables custom-built from supplied "bulk cable." Additionally, flex control cables were also custom-fitted and were built from supplied "bulk" flex cable material. In some single-seater airplanes, the only place to install the radio gear was behind the pilot's seat so remote controls using flex control cables and spline drive flex cables along with remote switch boxes and tuning heads were installed to allow the pilot to have the essential radio controls in front of him. There is also evidence that some RU-16/GF-11 gear was installed into a few small Navy boats and that some vehicular installations may have occurred from time to time. The USMC is said to have had some vehicles equipped with RU/GF gear. Not all RU-Series receivers were paired with the GF-Series transmitters. The RU-18 was usually paired with the much larger GO-Series transmitters. Some RU-Series receivers were setup in "receive only" stations while others might just be used for DF purposes. 


photo above
: RU-16 Receiver - serial number 8989

There was also a U.S. Army version of the RU/GF equipment, the SCR-AL-183. The receiver was designated as BC-AL-229 and the transmitter was BC-AL-230. The contracts are from the late-thirties up into 1940 with Western Electric as the contractor. This equipment is very similar in appearance to the RU/GF equipment but internally both the receiver and transmitter abound with minor differences. The SCR-AL-183 was the 12 volt version and the SCR-AL-283 was the 24 volt version. The Army versions were also intended for one and two-seater aircraft installations and are found in both black wrinkle finish and in bare aluminum.

The overall use of the later equipment was very low by mid-WWII. This non-use resulted in many complete RU-16/GF-11 equipment packages being sold on the post-WWII surplus market "new in the box" which accounts for the "fairly common" status of the RU-16/GF-11. The RU-17/GF-12 were the 24 volt versions and apparently this equipment was used much more extensively during WWII and isn't encountered as often as the RU-16/GF-11. For quick identification the data plates on the 12 volt units had a black field while the data plates on the 24 volt units used a blue field.


RU-16 Receiver Circuit - The earliest RU receivers used triode tubes in a TRF circuit with tracking BFO. A tracking BFO utilized an identical section of the main ganged tuning capacitor along with coils that allowed adjustment of an oscillator to "track" or "tune along with" the tuned RF frequency accurately. Usually, a tracking BFO would be set one kilocycle higher than the RF tuned frequency to allow a heterodyne to be audible, allowing demodulation of a CW signal. All early RU receivers were built by Aircraft Radio Corporation. The early RU versions didn't have an AGC circuit. Additionally, tuning range was limited by the few available coil sets. By early 1941, the RU-16 had been designed. It was the first version of the RU to use an AGC circuit. Six tubes are used in the RU-16 circuit which is still a TRF (tuned radio frequency) receiver with tracking BFO. The tubes used are 1RF - 78, 2RF - 78, 3RF - 78, AGC - 77, Detector - 77, AF Out/BFO - 38233 (aka 1642.) The last tube, type 38233/1642, is a dual triode that provides the tracking BFO with one triode and the Audio Output stage with the other triode. The plug-in coil assemblies each contain five shielded coil units - four units that determine the RF tuning range of the assembly and one unit for the tracking BFO coil required. The "dual frequency range" coil assemblies contained an internal switch that was operated by lever located on the front of the assembly. The single range coils had a metal handle-type strap for removing the coil from the receiver. 

Antennas - There are two antenna inputs, A and L - L. The L - L terminals are for a "homing loop" antenna. The Antenna or Loop switch could be set up to operate locally at the receiver or remotely via a flexible cable. The A terminal could be connected to any of the typical aircraft antennae available and depended mainly on what type of airplane was involved. Most single-seater airplanes had a wire antenna from the cockpit to the tail. Two-seaters usually had an aerodynamic mast near the airplane nose with a wire running to the tail. A central wire dropped down beside the rear-seat part of the cockpit and entered the side of the fuselage for the radio gear connection (a "T" antenna.) Some installations used a trailing wire (depended on the aircraft.) It was also possible to use the DU, DU-1 or DW-1 Amplified Direction Finding Loop which worked with an external sense antenna to provide a "true direction" cardioid pattern that allowed determining a correct bearing towards an unknown location signal. The output of the DU/DW Loop was connected to A on the RU receiver. The complete RU/GF setup provided power to operate a DU-type loop.   The DW-1 Loop is profiled further down this page.

The AGC Circuit -  Homing Loops provided a "figure-8" pattern with two deep nulls off of each side of the loop. The loop would be set athwartship and then the airplane steered toward the null. The general direction was known and the "homing loop" provided accurate navigation to a specific airport or Radio Range Beacon along a defined airway. A "Test Meter" could be used as a signal carrier level indicating device. Since "Homing" assumed a modulated carrier beacon was to be tuned (the constant tone of the A and N modulation plus the carrier when on the beam,) the receiver must be in AUTO for the meter to indicate RF amplifier cathode current that varied because the AGC tube was controlling the RF Amplifier's grid bias when in AUTO. The AGC tube rectifies the modulated wave envelope from the third RF amplifier (before the detector tube) and develops the AGC control voltage based on amplitude of the carrier wave. The modulation level doesn't significantly affect the AGC bias voltage due to filtering within the RU circuit. The meter is inserted in the RF cathode circuit to ground. Since the pilot would be flying in the direction indicated by the loop's null, he would be looking for the weakest signal which is indicated by the highest reading of RF amp cathode current. If the airplane drifted off course, the loop would not be pointing at the null and the signal carrier amplitude would increase which would cause an increase in the AGC bias, increasing the RF amp grid bias and reducing the RF gain and reducing the RF amplifier cathode current resulting in a lower meter reading. Once the pilot was on course he watched the meter and if it began to show reduced current, he knew the airplane had drifted "off the beam" and required some course correction. Since the AGC tube control is before the detector and has significant TC loading, AUTO (AGC) can also be used with CW operation. Since the RF amplifier tubes' cathodes are grounded in AUTO, the output level (INCREASE OUTPUT dual potentiometer) is controlled with a variable resistance on the audio output line. In MANUAL, a variable resistance (dual pot INCREASE OUTPUT) is connected into the RF amplifier tubes' cathode circuit to control the RF Gain of the receiver and the audio output level is fixed at maximum output. The switching of the dual pot's functions is accomplished by the Receiver Output cable connection to the Junction Box and the Receiver Switch Box cable connection to the Junction Box.

GF-11 Transmitter Circuit - The GF-Series started in 1932 and had a number of changes that run up to the GF-12 version. The GF-11 transmitter differs substantially from the early-1930s versions of the circuit that employed two type-10 tubes as modulators, a type-10 PA and a type-45 as an oscillator. The early GF transmitters only had one coil set so frequency options were limited. As the GF evolved, more coil sets were provided and the power output was increased from 3 watts up to about 15 watts. The GF-11 dates from 1941 and uses two type 89 tubes and two type 837 tubes. One of the 89 tubes was the master oscillator tube while the second 89 could be a MCW audio oscillator, an audio sidetone generator on CW/MCW or a Voice modulator depending the the mode selected. The two 837 tubes were operated in Push-Pull as the power amplifier. The 837 screens and suppressor grids were tied together and modulated by the type 89 AF tube in the MCW and Voice modes. The two 89 tube filaments are connected in series for 12vdc operation and the two 837 tubes are connected in parallel (837 tube uses 12 volt filaments.) Low voltage (+12 to +14vdc) was supplied by the aircraft battery/charging system buss and B+ was supplied by the shared dynamotor, that is, both the RU and the GF obtained their B+ from the same dynamotor (CW-21109A) and various resistor dividers within the circuits of each unit. Tuning ranges are determined by plug-in coil sets that provide a frequency range of 2000kc to 3200kc and from 3000kc to 9050kc. Eight plug-in coil sets were supplied with the GF-11. 

RF power output for the GF-11 was about 2 to 7 watts for all modes in the 2-3mc range and 12 to 15 watts in all modes in the 3-9mc range. The meter is an RF amp meter (the radio op tuned for maximum RF current to the antenna.) There were two PL-68 phone jacks on the side of the GF-11 that provided meter access to measure Modulator current and also the PA plate current. The RU-series Test Meter (optional for the RU-16) could be used to measure these points if desired (MOD I was direct but PLATE I had an internal shunt to scale the meter to 5x I.) Absolutely necessary for operation was the Transmitter Control Box CW-23097. This box had the switch for CW, MCW or VOICE modes of operation, RADIO-ICS switch, a neon +HV indicator, input jacks for an external key or mike and a connector for the cable to interface with the RU-16 Junction Box for transmitter operation. On top of the Transmitter Control Box was a hand key button for CW/MCW.


photo left: GF-11 Transmitter - serial number 8888

The Dynamotor-Filter Box - CW-21109A -  The power source for both the RU-16 and the GF-11 is the dynamotor. The dynamotor is mounted on top of the Filter Box which contains the various circuitry components. The voltage input is +12vdc up to +14vdc with better efficiency of operation at the higher input voltage. Running current is between 8 amps and 10 amps depending on the load but initial surge current is quite high (probably >35 amps.) A two conductor cable connected the dynamotor to the aircraft battery-charger buss. To be able to "turn on" the dynamotor from a remote switch box (the CW-23096A) required a relay inside the Filter Box that was operated by battery-charger voltage and the remote switch. The relay had very large contacts for conducting the fairly high current to the "motor" side of the dynamotor. The operating output voltage depended on the battery input voltage and also on the output load but generally was between +350vdc and +400vdc when operating both the RU-16 and the GF-11. Negative bias voltages were required for the GF-11 and for the RU-16 AGC tube. By elevating the output negative wire from the "generator" above chassis using a 1000 ohm WW resistor and a 140 ohm WW resistor in series to chassis, a voltage divider network allowed about -95vdc and -80vdc to be available for bias requirements. The dynamotor itself was built by Eclipse Aviation for Western Electric.


The Ancillary Pieces - The RU-16/GF-11 (actually the entire RU/GF series) required a considerable collection of peripheral ancillary equipment and interconnecting cables to actually operate the receiver and the transmitter with the dynamotor.

Cables and Plugs - In addition to several peripheral boxes there was an array of specifically "identified by number" interconnection cables with special connector plugs with unique pin patterns or different diameters that interconnected the RU-16/GF-11, the Dynamotor and the various switch boxes through the Junction Box. Originally, bulk cable was supplied with the equipment and each interconnection cable had to be custom-built using the correct type bulk cable with the correct connector plugs installed. Additionally, the bulk cables were "un-jacketed" to allow the cable shields to be easily bonded to the aircraft frame for lowest noise pickup. Cables were supposed to have a metal identification tag installed during construction. Since each installation was "custom-fitted" to the aircraft most of the original RU-GF cables remained in the aircraft. What is found today are mostly unused RU-GF connector plugs that have to be used to build new cables. Most plugs weren't identified except perhaps with a single number stamped on the shell. Lack of specific identification complicates finding some of the plugs. The connector pin numbering is unique to each type of plug, that, and the pin patterns have to be used to identify an unmarked plug. A typical plug is shown installed in the dynamotor photo to the right (it's a #134 plug.) 


photo above
: RU-16/GF-11 Dynamotor CW-21109A - serial number 6142.


photo above
: CW-62008A Junction Box with many of the required connector plugs partially inserted. Note that some of the plugs do have identification numbers on the shell. Plugs 37 and 80 are substitute plugs that are required for "receiver only" operation (both plugs) or for "single-seater" aircraft installation (80 only.) Box receptacles 74 and 76 are provided to power accessories like the LM-type Frequency Meter, the DU-1-type amplified loop antenna or the ZB-type Homing Adapter.
 

Junction Box, Switch Boxes and Substitute Plugs -  The Junction Box is essential for the proper interconnecting and operation of the entire RU-GF system. Likewise, the Dynamotor is necessary to provide B+ voltage to both transmitter and receiver by way of its connection to the Junction Box. To actually operate the RU-16 receiver required a large 11 wire cable from the RU-16 to the Junction Box. The RU-16 Remote Switch Box (photo below) provided the switching for CW/MCW, for selecting AUTO/MANUAL along with ON/OFF function for the entire system, a Gain control for the receiver output, two phone jacks for the audio output, a three-circuit phone jack for the Test Meter. The Receiver Switch Box was cable-connected to the Junction Box.

To operate the GF-11 transmitter required its nine wire cable to connect to the Junction Box and the Transmitter Control Box was also cable-connected to the Junction Box. There was also a GF-11 Extension Control Box that connected to the Junction Box (use was optional and intended for two-seater airplanes) and a Remote Transmitter Control switch (was user supplied and connected to the phone jack on Junction Box - operated the PTT/T-R line.) For single antenna T-R operation the Antenna Relay box was necessary (it also connected to the Junction Box using a small two pin plug and cable.)

There was also an optional and externally connected "RU Test Meter" that could be added to the setup (PL-68 plug inserted into the RU-16 switch box for Homing or into jacks on the side of the GF-11.) There were two connectors (74 and 76) on the Junction Box that could be used to provide voltage to operate a LM-type CFI (Crystal Frequency Indicator, aka: heterodyne frequency meter) or an amplified loop antenna like the DU-series. It was also possible to power a "Homing Adapter" like the ZB Series from either connector 74 or 76. (ZB-3 "Homing Adapter" profiled further down this page.)

Two "substitute plugs" were supplied and must be installed in the Transmitter Control Box connector and the Extension Control Box connector (37 and 80) of the Junction Box if a "receive only" setup was intended. If the Extension Control Box wasn't needed such as in a single-seater airplane then only sub-plug 80 is required. These "substitute plugs" each had an internal jumper to route the circuitry as necessary for this type of operation. Sub-plug 37 grounds the 38233 tube cathode so the receiver will function without the Transmitter Control Box's "RADIO/ICS-1/ICS-2" switch and sub-plug 80 completes the circuit so the Remote Transmitter Switch will function without the Extension Control Box.

Flex Cables, Extension Key, Microphone & ICS - Remote Loop-Antenna Switch flex cables and Remote Tuning Range Switch flex cables were included in the package but their use depended on the ultimate installation requirements. These flex cable connected controls were necessary in some single-seater installations where the radio gear was located behind the pilot and only the remote controls and switch boxes for the radio operation were up front. The flex cable was also supplied in bulk and each remote flex cable had to be custom-built for the installation requirements. An external telegraph key (called an "extension key") could be used, a carbon mike like the RS-38 was needed if Voice operation was desired and a set of Lo-Z 'phones (600Z ohms) was also necessary. The ICS (Inter-Communication System) provided a method for the radio op to talk to the pilot through the use of the Transmitter Control Box by switching to ICS-1 or ICS-2 and working into the pilot's Extension Control Box. ICS-1 allowed intercommunication with the radio signals still audible and ICS-2 removed the radio signals and only allowed the intercommunication (this position was "spring loaded" so the receiver signals couldn't be "locked out.") The ICS connection to the RU-16 audio output grid provided the sidetone through the 'phones when in "RADIO" on the Transmitter Control Box and when in the CW or MCW modes.


photo above: A RU-16 Single Range plug-in coil assembly for tuning Range E. Note the "extraction" handle. Also, five shielded coil units that function as (3) RF coils, (1) Detector-Coupler coil and (1) Tracking BFO coil. Tunes from approximately 1200kc up to 2100kc.

Plug-in Coils - All plug-in coils for both the RU-16 and the GF-11 are somewhat difficult to extract out of either piece of equipment. It seems likely that the coil sets needed were installed during pre-flight setup. The dual range RU coils allowed the pilot or radio op two ranges that could be easily selected during flight as required (a HF range for comms and a MW range for 500kc for navs, for example.) Single range coils were used when only one operating frequency was going to be needed. The GF coils were also single range and the required coil set was installed in the transmitter during the pre-flight setup for the intended operating frequency.
 

photo right: A RU-16 Dual Range plug-in coil assembly. This is the O-P Range coil set with a total coverage using both ranges of 187kc up to 455kc. The switch lever is located on the front-facing part of the coil assembly and is marked "FREQ - HIGH - LOW."


photo above: GF-11 coil set for 3675-4525kc in storage container

The RU used four "dual frequency range" coil packs and five single range coil packs. There were several other coil assemblies listed in the manual but only four duals and five singles were normally supplied with the receiver. Each coil assembly originally had a specific metal case to store it in. When all of the normally supplied coil assemblies were available the RU-16 could tune from 190kc up to 13.575mc. The coil assemblies not supplied were different combinations of frequency ranges and slightly different frequency ranges on the single coils. Ultimately, even if all coil assemblies were available, the same 190kc to 13.575mc was complete frequency coverage of the coil sets. The GF-11 also had its own plug-in tuning modules and each of those also originally had a metal box for protection during storage. Eight GF-11 tuning modules were supplied allowing the transmitter to operate from 2.0mc up to 9.05mc.

Interchangeability - Many of the ancillary pieces are interchangeable to the RU-16/GF-11 from the RU-17/GF-12 and RU-18 receivers and possibly earlier versions. It depends on what the piece's function was. The Receiver Tuning Head, for example, since it's entirely mechanical and the tuning dial scale is 0 to 100, is interchangeable within many of the RU-series receivers. Uniquely necessary for 24 volt operation is the proper Dynamotor, Junction Box and Antenna Relay Unit. The 24 volt receivers just have a voltage divider in the circuit to basically operate a 12 volt receiver on 24 volts. The NAVAER 08-5Q-100 manual is very specific with two pages of possible interchangeability of the various pieces for both the RU and GF equipment.

photo above: Receiver Switch Box. INCREASE OUTPUT control actually is a dual pot that controls the RF gain in MANUAL and Audio output level in AUTO.
For the ultimate in detailed information about the RU-16 Receiver and GF-11 Transmitter plus restoration and rebuilding information on the RU-16/GF-11 operation station,...go to "RU16-GF11 Restoration"
use home-index below for navigation.


Navy Department - RCA Manufacturing Co., Inc. - Contractor

 MODEL  DZ-2 - Aircraft Radio Direction Finder
NAVY Designation: Type CRV/CEX-46152
Contract: NOs-67427  Date: June 30, 1939  


RCA Manufacturing Co., Inc. built the earliest versions of this Radio Direction Finding receiver for the Navy for use in air navigation and search-rescue. The DZ-2 dates from 1939 but there was an earlier DZ-1 (almost identical but with upper frequency end of 1500kc, the DZ-A was similar to DZ-1.) With subsequent contracts, the receivers had the final assembly performed by RCA Manufacturing using completed component assemblies built by Emerson Radio & Phonograph Co. (up into 1942.) Receivers identified by the CEX prefix.

DZ-2 General Description - Using 8 tubes in a superhet circuit and tuning from 15 to 70 kc and from 100 to 1750 kc, the DZ-2 used a rotatable dual loop antenna (the VLF/LF loop is used on Bands 1 & 2 while the LF/MW loop is used on Bands 3, 4, 5 & 6) and a fixed vertical "sense" antenna (usually a "T" wire from the cockpit to the tail) to determine "true" direction (called Uni-lateral Reception/Sense.) Non-directional and Bi-lateral (bi-directional) options were also provided. The DZ-2 also featured a BFO (CW/MCW toggle switch in CW) and a switched audio filter ("SHARP" switches in a bandpass filter with a CF of 1020hz for CW reception.) The receiver used a cushioned shock mount.

POWER was provided by the aircraft battery/charger system buss running at approximately +28vdc cable-routed to the DZ-2 POWER connector and internally to the front panel POWER switch. When in the "ON" position, +28vdc was routed to the tube heaters and to pin B of the DYNAMOTOR connector which then routed the voltage down the three conductor DYNAMOTOR cable to the external dynamotor box. The dynamotor box had only one three-pin connector. The DZ-2 "ON" position turns the motor section of the dynamotor on and then the generator output section routed the +230vdc B+ back up the DYNAMOTOR cable via pin A to power up the DZ-2 B+ requirements. Pin C provided the common chassis ground return.


photo above: DZ-2 top of the chassis

The loop antenna (CRV-69065) was installed in an aerodynamic housing externally mounted on the aircraft fuselage with cables for signals and loop rotation routed to the aircraft interior for operator control. A dual-scale azimuth compass was provided and the compass was fitted with a relay-operated articulated mask that allowed only the correct scale to be viewed depending on the selection of BI-LAT (bi-lateral or bi-directional) or UNI-LAT (uni-lateral or single null cardioid pattern) functions and also on the frequency band selected. The two loops were mounted one loop within the other and offset at a 90º angle to one another (with the VLF/LF loop being the outer loop and the LF/MW loop being the inner loop.) The two loops were center-tapped and also shielded from each other. The corresponding two azimuth compass scales were also offset 90º. The relay-operated compass mask would show the correct scale for the loop in use (dependent on the FREQUENCY RANGE selected since the VLF/LF loop is oriented 90º from the MW loop) and then would also change again when UNI-LAT was selected since that required a 90º repositioning of the loop from the Bi-directional null position. (more details in "DFing with the DZ-2" below.)


photo above: DZ-2 bottom of the chassis. The long rectangular gray box at the lower right is the optional line filter for the +24vdc input voltage (aircraft batt-gen buss.)

Tubes used in the DZ-2 were mid-thirties glass envelope types with 6 volt heater requirements. RF-6D6, LO-76, Mixer-6C6, IF1-6D6, IF2-6D6, Det-6C6, BFO-76, AF Out-41 were the tube used. V-101 is actually a neon overload protection bulb on the RF amplifier grid. Noticeable was the tuning range gap from 70kc up to 100kc. This was to allow for the IF amplifier stages that operated at 89kc. The first IF amplifier stage input transformer had a tertiary winding that was switched in above 200kc. The tuned frequencies below 200kc employed somewhat loose coupling in the IF to provide sharp selectivity (also, this transformer was tuned to 88kc.) Above 200kc, the tertiary winding was switched in and that increased the coupling and broadened the IF bandwidth. The two remaining IF transformers were tuned to 89kc and were of standard configuration. The DZ-2 BFO was set to produce a 1000hz beat note on Bands 1 and 2 but to zero beat the IF on Bands 3, 4, 5 and 6.

No AVC was employed in the DZ-2 since the receiver was strictly for DF and the use of AVC could affect the operator's ability to find the nulls in signal levels. Audio output impedance was 600Z ohms. Dual phone jacks allowed the operator not only use 'phones but to also insert an audio output meter to monitor the receiver output level to aid in tuning in nulls. The audio output transformer T105 had an internal and separate choke in series with the transformer plate winding to provide isolation for the screen voltage to the type-41 tube and the plate winding of the audio transformer.

DFing with the DZ-2 - NON-DIR (non-directional) reception used just the sense antenna since it was omni-directional and usually allowed finding and tuning-in the desired signal frequency easily. BI-LAT (bi-directional) used just the loop antenna since it provided a "figure 8" pattern. UNI-LAT (uni-lateral) used both the loop and the sense antenna combined within the receiver's RF amplifier input section to provide a "cardioid pattern" that indicated true direction. DFing with the DZ-2 involved first using BI-LAT to determine approximate bi-directional signal minimum levels or nulls with one of the two nulls then selected and the bearing noted. The DZ-2 was then switched to UNI-LAT which resulted in the selection of the uni-lateral scale on the compass (the scale mask was shifted to show 90º offset.) The loop was then rotated to the same bearing that had been noted in BI-DIR on the formerly showing azimuth scale (essentially, rotating the loop 90º.) This orients the loop so that the minimum response of the cardioid pattern is either pointing directly towards the signal source or pointing 180º in the opposite direction away from the signal source. The UNILATERAL ADJUSTMENT control was then rotated while noting the signal level listening for a noticeable drop or null in the signal level. If a minimum null wasn't found, then the loop was rotated 180º and the UNILATERAL ADJUSTMENT again rotated listening for a minimum null response. IF the minimum null response heard was when the loop was at the first compass bearing (same noted Bi-directional bearing) then that compass reading was the correct bearing direction (the null towards the signal source.) IF, however, the minimum response was found when the 180º rotation was selected, then the actual correct bearing was due to the 180º rotation resulting in the loop null then pointing towards the signal source at that bearing indication on the compass. To make the math calculation easier and quicker, only two digits of the degrees are shown on the compass scale. If the degrees showing is <18, then add 18 for the reciprocal. If the degrees showing is >18, then subtract 18 for the reciprocal.


photo right:  The DZ-2 along with the CRV-69064/65 Dual Loop and Compass. This is a completely functional DZ-2 set-up. It runs on +28vdc to power the DZ-2 tube heaters and to power the dynamotor for +HV (located under the table.) The Loop-Compass is calibrated for its installation and does factor-in magnetic variance for Dayton, Nevada (18ºE.)


For a detailed write-up on the restoration and operation of this DZ-2 using the original dual magnetic-shielded loop antenna, rotation system and compass along with a replica dynamotor, go to the article "Radio Direction Finders" - use Home-Index below.


Navy Department-Bureau of Ships - Model ATD Aircraft Transmitter
Contactor: Bendix Radio Division of Bendix Aviation Corp.
Manufactured By: Sparks-Withington Corp. (Sparton)


ATD History - The story goes that, around 1940, the Navy was interested in purchasing a newly designed, modern aircraft transmitter, mainly for their two-seater aircraft. Supposedly a competition ensued between some of the manufacturers vying for a Navy contract. Eventually, three different types of aircraft transmitters were accepted and produced for the USN (some competition,...since all three transmitters were given contracts.) RCA provided the very small ATB transmitter. With only two selectable channels and only about 3.5 watts output, RCA had decided that their transmitter would be used in a two-seater for plane-to-plane communications. Bendix provided the ATD, a slightly more powerful transmitter with motor-drive selecting of four frequency channels that were pre-flight tuned. However, the ATD was still basically for the two-seater aircraft but the 40-50 watts output could provide air-to-ground communication. Collins provided the ATC, a versatile transmitter that could be used in almost any installation. At 100 watts output with ten HF and one LF selectable frequency channels that motor-drive auto-tuned the transmitter to preset antenna matching, it really wasn't much of a surprise that the Navy favored the ATC transmitter. It became the famous ART-13 and it's likely over 100,000 were built during the war and thousands were used post-WWII by various airlines. But, what about the Bendix ATD and the RCA ATB? There was only one ATD contract dated May 20, 1940 but it seems that several orders were built on that one contract during WWII. The ATB is very rare so it must have had only one contract also.  >>>

>>>  The ATD is an aircraft transmitter designed to be powered by a dynamotor and to output a signal into a relatively short antenna that usually ran from a post in front of the cockpit to the vertical stabilizer (usually a 25 ft "T" antenna.) The transmitter was to be setup to operate "remotely" by the pilot of a two-seater airplane. The two-seater airplanes at this time had a front-seated pilot and then the second person was seated about eight feet behind the pilot at the rear of the cockpit. The second person in the aircraft could operate the transmitter if deemed necessary by the pilot or if the pilot was incapacitated for some reason. The second person would have to cut the safety wire on the LOCAL-REMOTE switch to allow placing the transmitter in LOCAL. Then the second person could operate the transmitter directly, but normal operation of the ATD was by the pilot only and by using the Remote Control box that was mounted by the pilot's seat. 

Four channels were available for operation. The multitude of adjustments that were necessary for each channel to operate properly made pre-flight radio setup a prerequisite. Since many of the adjustments required removing the channel's individual tuning module out of the main frame for changing frequency to something other than the four pre-flight setup channels, changing settings during the flight couldn't be accomplished unless the frequency adjustment was within the range of what had been already setup, e.g., QSY from 3450kc up to something like 3460kc. However, any frequency change greater than a few kilocycles would probably require the use of a LM heterodyne frequency meter to setup accurately and the LM probably wouldn't have been carried along during the flight of a two-seater. The manual implies that neither the pilot nor the second person were necessarily "radiomen" but they could "operate" the transmitter within the limitations of the pre-flight setup. The fact that the REMOTE-LOCAL switch was "safety-wired" to REMOTE implies the second person in the airplane wasn't a trained radioman (the manual does refer to this person as "the operator" but he can't directly operate the transmitter.)

The frequency selection of the four channels was motor-driven based on the position of the channel switch on either the transmitter or its remote. A chain-driven rotating "letter wheel" (on the ATD) would display which channel had been selected. The selection of a channel's tuning module was accomplished by the motor driving a slowly rotating shaft that had four cams. Each cam was over a rectangular push-rod that the cam would push down. The push-rod had several metal pins (~.25" diameter) that would then push down the movable selector contacts on the back of the tuning module to connect the various frequency controlling circuits and the antenna matching circuits for the channel selected. Unselected channel contacts were grounded by way of the spring-loading of the contact arms. The motor-drive used a forward and a reverse winding that was timed to use just a momentary "reverse" connection to stop the motor after the forward winding was disconnected. This allowed precise position stopping at the selected channel with no "over-shoot." There was a manual channel select knob on the right side of the transmitter. If the handle of this knob was folded out that disengaged the motor drive gearbox and the main shaft could be rotated using this knob. When finished with the manual adjustment, the knob was folded back, the channel switch placed to the channel that had manually been selected and the manual control being "spring-loaded" would "drop into position" for the motor drive operation.    >>>

>>>   The ATD uses a 6L6G tube as the Master Oscillator. The Audio Driver and MCW/Sidetone oscillator functions are both accomplished by another 6L6G. The Power Amplifier tube is an 814/VT154 with +1000vdc on the plate. The two modulator tubes are a pair of 6L6G tubes provided push-pull plate modulation of the 814 PA. A VT-150/0D3 tube is used for a +150vdc voltage regulator for the MO screen voltage. A 12SL7GT is hidden away behind a shield in the right side of the transmitter. The 12SL7GT is the speech amplifier and it uses one triode if a dynamic microphone is used (250Z) or it uses both triodes if a carbon mike is used.

There are a multitude of relays in the ATD. The sending relay switches the antenna from receiver to transmitter with actuation of the sending key or PTT. The Phone relay selects many of the functions necessary for voice or MCW operation. CW selection places the +1000vdc on the 814 plate and +380vdc on the plates and screens of the other tubes but allows the telegraph key to work the keying line (PTT.) There's another relay that places a capacitor on the PA grid to keep it from oscillating when the TUNE mode is selected (it's switched out with PTT or keying.) Besides the relays, each tuning module has six movable contacts that must have good conductivity. These are placed into position by the push-rod of the selected channel.

The Grid Current Meter measures the MO plate output by its connection to the PA grid. This meter has a switch that allows it to also read battery voltage (the aircraft battery buss voltage.) The PA plate meter reads the plate current on the 814 tube. The RF Amps (Antenna Current) measures the actual RF current to the antenna (fs=5A.) Power output is normally 50 watts in CW and 40 watts in Phone.

There are three data plates on top of the ATD and each tuning module also has its own data plate. The data plate shown to the upper left is for "MODEL ATD" and lists the various accessories. The data plate to the right is for the CQW-52253 transmitter itself. The letter prefix in the "TYPE" denotes the builder, in this case, Sparks-Withington Co., whose trade name was Sparton. Note that the Acceptance Tag, also shown to the right, is unstamped indicating this ATD was probably still in its crate at the end of WWII. There's a metal Overall Calibration Chart on top of the ATD that has information on both sides. It stows in a holder with two securing clips. The information on the chart provides approximate settings for all of the tuning modules at various frequencies.

The dynamotor provides +380vdc at 400mA and +1000vdc at 150mA. Input voltage is +28vdc and the current required depends upon the load but could range up to 19 amps in some modes and to certain types of antennas (this is the "up and running" current but the actual "instantaneous starting current" is probably at least 50 amps.) The top cover that allow access to the tubes has an interlock switch that only allows the +28vdc to go to the dynamotor when the ATD lid is closed. The dynamotor also has an interlock on its top cover. The Cannon box connectors on the left side of the transmitter are for the dynamotor, the remote and for the channel indicator (a box with buttons that would protrude out if that channel was selected and would retract if another channel was selected and then that channel's button would protrude out. Both the remote and the indicator were up with the pilot.) The remote was operated by the pilot and had inputs for a mike and a key along with the ability to select channels. No meters or other indicators were on the remote.

Servicing the Dynamotor - Although this dynamotor appears to be NOS (and probably hasn't ever been used,) that doesn't mean it would just power right up with +28vdc applied. The bearings still have 80 year old grease inside and the brushes have probably been setting in the same position on the commutators and in their brush-barrels since the early-1940s. All "as found" dynamotors really need to be taken apart and examined first. If everything looks good, then the commutators can be cleaned, the brush surfaces cleaned, the bearings cleaned and relubed and any other clean-up required performed. The component box should be checked. Only after this servicing is performed can the dynamotor be powered up. 

The end-bells on this dynamotor still have the mounting screws "safety-wired" and it's unfortunate that the wire has to be removed in order to dismount the end-bells to have access to the bearings, brushes and commutators. With the end-bells off, I could use the fan to manually rotate the armature to see if it would move and how much "drag" there was. The armature did move and the drag was considerable.

Component box inspection turned up a leaky oil-filled capacitor. This was physically "leaking oil" not current leakage. Although it looked like a lot of oil it really wasn't. The residue was cleaned up with a Q-tip. This "weeping" of oil is common and usually isn't a problem if it's just the "weeping" type of leakage. The capacitor will have to be monitored from time to time to see how much (if any) oil leaks out. Everything else in the component box looked in good condition. All spare fuses and tools were present.

I pulled all of the brushes. These were placed on a white sheet of paper in the proper orientation and placement for reassembly. Pulled the fan off of the shaft to allow access to the bearings and motor-side commutator. Pulled the bearing covers on both ends. Dried grease was obvious. I used WD-40 as a solvent to loosen and remove the old grease. I worked the WD-40 into the bearings on both sides by rotating the armature. At first, with the dried grease, the shaft was moderately difficult to turn and wouldn't "spin." After the WD-40 soaking, the armature spins easily. I let the WD-40 soak in the bearings all night.

The next day, I cleaned the commutators with 600 grit Al-Ox paper and then washed the commutators with denatured alcohol. I repacked the bearing using red wheel bearing grease and then reinstalled the bearing caps. I checked the brushes and they looked new but a gave them a gentle cleaning with a brass brush just to get any old dirt off. The brushes were installed exactly in the positions that I had removed them from. I cleaned the area around the commutators with denatured alcohol to remove any excess grease. This completed the servicing.


ATD Dynamotor - TYPE DMDFX618 sn: 260453
Mfg. by: Continental Electric Co., Inc.

"On the Air" - Of course, this ATD needed a lot of help to actually get it to reliably put RF out into the ether. I had all of the tubes necessary since all of the tubes were missing when I got the ATD. The exception was the 814. I ordered to "cheapies" that were supposed to be NOS but weren't tested,...waste of time,...one had an open filament and the other was gassy. I finally just ordered one that was tested and it worked great. All relay contacts had to be cleaned. All channel selecting contacts had to be cleaned. The motor-drive gearbox needed lubrication. The channel selecting cam shaft bearings needed oil. The ATD framework was full of spider webs and dried up insect carcasses. That all had to be cleaned. The ATD was missing its RF Amperes meter. W7MS donated a Bendix TA-12 antenna current meter that with a little modification fit into the ATD fine. The two 550kc to 1500kc tuning units are not really usable, so I just cleaned them to make sure nothing was going to cause any problems. The ATD actually came with just one 550kc to 1500kc tuning unit. Mine is missing the correct 1500kc to 3000kc tuning unit. I went through the 3000kc to 9050kc tuning units since these are the ones that can be used. Lots of missing screws everywhere. Overall, this ATD was a decent example that wasn't difficult to get "on the air." It easily loads up my Collinear Array,...if there's 37pf of series capacitance on the Antenna output connector. Incidentally, the ATD uses RAJAH spark plug connectors for the antenna and ground terminals. For a simple MOPA with Class B P-P modulation plus a voltage regulated MO, the ATD puts out a nice quality signal and its 40 watts of carrier is sufficient for the Nevada Mil-Rad Net on 75M (using the Collinear Array antenna helps.)

For many, many more details on the disassembly, cleaning, repair and testing plus lots of photographs of this ATD, go to Bendix-USN ATD Transmitter. Go to Home-Index for navigation.


Navy Department - RCA Manufacturing Co., Inc.

Aircraft Radio Receiver - Model ARB - Type CRV-46151
 

The ARB receiver was a six tube superheterodyne receiver intended for use in USN aircraft. It was an updated version of the earlier, mid-thirties RU receiver series that required several sets of plug-in coil assemblies to change tuning ranges in addition to a baffling array of remote boxes, remote cables and a junction box for interconnection of all of the extra pieces. The ARB receiver simplified the hook-up and dramatically improved the overall performance by replacing the RU's TRF with Tracking BFO circuit with a superheterodyne circuit. The ARB receiver tuned from 195kc up to 9.05mc in four bands. Two dual-frequency IF amplifiers are utilized with 135kc used in the 195kc to 1600kc range and 915kc used from 1.6mc to 9.05mc (a dual frequency BFO was also required.) The receiver used 12 volt heater tubes (in series-parallel for 24-28 volt operation) and had one RF amplifier 12SF7, a Converter 12SA7, two IF amplifiers, both 12SF7, Det-AVC-1AF stage 12SF7 and an audio output stage 12A6. A neon bulb was used as a voltage regulator for the LO part of the Converter stage. The lower two bands could be set up for loop operation, specifically for homing DF purposes. All four bands could be used for Communications and operated with the various types of aircraft antennae available. To simplify the external power hookup, the aircraft +28vdc buss was connected to POWER for tube heaters and inside the ARB was a dynamotor that provided the +230vdc B+.

The ARB was designed for either single-seater (pilot only) or two-seater aircraft (pilot and radio op) but could also be found in larger aircraft with a crew that included radio op/navigator, pilot and co-pilot. Modes of reception were CW, MCW and Voice with the options of AVC or MVC (Manual gain control.) When in "AVC," the Volume control operated as an AF gain control with RF/IF sensitivity controlled by the AVC line. When in "MVC," the Volume control operated as a RF/IF gain control with the audio gain set to maximum. Selectivity options when in AVC were either Sharp or Broad. The "Broad" position was intended to ease tuning in the 1600kc up to 9.05mc range where signals tended to be more difficult to "tune in" due to the wide span of frequency coverage in each of the two bands (additionally, the remote receiver tuning head was particularly difficult to "fine tune" due to flexing of the cable drive which resulted in significant "backlash" if not installed correctly.)

The initial ARB receivers are pre-WWII and were used for Communications and for Homing DF usually paired with the ATD transmitter in some types of two-seater aircraft. For DF, the aircraft had to be equipped with a rotatable, non-center-tapped, loop antenna that could be connected to the ARB receiver terminals marked L1 and L2 (L2 is chassis ground.) When connected in this way, the loop would be operational only on the two lower frequency bands only (195kc to 1600kc.) This type of loop antenna would have a bi-directional "figure-8" pattern and was generally set "athwartship" and the airplane steered towards the minimum signal response (homing.) The two other antenna terminals are marked AT and AF. AT indicated a "Trailing Antenna" which was normally installed in larger aircraft and consisted of a clad stranded steel cable with flight weight that could be reeled out to about 200 feet behind the aircraft when in flight. AF indicated "Fixed Antenna" which was a smaller antenna consisting of an off-center fed wire between the cockpit and the tail of the airplane or it could be a short vertical installed on larger aircraft (usually 4 to 5 feet tall maximum.)


photo above
: ARB Receiver on its shock mount (hard to see) with ZB-3 Homing Adapter on top, Operator's Control Box and Receiver Tuning Head to the right. On the Operator's Control Box, the unused connector plug marked "Control Box" would be used for the wire cable running to the Pilot's Control Box. The opening with the threaded barrel is for the Bowden cable that ran to the cockpit to allow the pilot to switch control of the receiver from "REMOTE" back to the radio operator, "LOCAL." Dual phone jacks could be used for two sets of 'phones or one jack could be used to operate an Audio Output Meter for DF purposes.


Pilot Control Box
CRV-23254

The Control Boxes - To actually operate the ARB receiver required the Operator's Control Box (Type CRV-23256) or the Pilot's Control Box (CRV-23254.) The receiver could be operated by either of the control boxes when the aircraft installation was for "dual control setup" required for radio-navigator or pilot control. There wasn't a volume control on the receiver but each control box had a volume control. Likewise, there wasn't a phone jack on the receiver for audio output and, again, the control boxes had dual phone jacks for audio output. Normally, the audio output impedance was set for LOW which was 600Z ohms. By moving a pair of jumpers in either control box the audio output impedance could be set to HI or 4000Z ohms. Either control box could also switch bands on the receiver remotely when the receiver's "MOTOR" switch was ON as this enabled the receiver's motor-driven band switch. This function could be disabled with the receiver front panel "MOTOR" switch and the band switch on the receiver then operated manually.

The Operator's Control Box had a port with a threaded barrel for installing a bowden cable that mechanically connected internally to the "LOCAL-REMOTE" switch. If the radio op wanted to pass control of the receiver to the pilot, he switched the lever to "REMOTE." This operated the bowden cable and pushed the bowden cable knob at the pilot's location to the "up" position. Through the inter-connecting wire cable the Pilot's Control Box electrically was activated and the Operator's Control Box was deactivated. The Pilot's Control Box now allowed the pilot to have control of receiver operation. Additional to this "dual control setup" was a second (flex cable connected) Receiver Tuning Head that was installed in the cockpit near the pilot. This setup allowed the pilot to tune the receiver, switch bands, control gain and select reception mode. To pass control back to the radio op, the pilot would push down the bowden cable knob and that operated the Operator's Control Box "LOCAL-REMOTE" switch via the bowden cable returning control back to "LOCAL" and activating the Operator's Control Box and deactivating the Pilot's Control Box. Where the installation only required the pilot to operate the receiver then just the Pilot's Control Box could be installed and it would provide normal operational control of the receiver by a single operator. It's worth noting that the usual two-seater set-up of the ARB operating with the ATD transmitter had the control of the ATD exclusively by the pilot using the ATD remote. The LOCAL switch on the ATD was safety-wired in the REMOTE position preventing the "operator" from using the transmitter (unless the safety-wire was cut and the switch placed in the LOCAL position.) It's seems likely then, if the ARB was paired with the ATD, then it also was exclusively operated by the pilot.


Operator Control Box
CRV-23256

The Receiver Tuning Head -  Receiver tuning was accomplished by using a Receiver Tuning Head (Type CV-23253) that had a conical tuning dial scale viewed behind an index window and a hand crank type of tuning control. Coupling to the receiver was via a metal flexible spline-ended cable in a metal flexible housing (similar to the speedometer cable used in older cars.) There was also a direct coupler that could be attached to the receiver tuning gearbox that allowed direct "at the receiver" tuning utilizing the receiver dial for frequency readout but the dial scale was minuscule so a magnifying lens was built into the dial bezel.

Additionally, the direct coupler had a "feed-thru" connection that allowed the direct coupler and the receiver tuning head to be connected together and to simultaneously operate the receiver tuning (this setup tends to compromise the otherwise smooth operation of the Receiver Tuning Head.) Hint: For smooth tuning operation don't over-tighten the collar nuts on any of the flex cables or couplers. Also, avoid "tight" bends in the routing of the flex cable with no radius tighter than 6" for best results. Securely mounting the flex cables and tuning heads will also help significantly by keeping all parts in a stable, fixed position.

Ancillary Parts
- The ARB used one power cable, one control box cable, one flexible tuning (spline-ends) cable, one "Pilot's" control box, one remote tuning head, a shock mount and phones. It was also possible to setup for "dual operation" by adding an "Operator's" control box and control box cable (connected to the first control box) along with a second flexible tuning cable, "T" coupler and second tuning control head for larger aircraft where either a navigator or radioman was aboard. A bowden cable was also necessary to allow switching from "Remote" to "Local" control from the pilot's position.

Operational Notes - It's NOT a Ham Receiver - A very selective IF bandwidth was not really desirable in a WWII aircraft receiver that might be operated solely by the pilot. Quick location of the desired signal (a homing beacon, for example,) with a minimum of operational movements was necessary. Also, interference was practically nil in normal operations at the time. Today, when trying to use the ARB as an AM ham station receiver, one will immediately find that the IF passband is extremely wide, even in the SHARP position (at least 10kc bandwidth in SHARP.) The ARB is certainly sensitive enough but adjacent frequency signals will be heard and sometimes these adjacent signals seem to overwhelm the desired signal. A small separate receive antenna might help reduce some QRM. Also, a loop antenna might allow "nulling" the offending QRM. The use of preselectors or converters only seems to complicate the set up for a receiver that wasn't designed for and was never intended for voice ham band operations. Although the same selectivity problems naturally exist for CW operation the lack of CW activity (in the CW portions of the HF ham bands) these days generally results in QRM-free operation.

photo left: Close-up of the Receiver Tuning Head Type CRV-23253


 National Company, Inc.  -  RCK-N  for US Navy (unofficially)

National had been building receivers for airport communications since 1932 with their contract for RHM superheterodynes. The HRO was destined for airport use but its many accessories, such as multiple coil sets, separate power supply and speaker seemed to limit its popularity as an "airport receiver." In 1936, National introduced the NC-100 "Moving Coil" Receiver. Only a speaker was required and the receiver was easy to use and very durable. By 1937, National had introduced the RCD, an NC-100 especially made for airport communications use. That was followed by the RCE that had further refinements to airport use. The RCF and the RCF-2 came along in 1940.

During WWII, Navy airport ground-to-air communications required some changes to the standard National Co. Airway Communication Receiver. The Navy wanted more than just the 200kc to 400kc band that had been standard for Airway receivers. National added 400kc to 800kc to allow full use of that part of the spectrum, particularly complete coverage of the entire 400kc to 500kc band. The remaining HF bands cover 2.5mc up to 23.5mc, again, slightly different than the standard National Co. Airway receiver but probably tailored to what the Navy airbases needed. The RCK-N wasn't built on a specific Navy contract. Possibly, National offered the RCK-N to any airport users that required increased LF and MW coverage and the Navy just happened to be the major user during WWII. 

12 tubes are used in the RCK-N with no S-meter or carrier level indicator supplied. The C.O.N.S. switch is a "Carrier Operated Noise Silencer" that acted as a squelch control allowing the receiver to operate only when a carrier was present. Since the receiver covers 200kc to 800kc continuous, the IF had to be moved from the standard 457kc (for all other National Co. Airways receivers only) up to 1560kc. Audio output uses a single 6V6 into a 600Z ohm load. The entire Airway communication receiver line continued with the RCL that featured a two-position bandwidth switch. After WWII, RCK and RCL receivers were rebuilt into the RCP and RCQ receivers by specialized contractors (not National.) The last National Airway receiver was the RCR from 1948 and it was based on the NC-240CS receiver.

The model letters RCK seem to have been concurrently assigned to both the Airway receiver by National Company and to a Navy VHF four channel receiver built by Scott Radio Laboratories. National's assignment of "RC" for all of their Airway and Airport receivers had been going on since the RCD receiver in 1937. RCK was National's next identification assignment when this receiver was released. Apparently, National was aware that there was a Navy RCK version but rather than reassign different letters, National added a suffix "-N" to differentiate their RCK-N from the "official" Navy RCK VHF receiver. As stated, the RCK-N wasn't an official Navy contract but the Navy was probably the main intended purchaser.


U. S. Navy Shipboard and Shore Entertainment Receivers

SLR-F Receiver with BFO

E. H. Scott Radio Laboratories, Inc.  -  SLR Series, RBO Series

During WWII, Scott Radio Laboratories was contracted to design and build a type of military marine entertainment receiver that had very low Local Oscillator radiation or leakage to the antenna system. Scott advertising of the time indicated that the Navy was concerned with the possibility that enemy submarines could tune in a superheterodyne receiver LO signal and determine a ship's position with direction finding equipment. The Scott ads further stated that enemy DF equipment was sensitive enough to detect LO signals up to 100 miles away. While this all may have been theoretically true, the primary reason for the installation of low radiating receivers onboard ships is that any receiver has to operate in the presence of the several other receivers, transmitters and sometimes radar equipment that would also be in use on the ship. None of the receivers can cause interference with ship equipment and they must be able to perform their function without interference from other ship equipment. The USN specification was "less than 400 pico watts" was to appear on the antenna from local oscillator leakage. The "Scott Low Radiation" Receiver, or SLR, was built to operate in such a shipboard environment with no interference. The Scott SLR receivers tuned the standard AM Broadcast band and two bandspreaded Shortwave bands. They were designed as a stand-alone receiver capable of high quality reception and wide range audio reproduction via its powerful push-pull 6V6 output stage.

The multi-tap output transformer allowed matching to virtually any impedance that might be encountered with 600 ohms being the most commonly encountered. The receiver's output could be distributed throughout the ship via the 600 ohm line or it might be matched to the distribution amplifier for the ship's audio system. Each ship had different requirements and the Scott was designed to work with just about any of the ship speaker-audio systems. Single preselection, two IF amplifers and a Noise Limiter were included. A BFO was also included in case the receiver had to double as a communications receiver. When in the C.W. position, the AVC is disabled and the Volume control actually controls the RF-IF gain so the signal to BFO injection ratio is correct. A cathode-ray "tuning eye" tube was also included in the SLR version. The "eye tube" works off of the AVC voltage which limits its use to AM reception only. 

Not all versions of the SLR receiver will be equipped with a BFO. If the BFO is not installed then the data plate is mounted where the CW OSC control was. Receivers without the BFO option are always in the AVC mode, like a "broadcast entertainment radio."


photo left:  Scott SLR-12-B. This version doesn't have a BFO. This SLR is complete but awaiting restoration.

Scott also built the RBO receiver, a similar looking set but without the push-pull audio and without a BFO. Parallel rectifiers are used in the RBO and sometimes the receiver is seen with a drop-down dial cover - a hinged metal piece that can be raised up to entirely cover the illuminated dial. The RBO generally was used for local entertainment within a limited space (one room) since the single 6V6 audio output didn't provide enough power to drive the the ship's 600 ohm line directly (it could run the distribution amp though.)

Both the SLR and the RBO receivers were installed in a very large metal cabinet that was shock-mounted to a substantial base mount.

Scott built many different versions of these high quality "entertainment" receivers. The receivers were installed not only on U.S. Navy ships but also merchant ships, tankers, transports and other types of American vessels.


photo right: Scott RBO-2. This version has single-ended audio and no BFO. This particular RBO-2 was rebuilt by Mare Island Naval Shipyard in the early 1950s. The panel and cabinet were repainted light grayish-cream color and the nomenclature masked to preserve readability. The metal data plate located under the "eye-tube" is the Mare Island "rebuild" tag.


Scott Radio Laboratories, Inc. - SLRM Marine Receiver

The SLRM is a twelve-tube shipboard receiver that operates on 115 volts AC or DC. The construction is unusual in that aluminum is used for chassis, the shielding and the cabinet. This reduces the receiver's weight significantly - weight is around 50 lbs. Single pre-selection is used with two IF stages. An ineffective BFO and a clipper-type Noise Limiter are provided. Selectable bandwidths are available. The RF gain is controlled by the AVC when MOD bandwidths are selected but the RF gain becomes a manual control if CW is selected. Frequency coverage from .54mc up to 18mc. Push-pull 25L6 tubes for the audio output. The 1629 "eye tube" only operates when AVC is controlling the receiver sensitivity in MOD modes. In CW, the 1629 will remain "on" but the "shadow" will not respond to signals since the AVC is disabled. The panel speaker is 5" in diameter but there is a multi-impedance-taps output transformer for external loads. The panel speaker can be turned off if an external speaker is used. Onboard the ship, the audio output would have been connected to distribute the receiver output as necessary.

Performance is quite good for AM signals. In the HF bandwidth AM BC signals or strong SW BC signals sound great if a large diameter, matched external speaker is used. The SLRM was primarily an entertainment receiver, not a communication receiver.

On the downside,...there will be many problems encountered when operating the SLRM. The seriousness of these issues is dependent on the user's expectations. Images will become very apparent around 15mc. SSB and even CW performance is extremely poor, in fact, these modes are impossible to demodulate. The SLRM may as well not have a BFO since it doesn't function adequately. The BFO tube is only running +10vdc on the plate (check the manual, the 220K ohm plate load resistor significantly drops the B+) and then the BFO circuit is electrostatically-coupled to the detector which results in a totally useless BFO. It's likely that because of the SLRM's single pre-selection circuit and all-aluminum construction there was more RF leakage than the <400pW specification when the BFO was operating (turned on.) Scott obviously intentionally reduced the BFO output until the RF leakage was <400pW probably figuring that the SLRM was going to be for shipboard entertainment where the barely-functional BFO wouldn't be missed anyway. Nowadays, it's very easy to replace the 220K BFO plate load resistor with a resistor value around 4.7K which will increase the plate voltage on the BFO tube to around +85vdc. This increases the rms voltage of the BFO output to the point where SSB and CW demodulation is possible. An additional improvement would be to couple the BFO through a 10pf capacitor to the second detector. This would result in a standard BFO circuit for the SLRM. The RF Gain would still have to be reduced to the point where the signal to BFO injection ratio provides good demodulation.

IMPORTANT NOTE:  Another significant problem is the SLRM's AC-DC power input which MUST NOT be operated with the original 3-wire "twist lock" plug and a modern grounded (3-wire) AC power plug connected directly to the house AC line. To do so will connect the line return power wiring directly to chassis which prevents the dial lamp from lighting and takes some of the bias voltages to chassis. Modern house AC wiring has neutral connected to ground (at the breaker box) and this will conflict with the receiver power input wiring that assumed the two AC lines would be "floating." To safely operate the SLRM (or any AC-DC receiver) requires the use a 1:1 isolation transformer. This provides the "floating" two-wire AC plus separate chassis ground that the SLRM design anticipated. The isolation transformer should use a three-wire cable/plug on the input side. The input side ground pin should be wired directly to the transformer's output socket ground pin only. The AC output of the isolation transformer winding will be "floating" which allows the use of the original three-wire power cable and twist-lock plug that grounds the chassis but not either of the "floating" AC lines. The original power cable on the SLRM used a three-wire "twist-lock" (actually, two wires and a shield-ground) which can still be used if powered with an isolation transformer set-up as described. Be sure to have an "ON-OFF" switch on the AC input to the isolation transformer. This can also be operating the isolation transformer from a switchable three-wire power strip. If the isolation transformer is left connected to AC and to the SLRM, then the two line bypass capacitors will be passing a small amount of reactance AC current to chassis ground - even if the SLRM is turned off (check the schematic.)


TecRad LRR-5 from 1945

Technical Radio Company (TecRad)  - LRR-5

Technical Radio Company was founded in San Francisco, California in 1937 by Clayton Bane and George Weiss. Bane was an assistant to Frank Jones at Western Wireless, Ltd. (1932 to 1934) where he helped install the first two-way radio system at Alcatraz Federal Prison. Many of Bane's crew at Western Wireless went onto work at Eitel-McCollough (Eimac) but Bane went on to form his own company called Technical Radio Company. TecRad (as it was sometimes called) became a prime contractor for the U.S. Navy building high quality shipboard entertainment receivers and a couple types of small transmitters. Only a few companies built Navy acceptable shipboard entertainment radios since there was a strict requirement that no more than 400 pico-watts of LO leakage was allowed on the antenna. TecRad claimed that only 100 pW was present on the antenna with their receivers. Scott Radio Laboratories built the SLR and RBO receivers that are the most common of the "low radiation" WWII shipboard entertainment receivers but TecRad also produced their versions during the war designated as "LRR" with numeral suffixes from 1 up to 6 (LRR = Low Radiation Receiver.) The TecRad receiver shown is the Model LRR-5 from May 1945.

The LRR-5 is typical of the WWII shipboard entertainment receivers in that robust, high fidelity audio is delivered to selectable multiple output impedances (six impedances from 16 ohms to 800 ohms) since many ships had various kinds of audio loads depending on the size and layout of the audio distribution within the ship. A front panel speaker switch is provided to allow disconnecting specific speaker lines depending on how the ship's speaker system was wired. Most systems probably had the speaker switch wired to allow the local radio room speaker to be disconnected while the ship's audio system remained on. 15 tubes are employed in the LRR-5 including an 0C3 voltage regulator and push-pull 6V6 audio output tubes. Also, a 6E5 cathode ray tuning indicator tube is provided. The frequency coverage is typical of shipboard entertainment receivers with the AM-BC tuned with Band 1, Band 2 tuned from 2.0mc to 6.5mc and Band 3 tuned from 6.5mc up to 18mc. Also, a very accurate logging scale is provided. Single preselection is used along with two IF amplifiers with three selectivity bandwidths available. A phonograph input is also provided. Like some of the Scott Radio Labs' SLR/RBO receivers, a BFO is included - just in case the receiver might be needed for CW reception and a Send-Receive switch is provided - just in case the receiver had to be used for two-way communications. Unlike the Scott receivers, the LRR-5 includes separate RF and Audio Gain controls thus when the BFO is tuned on, the RF Gain must be reduced and the Audio Gain increased for proper CW reception. 

Performance of the LRR-5 is impressive. The audio is high quality and with push-pull 6V6 tubes in the output there seems to be quite a bit of power available. Bass response is very good and Shortwave Broadcast stations that are playing music sound incredible. AM-BC sounds very good with plenty of sensitivity available - after all, you might be trying to "pull in" an American AM-BC station while in the middle of the Pacific Ocean. Although only a single RF stage is provided, images are not apparent in normal reception above 15mc as would be expected. Alignment of the front end provides L and C adjustments for all three bands and the IF transformers are permeability tuned. Strategic shielding is used to keep the LO leakage down so there are a few shielded boxes in the receiver's front end. High quality Peerless transformers (Altec-Lansing) are used in the LRR-5. One has to also note the perhaps intentional resemblance that the LRR-5 has to receivers built by Mackay Radio and Telegraph Company around the same period. The LRR dial material is exactly the same opaque white plastic (side illuminated) that will glow purple with intense rear lighting and the gray panel with white nomenclature is quite similar to that period Mackay receivers. Perhaps it was intentional so that the LRR-5 would fit in with Mackay Radio equipment that was in use on many ships.

In 1948, Clayton Bane stated that due to some personal reasons and due to the fact that his building lease was not going to be renewed he was closing down TecRad. According to Bane the company was profitable but there was also some difficultly in that the Navy wanted TecRad to remain exclusively a Navy Contractor and not be able to produce for the civilian market. Bane went on to form a successful advertising business. Bane died in 2003.


Minerva Corporation of America - W117 "Tropic Master"

The Minerva Tropic Master is an eight-tube receiver that covers AM-BC and provides one Shortwave band, 5.5mc to 18mc (there are some minor variations in the shortwave coverage with different production runs.) The cabinet is metal and features a fold-down front cover along with a carrying handle. The Tropic Master is an AC-DC powered receiver. There were two circuits used with the earlier version having push-pull 50L6 tubes and a series-parallel filament string. This version could also be modified to use two 25L6 tubes by changing the filaments to series making the entire string a series load. NOTE: The schematics in Riders VOL. XV have several errors including the 50L6 filament connection. The later circuit uses two 50A5 tubes and a 35Z5 rectifier. The P-P audio seems a bit much for the small built-in PM speaker. Four controls provide Volume and ON-OFF, Tone, Band Select and Tuning. The rear panel of the cabinet has a door to allow access to the power cord and the antenna terminals. The Tropic Master didn't have enough shielding to be used onboard ships as the LO leakage would have exceeded the minimum acceptable level of 400pW on whatever antenna was used with the receiver.

Minerva advertised that they had supplied the Tropic Master to the military (both Navy and Army) as a "Morale Radio" - that is, a radio primarily for entertainment in barracks or other shore locations. Apparently, a few Tropic Masters did serve in that capacity as there seems to be enough first-hand accounts to believe Minerva's advertising was essentially true. Certainly though, the majority of Tropic Masters were sold post-WWII. The selling price was $75 and many were sold out of the PXs at various military bases during late-1945 and through 1946. The Minerva W117 schematic in Riders' VOL. XV is dated June 1945 and this data shows the two different versions that are documented. There are apparently other minor variations that were incorporated into the receiver circuits but these were not documented.


photo above: The Tropic Master with the front closed

The Tropic Master receivers have quite a following and there is ample information available on the Internet. The Tropic Master (T-M) shown is the second one (of three) I own or have owned. Number two, a currently-owned T-M, was found at a Hot August Nights' Swap Meet (a car swap meet in Reno) around 2010. I saw it there one year and passed it up because of the asking price was $80. Next year, to my surprise, there was the same seller with the same T-M - this time for $50. I purchased it since I had always regretted the fate of my first T-M.

My first T-M was given to me for shortwave listening  in 1964 (when I was fourteen years old) by Phil Rios of Rios Radio-TV Shop, my old mentor in radio repair (where I had worked summers as a teenager.) I never did get it to work because, like many of these receivers, the 25Z6 rectifier was missing and, in the mid-sixties, the 25Z6 was difficult to find (read - expensive, at least for a teenager.) Eventually, I used the cabinet for a power supply and lost the chassis in one of several moves. I still have the cabinet although it's painted brown.

T-M #3 had been stored for decades in a shed or garage in a humid environment (SF Bay Area, I think.) It has quite a bit of surface oxidation everywhere. It's also missing one knob. I acquired TM #3 in 2019. When I get around to a detailed inspection, I'll add its description information.

Luckily, T-M #2 is in excellent original condition and does function (filter cap replacement was necessary though.) This receiver is the earlier version with the P-P 50L6 tubes with parallel filament connections.


The Crosley Corporation  -  REO

Crosley seemed to have most of the WWII contracts for the smaller "Morale Radios" destined for shore use. Though the Scott SLRs and RBOs along with the TecRad LRRs could and were used aboard ships, the smaller radios were generally designed to be less expensive and this usually resulted in excessive LO radiation which prohibited their use aboard ship. Though some of the more elaborate "Morale Radios" for shore use were sometimes found in metal cabinets (like the Tropic Master above,) the REO is housed in a wooden cabinet that is painted Navy gray. This simple radio covers AM BC only. The controls are left to right, Volume, On/Off and Tuning. The Navy wanted to be sure that every user was aware that the REO was strictly "land use only" and provided a large red warning tag stating so ("Unsafe Radiation Limits" refers to the radio's Local Oscillator signal radiation from the antenna and elsewhere in the circuit since the cabinet provides no shielding.) 


WWII U. S. Navy Contractor Designators

During WWII most U.S. Navy equipment built for the war effort was manufactured or assembled by contactors. Many times the items built would be a specific product model of a particular company and would have exactly the same company parts and same assembly techniques but the item was assembled by a contactor company. The contactor-built equipment had to meet the same specifications and therefore most of the time the equipment performs exactly the same as another example built by the original manufacturer or another contactor. Each contactor or component supplier had a specific letter identification that was incorporated into the specific model number. The first letter is always a "C" then the following letter or letters identify the particular company. So, if a piece of Navy radio equipment is ID'd as CFT-43600, then that piece of equipment was built by Federal Telephone & Radio Corporation. Below is a list of designators used for some of the popular contactor and component supplier companies during WWII.
CAN  -  Sangamo Electric (capacitors)

CAW -  Aerovox (capacitors)

CAY  -  Westinghouse

CBN  -  Central Radio Labs

CBV  -  John E. Fast & Co. (capacitors)

CBY  -  Aircraft Radio Corp.

CCR  -  Bendix Radio (div. Bendix Aviation Corp.)

CCT  -  Stromberg-Carlson Co.

CD    -  Cornell-Dubilier (capacitors)

CDC  -  Dictograph Company (audio reproducers)

CEX  -  Emerson Radio & Phonograph Corp.

CFD  -  Federal Mfg. & Engineering Corp. (test gear)

CFN  -  Farnsworth Television & Radio Corp.

CFT  -  Federal Telephone & Radio Corp. (ITT)

CG   -  General Electric

CHC  -  Hammarlund Mfg. Co., Inc.

CHH  -  Arrow-Hart Hagerman (toggle switches)

CHL  -  The Hallicrafters Co.

CHS  -  Hygrade-Sylvania Corp. (vacuum tubes)

CJB  -  J.H. Bunnell Company (telegraph equipment)

CJC  -  Howard B. Jones

CKP  -  Air King Products Co., Inc.

CKR  -  KEN-RAD  (vacuum tubes)

CLF   -  Littlefuse Labs

CLT  -  Lundquist Tool Co. (telegraph keys)

CMA  -  P.R. Mallory & Co. (capacitors)

CMC  -  Clarostat Mfg. Co. (potentiometers)

CME  -  Radio Manufacturing Engineers, Inc. (RME)

CMI  -  Molded Insulation Company (telegraph keys)

CMX -  The Magnavox Company

CN   -   NEMS (National Engineering Machine Shops)

CNA  -  National Company, Inc. 

CND  -  Andrea Radio Corp.

COL  -   Collins Radio Company

CPN  -   Panoramic Corp.

CQW -   Sparks-Withinton Corp. (Sparton)

CRA  -   Utah Radio Products Co. (audio reprdcrs & xmfrs)

CRC  -   RCA  (Vacuum Tube Division)

CRV  -   RCA-Victor and RCA Mfg. Co.

CSF  -   Sprague Specialties Co. (capacitors)

CTD  -   Tobe Deutschmann Corp. (capacitors)

CW   -   Western Electric Company

CWQ  -  Wells Gardner & Company

CWS  -   Stewart-Warner

CYM  -   Yaxley-Mallory (switches, jacks)

CZC   -   Scott Radio Laboratories, Inc.

CZR   -   Zenith Radio Corp.


NAVY-RADIO.COM - For the most detailed information WWII Navy gear and on all types and all vintages of Navy radio equipment, radio stations, vintage photographs - go to www.navy-radio.com   Nick England's incredible Navy-Radio website has the most information available. 


WWII USAAF USCG GEAR PART 2                    WWII COMM GEAR PART 3 (ALLY GEAR)               Home Index


Radio Boulevard
Western Historic Radio Museum

 Vintage Radio Communication Equipment Rebuilding & Restoration Articles,

 Vintage Radio History and WHRM Radio Photo Galleries

1909 - 1969

- 60 years of Radio Technology -


This website created and maintained by: Henry Rogers - Radio Boulevard, Western Historic Radio Museum © 1997/2025